Introduction
In the world of electronics repair and modification, knowing how to remove solder from a Printed Circuit Board (PCB) is an essential skill. Whether you’re replacing a faulty component, modifying a circuit, or salvaging parts, mastering the art of desoldering can save you time, money, and frustration.
Why Removing Solder Matters
Removing solder from a PCB is crucial for several reasons:
- Component replacement: When a component fails, it needs to be removed and replaced.
- Circuit modification: Desoldering allows for circuit modifications and upgrades.
- PCB repair: Removing solder is often the first step in repairing damaged traces or pads.
- Parts salvage: Desoldering lets you recover valuable components from old or discarded boards.

Challenges in Removing Solder
Desoldering isn’t always straightforward. Some common challenges include:
- Risk of damaging the PCB or nearby components
- Dealing with lead-free solder, which has a higher melting point
- Removing solder from multi-layer boards or plated through-holes
- Working with small or densely packed components
Tools Preview
Before diving into the methods, let’s preview the essential tools for removing solder:
- Desoldering pump (solder sucker)
- Desoldering braid (wick)
- Soldering iron
- Hot air rework station
- Flux
- Tweezers and heat sinks
Each tool has its strengths and is suited for different desoldering scenarios.
Essential Tools for Removing Solder
Having the right tools is crucial for effective and safe solder removal. Let’s explore each tool in detail:
1 Desoldering Pump (Solder Sucker)
A desoldering pump, also known as a solder sucker, is a mechanical device that creates suction to remove molten solder.
- How it works: The pump is primed, then released over melted solder to suck it up.
- Pros: Effective for through-hole components and larger solder joints.
- Cons: Can be less effective on surface-mount devices (SMDs) or small joints.
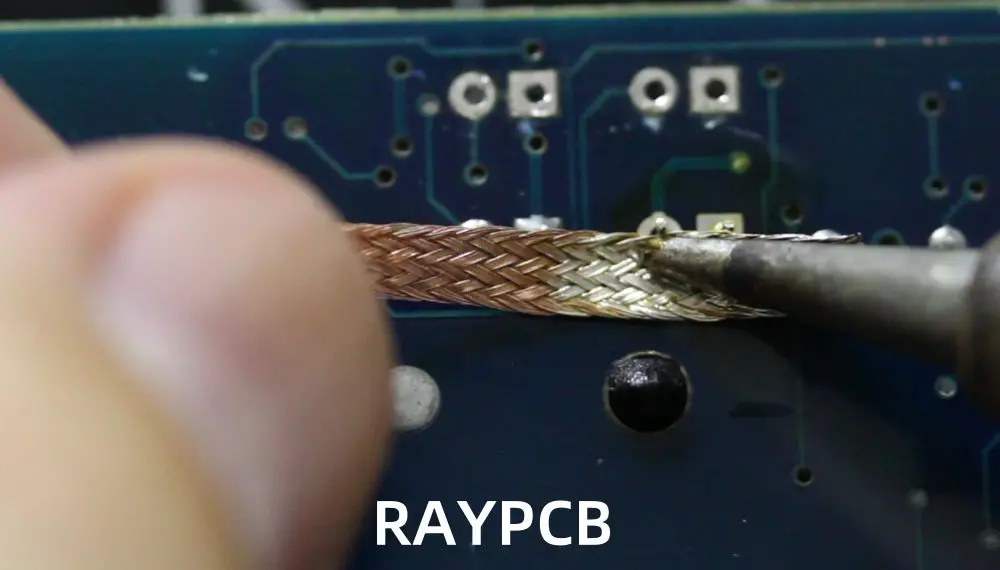
2 Desoldering Braid (Wick)
Desoldering braid, or solder wick, is a fine copper mesh that absorbs molten solder through capillary action.
- How it works: The braid is placed on the solder joint and heated, drawing the molten solder into itself.
- Pros: Excellent for surface-mount components and cleaning up residual solder.
- Cons: Can be less effective on large amounts of solder.
3 Soldering Iron
A soldering iron is essential for heating solder to its melting point.
- Features to look for: Temperature control, various tip sizes, and a comfortable grip.
- Tip: Use a clean, well-tinned tip for efficient heat transfer.
4 Hot Air Rework Station
A hot air rework station uses a stream of hot air to melt solder, making it ideal for SMD removal.
- Advantages: Can heat multiple pins simultaneously, reducing the risk of board damage.
- Caution: Requires practice to avoid overheating components or the PCB.
5 Flux
Flux is a chemical cleaning agent that improves solder flow and helps in the removal process.
- Types: Rosin-based, no-clean, and water-soluble fluxes are common.
- Application: Can be applied as a liquid, paste, or in pen form.
6 Tweezers & Heat Sinks
Tweezers help manipulate small components, while heat sinks protect sensitive parts from excessive heat.
- Tweezers: ESD-safe tweezers are recommended to prevent static damage.
- Heat sinks: Clip-on heat sinks can be attached to component leads to dissipate heat.

Method 1: Using a Desoldering Pump
The desoldering pump is a popular and effective tool for removing solder, especially from through-hole components.
Step 1: Prep the PCB
- Clean the area around the solder joint with isopropyl alcohol.
- Secure the PCB in a vise or PCB holder to keep it stable.
Step 2: Heat the Solder Joint
- Set your soldering iron to the appropriate temperature (usually around 315-370°C or 600-700°F).
- Apply the iron tip to the solder joint until the solder becomes molten.
Step 3: Apply Suction
- Quickly position the nozzle of the primed desoldering pump over the molten solder.
- Trigger the pump to create suction and remove the solder.
Step 4: Repeat if Necessary
- If residual solder remains, reheat the joint and repeat the suction process.
- For stubborn solder, adding fresh solder can help improve heat transfer and removal.
Step 5: Clean the Pad
- Use isopropyl alcohol and a lint-free cloth to clean the pad after desoldering.
- Inspect the pad for any damage or remaining solder.
Pro Tip: Use a heat sink on nearby sensitive components to prevent heat damage during the desoldering process.

Method 2: Using a Desoldering Braid
Desoldering braid is excellent for removing solder from surface-mount components and cleaning up excess solder.
Step 1: Select the Right Braid Width
- Choose a braid width that matches or slightly exceeds the size of the solder pad.
- Wider braids are better for larger joints, while narrower ones work well for delicate work.
Step 2: Apply Flux
- Apply a small amount of flux to the braid to improve its solder-absorbing capacity.
- Flux also helps in heat transfer and prevents oxidation.
Step 3: Position and Heat
- Place the braid over the solder joint.
- Press down gently with a hot soldering iron tip on top of the braid.
Step 4: Allow Solder Absorption
- As the solder melts, it will be drawn into the braid through capillary action.
- Once the solder is absorbed, lift both the iron and the braid away from the board.
Step 5: Trim Used Sections
- Cut off the used portion of the braid to expose fresh copper for the next joint.
- This ensures maximum efficiency in solder removal.
Warning: Avoid applying excessive heat, as this can cause pad lifting or damage to the PCB.
Read more about:
Method 3: Advanced Techniques
For more complex desoldering tasks, advanced techniques and tools may be necessary.
1 Hot Air Rework Station
Hot air rework stations are ideal for removing surface-mount components with multiple pins.
- Process:
- Apply flux to all pins of the component.
- Set the hot air temperature (typically 315-370°C or 600-700°F) and airflow.
- Move the hot air nozzle in a circular motion over the component.
- Once all solder joints are molten, carefully remove the component with tweezers.
- Advantages:
- Reduces the risk of pad damage compared to individual pin desoldering.
- Ideal for BGA (Ball Grid Array) and QFP (Quad Flat Package) components.
2 Low-Temp Solder Alloy
Low-temperature solder alloys can be used to remove components with less heat exposure.
- Process:
- Apply low-temp solder to all joints of the component.
- Heat the joints until all solder is molten.
- Remove the component while the solder is liquid.
- Benefits:
- Reduces the risk of thermal damage to sensitive components.
- Useful for working with heat-sensitive parts or multi-layer PCBs.
3 Manual Tools
For certain applications, specialized manual tools can be effective:
- Desoldering tweezers: Heated tweezers that melt solder on both sides of a component simultaneously.
- Spring-loaded desoldering irons: Combine a soldering iron with a built-in suction mechanism.
Special Cases & Troubleshooting
1 Removing Solder from Holes
Plated through-holes can be particularly challenging to desolder.
- Technique:
- Use a solder sucker in combination with a soldering iron.
- If unsuccessful, try adding fresh solder to improve heat transfer.
- For stubborn holes, use a desoldering braid from both sides of the board.
2 Dealing with Stubborn Residue
Sometimes, a thin layer of solder remains after desoldering.
- Solutions:
- Use flux and a fine-tipped soldering iron to re-melt and remove the residue.
- Try a fiberglass brush pen to gently scrub away remaining solder.
3 Removing Solder Without an Iron
In emergencies, solder can be removed without specialized tools:
- Methods:
- Use a lighter to heat the solder and quickly tap the board to shake off molten solder.
- For through-hole components, heat the solder and use a paperclip or pin to push through the hole.
Caution: These methods carry a high risk of board damage and should only be used as a last resort.
Post-Desoldering Cleanup
Proper cleanup after desoldering is crucial for the longevity and reliability of your PCB.
1 Removing Flux Residue
Flux residue can cause corrosion and affect the board’s performance if left uncleaned.
- Cleaning methods:
- For rosin-based flux: Use isopropyl alcohol and a soft brush.
- For no-clean flux: Often doesn’t require cleaning, but can be removed with specialized solvents if necessary.
- For water-soluble flux: Clean with warm water and a soft brush, then dry thoroughly.
2 Inspection
After cleaning, inspect the board thoroughly:
- Check for any remaining solder bridges or residue.
- Examine pads and traces for signs of damage or lifting.
- Use a magnifying glass or microscope for detailed inspection of small components.
3 Preventing Oxidation
Exposed copper can quickly oxidize, making future soldering difficult.
- Protection methods:
- Apply a thin layer of solder (tinning) to exposed pads.
- Use a PCB lacquer spray to protect the entire board if it won’t be immediately reused.
Frequently Asked Questions
1 Can solder be completely removed from a PCB?
While it’s challenging to remove 100% of the solder, with proper techniques and tools, you can remove enough solder for successful component replacement or board modification.
2 How can I remove solder without a wick or pump?
In a pinch, you can use aluminum foil as a makeshift wick. Place a small strip of foil on the joint, apply the soldering iron, and the foil will absorb the molten solder.
3 How do I remove solder from speaker terminals or through-hole pins?
For large terminals or pins, heat the solder and use pliers to gently wiggle and pull the component while the solder is molten. Be careful not to apply too much force, which could damage the board.
Safety & Best Practices
1 Ventilation
Always work in a well-ventilated area to avoid inhaling solder fumes.
- Use a fume extractor if working indoors.
- Consider wearing a mask designed for soldering work.
2 ESD Protection
Electrostatic discharge can damage sensitive components.
- Use an ESD-safe workstation with a grounded mat and wrist strap.
- Handle components and boards by their edges to minimize static risk.
3 Temperature Control
Proper temperature control is crucial for effective desoldering and component protection.
- Start with lower temperatures and increase as needed.
- Allow components and the board to cool between desoldering attempts.
- Use heat sinks on nearby components to prevent collateral heat damage.
Conclusion
Mastering the art of removing solder from PCBs is a valuable skill in electronics repair and modification. By understanding the various tools and techniques available, you can tackle a wide range of desoldering challenges safely and effectively.
Remember that practice makes perfect. Start with simpler projects and work your way up to more complex boards. Always prioritize safety, use the right tools for the job, and take your time to avoid damaging valuable components or PCBs.
Whether you’re a hobbyist tinkering with electronics or a professional repairing high-end equipment, the ability to cleanly and efficiently remove solder will serve you well in your electronic endeavors. Happy desoldering!