A Rigid-Flex PCB Stackup refers to the specific arrangement and composition of layers in a printed circuit board that incorporates both rigid and flexible sections. This unique construction allows for a seamless integration of traditional rigid board stability with the adaptability of flexible circuits. The proper design of a Rigid-Flex PCB Stackup is paramount in ensuring the reliability, performance, and manufacturability of advanced electronic devices.

As we delve deeper into this topic, we’ll explore the intricacies of Rigid-Flex PCB Stackup, addressing key challenges and uncovering the wealth of design opportunities it presents. Whether you’re an experienced PCB designer or new to the world of flexible circuits, understanding the nuances of Rigid-Flex PCB Stackup is essential for staying at the forefront of modern electronics design.
1. What Is a Rigid-Flex PCB Stackup?
Definition and Structure
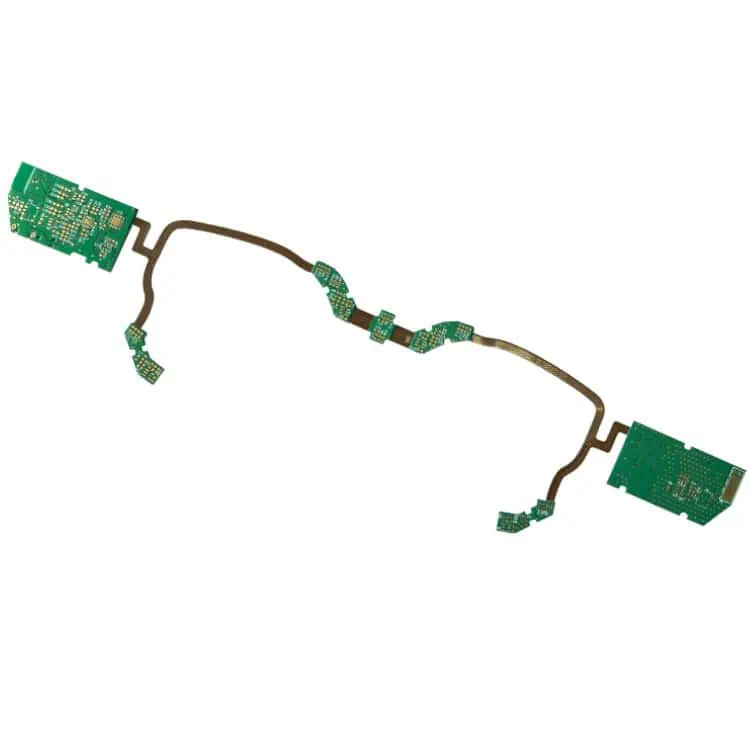
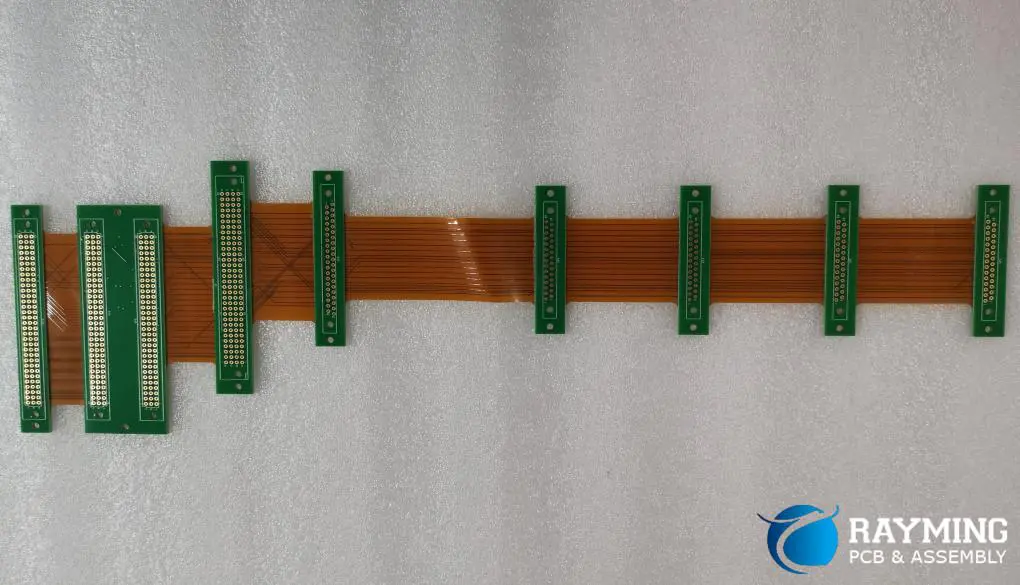
A Rigid-Flex PCB Stackup is a specialized printed circuit board configuration that combines rigid and flexible circuit technologies within a single, integrated structure. This hybrid design consists of alternating layers of rigid and flexible materials, carefully arranged to meet specific mechanical and electrical requirements.
The rigid sections of the PCB provide stability and support for components, while the flexible sections allow for dynamic bending and folding. This unique combination enables designers to create complex three-dimensional layouts that can conform to tight spaces or unique form factors.
Advantages over Traditional Rigid Boards
Rigid-Flex PCB Stackups offer several significant advantages over conventional rigid PCBs:
- Space Optimization: By eliminating the need for connectors between separate rigid and flexible boards, Rigid-Flex designs can significantly reduce the overall size and weight of electronic assemblies.
- Increased Reliability: With fewer interconnection points, Rigid-Flex PCBs are less prone to connection failures, enhancing overall system reliability.
- Design Flexibility: The ability to bend and fold allows for creative solutions to packaging challenges, enabling designs that were previously impossible with rigid boards alone.
- Improved Signal Integrity: By reducing the number of connections and eliminating cables, Rigid-Flex designs can offer superior signal integrity, especially in high-frequency applications.
- Simplified Assembly: Rigid-Flex PCBs can reduce the complexity of assembly processes, potentially lowering manufacturing costs and improving quality control.
Typical Applications
The versatility of Rigid-Flex PCB Stackups has led to their adoption across a wide range of industries and applications:
- Medical Devices: Implantable devices, hearing aids, and portable diagnostic equipment benefit from the compact and flexible nature of Rigid-Flex designs.
- Aerospace and Defense: Satellites, aircraft avionics, and military communications systems utilize Rigid-Flex PCBs for their reliability and ability to withstand harsh environments.
- Consumer Electronics: Smartphones, wearable devices, and cameras leverage Rigid-Flex technology to achieve sleek, compact designs.
- Automotive: Advanced driver assistance systems (ADAS) and in-vehicle infotainment systems increasingly rely on Rigid-Flex PCBs to meet space constraints and reliability requirements.
- Industrial Equipment: Robotics, control systems, and test equipment benefit from the durability and design flexibility of Rigid-Flex stackups.
2. Key Elements of a Rigid-Flex Stackup Design
Designing an effective Rigid-Flex PCB Stackup requires a thorough understanding of its key elements. Each component plays a crucial role in the overall performance and reliability of the final product.
Flexible Core Materials
The flexible sections of a Rigid-Flex PCB are typically built around a core material that provides the necessary flexibility and electrical properties. The most common flexible core material is polyimide, known for its excellent mechanical and thermal stability. Key considerations for flexible core materials include:
- Thickness: Ranging from 12.5μm to 125μm, depending on the required flexibility and electrical characteristics.
- Copper Cladding: Available in various weights, typically from 1/2 oz to 2 oz per square foot.
- Dimensional Stability: Important for maintaining consistent electrical properties across bending cycles.
Rigid Core Materials
The rigid sections of the PCB provide structural support and allow for the mounting of components. The most commonly used rigid core material is FR4, a glass-reinforced epoxy laminate. When selecting rigid core materials, consider:
- Glass Transition Temperature (Tg): Higher Tg materials offer better thermal stability.
- Coefficient of Thermal Expansion (CTE): Matching CTE between layers helps prevent delamination.
- Dielectric Constant (Dk) and Loss Tangent: Critical for high-frequency applications.
Adhesives and Bonding Layers
Adhesives play a crucial role in bonding the rigid and flexible sections of the PCB. Common types include:
- Acrylic Adhesives: Offer good flexibility and thermal resistance.
- Epoxy Adhesives: Provide excellent bonding strength and chemical resistance.
- No-Flow Prepregs: Used in more complex stackups to fill voids and provide insulation.
The choice of adhesive can significantly impact the overall performance and reliability of the Rigid-Flex PCB.
Coverlays vs. Solder Masks
In flexible circuit areas, coverlays are often used instead of traditional solder masks. Coverlays are typically made of polyimide film with an adhesive layer and offer several advantages:
- Better flexibility and durability compared to liquid solder masks.
- Improved protection against environmental factors.
- Can be selectively applied to leave certain areas exposed for component mounting or interconnection.
In rigid sections, conventional solder masks are still used to protect copper traces and define soldering areas.
Importance of Controlled Impedance in Multilayer Designs
As Rigid-Flex PCBs often carry high-speed signals, maintaining controlled impedance throughout the design is crucial. This involves careful consideration of:
- Trace Width and Spacing: Calculated based on the desired impedance and stackup characteristics.
- Dielectric Thickness: Affects the capacitance between signal layers and ground planes.
- Ground Plane Placement: Strategic positioning of ground planes helps maintain consistent impedance and reduces EMI.
Designers must work closely with manufacturers to ensure that the intended impedance values can be achieved within manufacturing tolerances.
3. Multi-Layer Rigid-Flex PCB Stackup: Design Challenges

While Rigid-Flex PCB Stackups offer numerous advantages, they also present unique design challenges that must be carefully addressed to ensure optimal performance and reliability.
Layer Count and Complexity
As the number of layers in a Rigid-Flex PCB increases, so does the complexity of the stackup design. Designers must consider:
- Balance Between Rigid and Flex Layers: Ensuring proper distribution of rigid and flexible layers to maintain overall board stability.
- Neutral Axis Calculation: Positioning the flex layers near the neutral axis to minimize stress during bending.
- Transition Zones: Carefully designing the areas where rigid sections transition to flexible sections to avoid stress concentration.
Mechanical Stress and Flex Cycles
One of the primary challenges in Rigid-Flex design is managing mechanical stress, particularly in areas that undergo repeated bending. Key considerations include:
- Bend Radius: Determining the minimum bend radius to prevent damage to copper traces and dielectric materials.
- Flex Cycle Life: Estimating the number of flex cycles the PCB can withstand before failure.
- Strain Relief: Implementing proper strain relief techniques to distribute stress and prevent localized failures.
Signal Integrity and EMI Concerns
Maintaining signal integrity in Rigid-Flex designs can be challenging due to the varying dielectric properties between rigid and flexible sections. Designers must address:
- Impedance Matching: Ensuring consistent impedance across rigid and flexible sections.
- Cross-Talk: Minimizing electromagnetic coupling between adjacent traces, especially in tightly packed flexible sections.
- EMI Shielding: Implementing effective shielding techniques, which may differ between rigid and flexible areas.
Importance of Accurate Rigid-Flex Stackup Modeling
Given the complexity of Rigid-Flex designs, accurate modeling of the PCB stackup is crucial. This involves:
- 3D Modeling: Using advanced CAD tools to visualize and analyze the complete 3D structure of the Rigid-Flex PCB.
- Material Property Simulation: Incorporating accurate material properties for both rigid and flexible sections in simulation models.
- Thermal Analysis: Predicting heat distribution and potential hotspots, especially in areas where rigid and flexible sections meet.
4. Common Rigid Flex PCB Stackup Configurations
Rigid Flex PCB stackups come in various configurations to suit different application needs:
4 Layer Rigid Flex PCB Stack-up (2 Flex Layers)
A typical 4-layer Rigid-Flex PCB stackup with 2 flex layers consists of:
- Top solder mask
- Top copper layer (rigid)
- Prepreg
- Inner copper layer (flex)
- Flexible core
- Inner copper layer (flex)
- Prepreg
- Bottom copper layer (rigid)
- Bottom solder mask
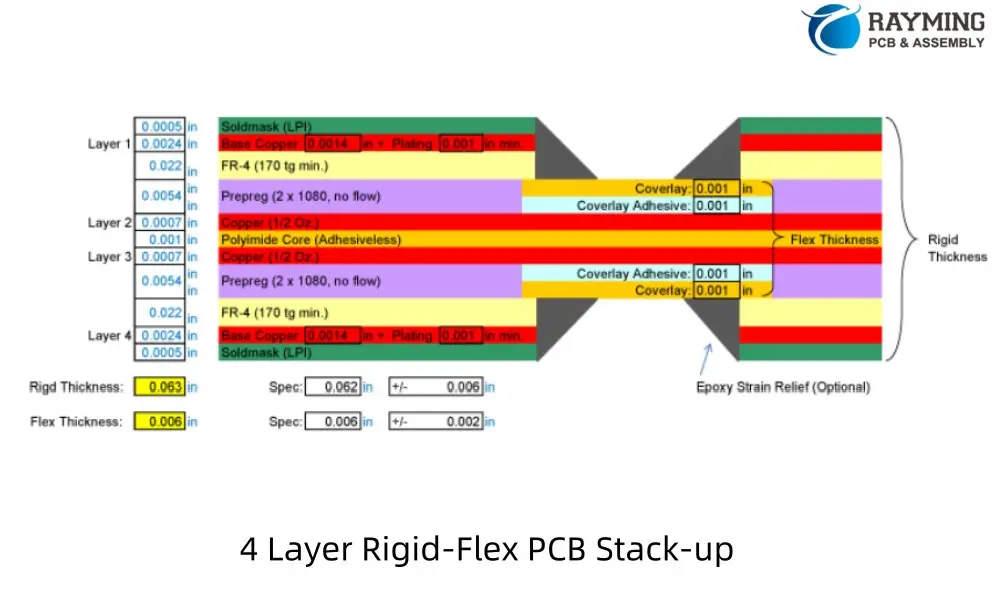
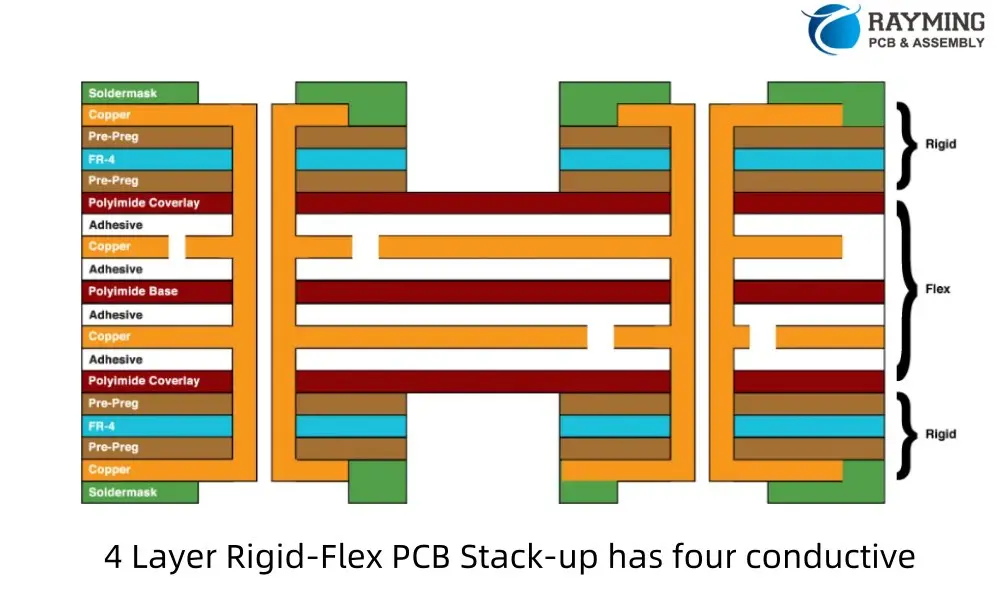
This configuration offers a good balance between flexibility and rigidity, suitable for applications requiring moderate complexity and bendability.
6 Layer Rigid Flex PCB Stackup (4 Flex Layers, 2 Rigid Layers with Air Gap)
A 6-layer Rigid-Flex PCB stackup with 4 flex layers and an air gap typically includes:
- Top solder mask
- Top copper layer (rigid)
- Prepreg
- Inner copper layer (flex)
- Flexible core
- Inner copper layer (flex)
- Flexible core
- Inner copper layer (flex)
- Flexible core
- Inner copper layer (flex)
- Air gap
- Prepreg
- Bottom copper layer (rigid)
- Bottom solder mask
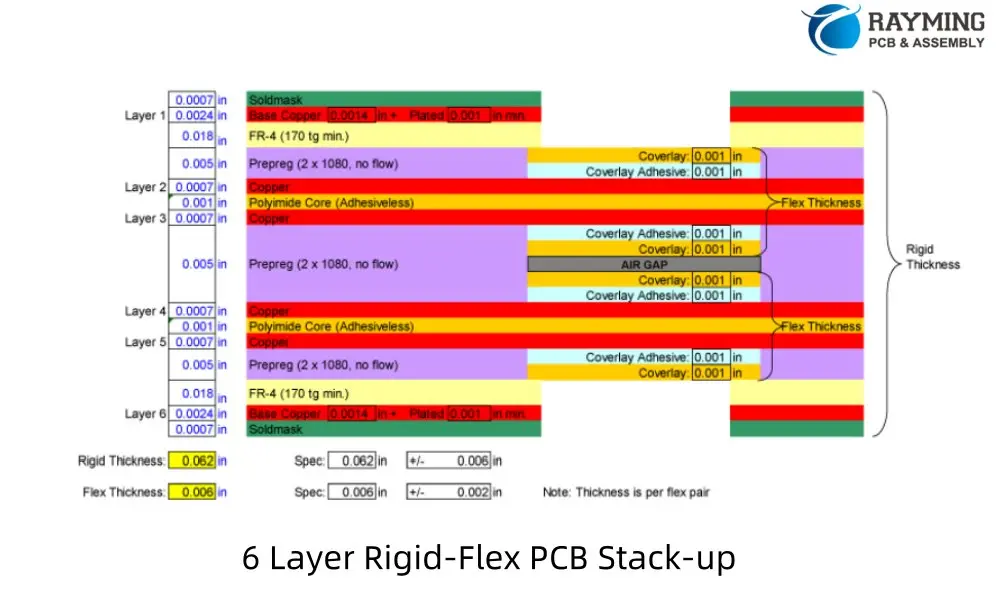
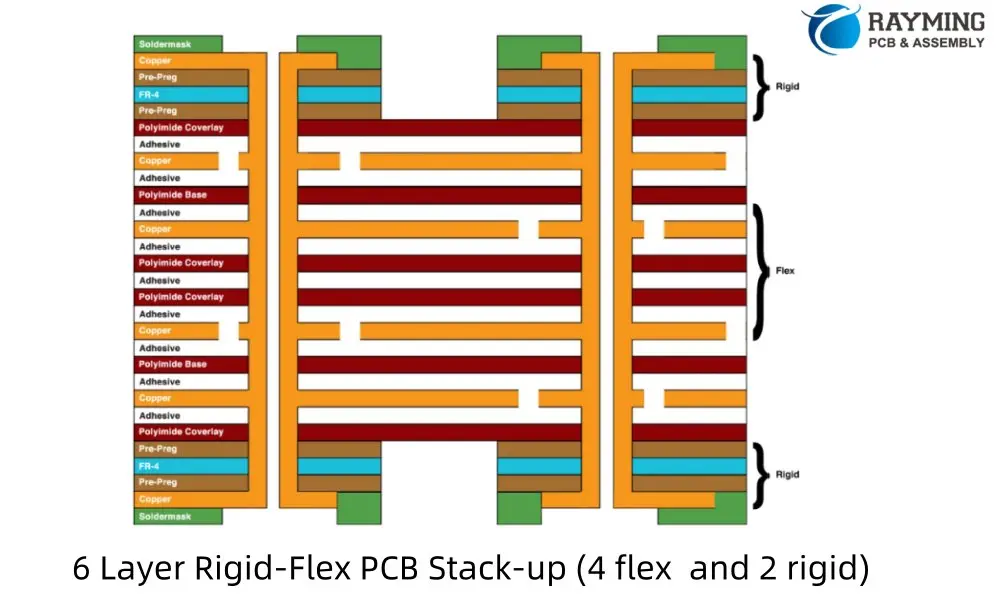
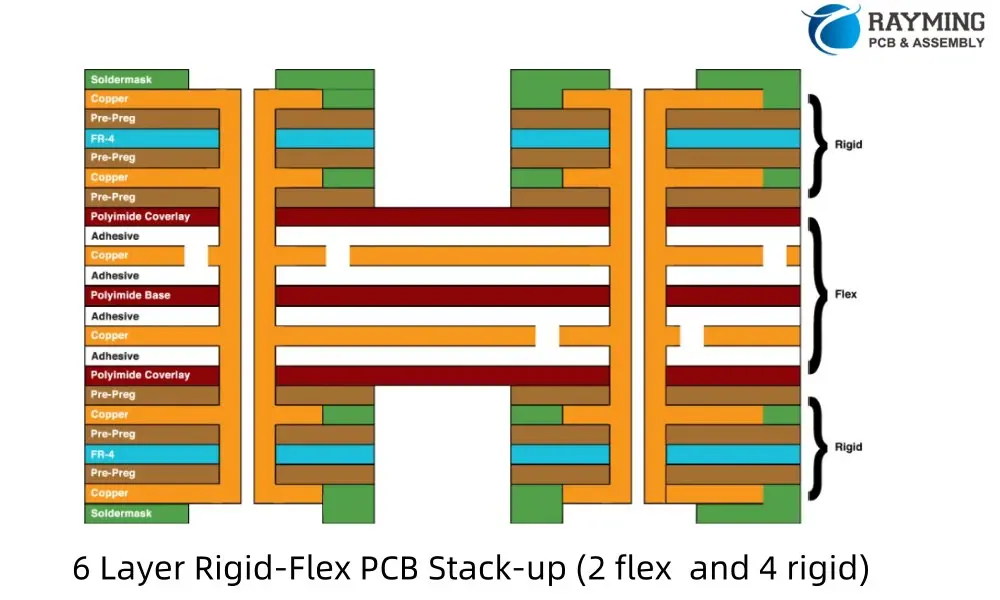
This design allows for increased circuit density in the flex portion while maintaining rigidity where needed. The air gap helps reduce overall thickness and improve flexibility.
8 Layer Rigid Flex PCB Stackup (4 Flex Layers with Air Gap, 4 Rigid Layers)
An 8-layer Rigid-Flex PCB stackup with 4 flex layers, 4 rigid layers, and an air gap typically consists of:
- Top solder mask
- Top copper layer (rigid)
- Prepreg
- Inner copper layer (rigid)
- Core
- Inner copper layer (rigid)
- Prepreg
- Inner copper layer (flex)
- Flexible core
- Inner copper layer (flex)
- Flexible core
- Inner copper layer (flex)
- Flexible core
- Inner copper layer (flex)
- Air gap
- Prepreg
- Inner copper layer (rigid)
- Bottom copper layer (rigid)
- Bottom solder mask

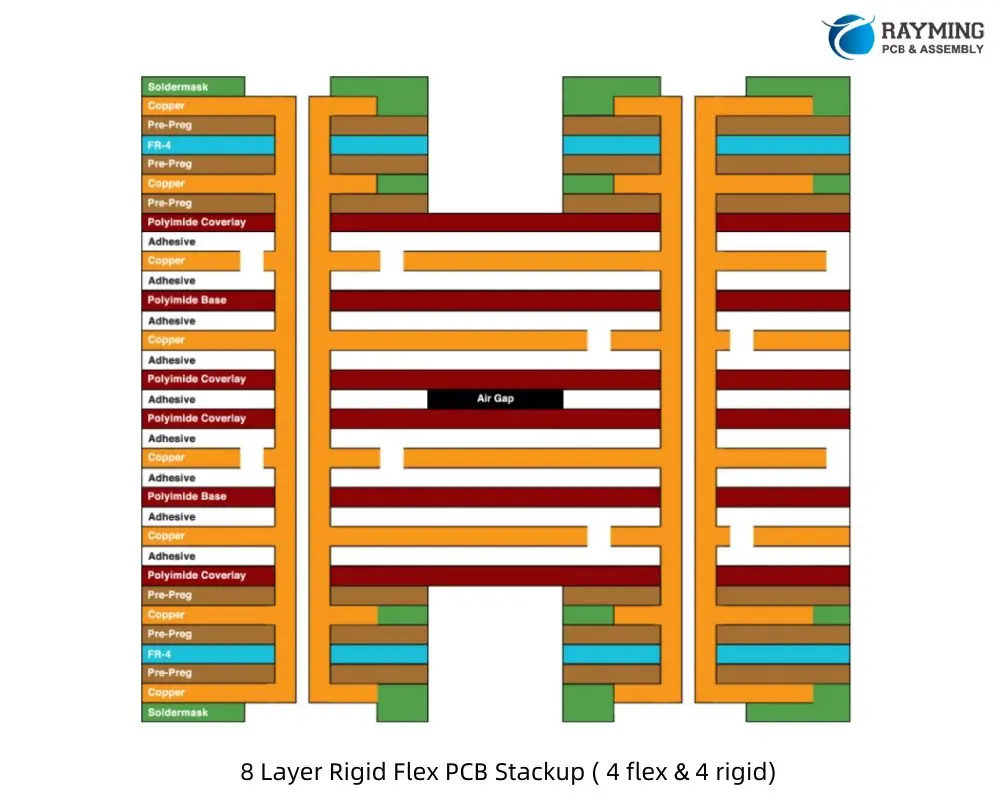
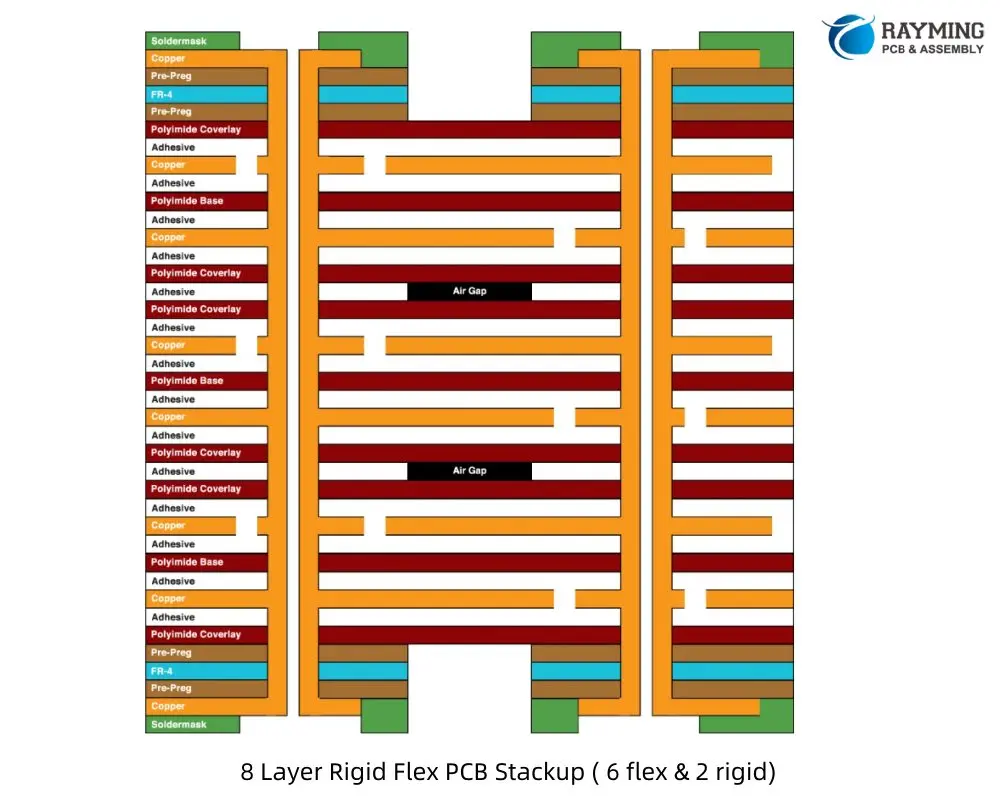
This configuration offers high circuit density in both rigid and flex sections, suitable for complex designs requiring significant routing capabilities.
10 Layer Rigid-Flex PCB Stackup
A 10-layer Rigid-Flex PCB stackup typically includes:
- Top solder mask
- Top copper layer (rigid)
- Prepreg
- Inner copper layer (rigid)
- Core
- Inner copper layer (rigid)
- Prepreg
- Inner copper layer (rigid)
- Prepreg
- Inner copper layer (flex)
- Flexible core
- Inner copper layer (flex)
- Flexible core
- Inner copper layer (flex)
- Flexible core
- Inner copper layer (flex)
- Prepreg
- Inner copper layer (rigid)
- Core
- Inner copper layer (rigid)
- Bottom copper layer (rigid)
- Bottom solder mask
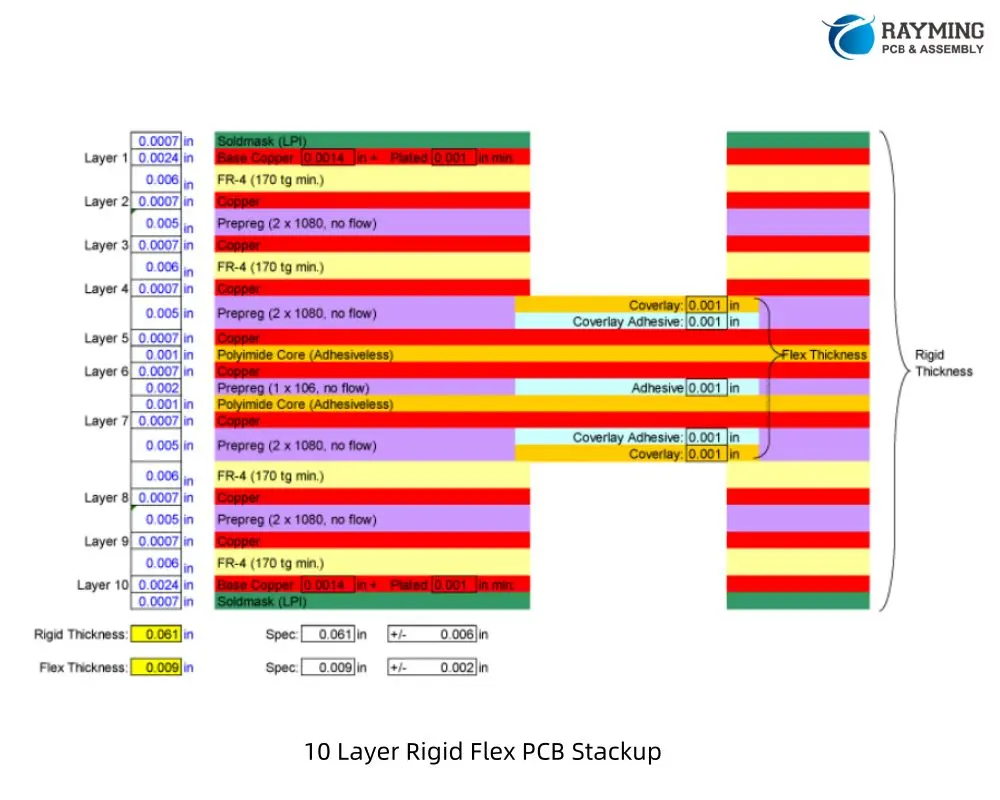
This design allows for very high circuit density and is suitable for complex applications requiring multiple ground and power planes in both rigid and flex sections.
12 Layer Rigid-Flex PCB Stackup (with Air Gap)
A 12-layer Rigid-Flex PCB stackup with an air gap might consist of:
- Top solder mask
- Top copper layer (rigid)
- Prepreg
- Inner copper layer (rigid)
- Core
- Inner copper layer (rigid)
- Prepreg
- Inner copper layer (rigid)
- Core
- Inner copper layer (rigid)
- Prepreg
- Inner copper layer (flex)
- Flexible core
- Inner copper layer (flex)
- Flexible core
- Inner copper layer (flex)
- Flexible core
- Inner copper layer (flex)
- Air gap
- Prepreg
- Inner copper layer (rigid)
- Core
- Inner copper layer (rigid)
- Prepreg
- Inner copper layer (rigid)
- Bottom copper layer (rigid)
- Bottom solder mask
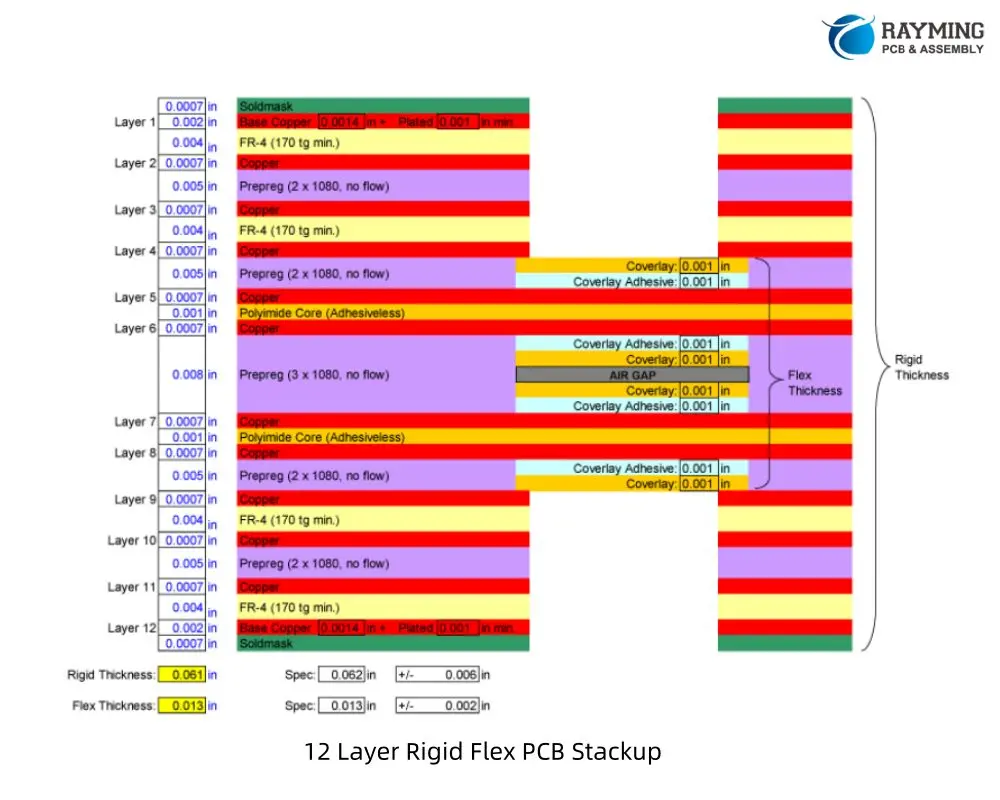
This configuration offers maximum circuit density and is ideal for the most complex Rigid-Flex applications. The air gap helps maintain flexibility in the flex portion despite the high layer count.
Read more about:
5. Using Altium Designer for Rigid-Flex Stackup Planning
Altium Designer is a powerful tool for creating Rigid-Flex PCB designs, offering specialized features to streamline the process. Here’s an overview of how to leverage Altium’s capabilities for effective stackup planning.
Overview of Altium Rigid-Flex Stackup Capabilities
Altium Designer provides a comprehensive set of tools for Rigid-Flex PCB design, including:
- Layer Stack Manager: Allows detailed definition of both rigid and flexible sections.
- Rigid-Flex Support: Enables the creation of complex board shapes with multiple rigid and flex areas.
- 3D PCB Editor: Provides visualization of the folded PCB in its final form.
Setting Up Layer Stacks and Bending Zones
To set up a Rigid-Flex stackup in Altium:
- Use the Layer Stack Manager to define your base stackup.
- Create regions for different stackups (rigid and flex areas).
- Define bending lines to indicate where the board will flex.
- Specify bend radius and direction for each bending line.
Simulating Mechanical Bends
Altium’s 3D PCB Editor allows you to:
- Visualize the PCB in its folded state.
- Check for clearances and potential issues in the folded configuration.
- Export 3D models for further analysis or integration with mechanical CAD systems.
Best Practices When Using Altium’s Rigid-Flex Tools
- Start with a well-planned stackup before beginning routing.
- Use the “Bend Region” feature to ensure proper clearances in flex areas.
- Leverage Altium’s Design Rule Checker to catch Rigid-Flex specific issues.
- Utilize the “Multi-board” feature for complex assemblies involving multiple Rigid-Flex boards.
Common Pitfalls to Avoid in Altium Designs
- Forgetting to define proper bend regions, leading to DRC errors.
- Incorrectly specifying layer functions in the stackup manager.
- Overlooking the need for different design rules in rigid vs. flex areas.
- Not utilizing the 3D viewer to check the folded configuration regularly during design.
6. Material Considerations for High-Reliability Rigid-Flex PCBs
The choice of materials plays a crucial role in the performance and longevity of Rigid-Flex PCBs, especially in high-reliability applications. Let’s explore the key material considerations.
Choosing the Right Flex Substrate
The flex substrate is the foundation of the flexible sections. Common options include:
- Polyimide (PI):
- Pros: Excellent thermal stability, good chemical resistance.
- Cons: Higher cost, can be brittle in extreme cold.
- Best for: High-temperature applications, aerospace, and medical devices.
- Polyethylene Terephthalate (PET):
- Pros: Lower cost, good flexibility.
- Cons: Lower temperature resistance, less dimensional stability.
- Best for: Consumer electronics, low-cost applications.
- Liquid Crystal Polymer (LCP):
- Pros: Excellent electrical properties, low moisture absorption.
- Cons: Higher cost, limited availability.
- Best for: High-frequency applications, harsh environments.
Stiffener Materials and Placement
Stiffeners are used to provide additional support in specific areas of the flex circuit. Common materials include:
- FR4: Compatible with rigid sections, good for component mounting areas.
- Polyimide: Matches the flex substrate, useful for creating gradual transitions.
- Aluminum: Provides excellent heat dissipation for high-power components.
Proper placement of stiffeners is crucial to manage stress and ensure reliability in dynamic flex applications.
Plated Through-Hole (PTH) Reliability
PTHs in flex circuits are particularly vulnerable to stress. To enhance reliability:
- Use “via-in-pad” design where possible to reduce stress on the vias.
- Consider buried or blind vias in rigid sections to minimize impact on flex areas.
- Implement “anchoring” techniques to secure PTHs in flex regions.
Environmental Factors
High-reliability Rigid-Flex PCBs must withstand various environmental challenges:
- Temperature:
- Choose materials with appropriate glass transition temperatures (Tg).
- Consider coefficient of thermal expansion (CTE) matching between layers.
- Humidity:
- Use moisture-resistant materials and coatings.
- Implement proper sealing techniques for exposed flex areas.
- Chemicals:
- Select materials with appropriate chemical resistance for the intended application.
- Consider conformal coatings for additional protection.
- Mechanical Stress:
- Design for the expected number of flex cycles.
- Implement strain relief features in high-stress areas.
7. Manufacturing Insights: How Stackup Affects Fabrication
Understanding the manufacturing implications of your Rigid-Flex PCB stackup design is crucial for ensuring a successful and cost-effective production process. Let’s explore some key considerations.
Critical Manufacturing Constraints
- Layer Registration: As the number of layers increases, maintaining precise alignment becomes more challenging. Tight registration tolerances are essential, especially in flex areas.
- Material Handling: Flexible materials require special handling during manufacturing to prevent damage or distortion.
- Plating Processes: Achieving consistent plating across both rigid and flex areas can be challenging due to different material properties.
- Lamination: The lamination process must account for the different thermal and mechanical properties of rigid and flex materials.
Vias in Flex vs. Vias in Rigid Sections
Vias present unique challenges in Rigid-Flex PCBs:
- Flex Sections: Vias in flex areas must withstand repeated bending. Laser-drilled microvias are often preferred for their smaller size and better reliability.
- Rigid Sections: Traditional mechanical drilling is typically used, but care must be taken at the rigid-flex interface.
- Stacked and Staggered Vias: These can be used to create reliable connections between layers while minimizing stress on the flex sections.
Panelization and Yield Considerations
Efficient panelization is crucial for optimizing yield and reducing costs:
- Panel Size: Consider the maximum panel size your manufacturer can handle, especially for larger flex circuits.
- Rigid-Flex Interface: Place rigid-flex transition areas away from panel edges to reduce stress during manufacturing.
- Scoring and Routing: Plan for appropriate methods to separate individual boards from the panel without damaging flex areas.
- Test Coupons: Include test coupons on the panel for quality control and impedance verification.
Working Closely with Your PCB Fabricator on Stackup Validation
Collaboration with your PCB manufacturer is essential for successful Rigid-Flex PCB production:
- Early Engagement: Involve your fabricator in the design process as early as possible to address manufacturability issues.
- Material Selection: Consult with your manufacturer on material availability and performance characteristics.
- Design Rule Verification: Ensure your design adheres to the manufacturer’s specific capabilities and limitations.
- Prototyping: Consider building prototypes to validate the design before moving to full production.
Conclusion
Mastering the intricacies of Rigid-Flex PCB stackup design is crucial for creating high-performance, reliable electronic products in today’s demanding markets. The ability to combine the stability of rigid boards with the flexibility of flex circuits opens up new possibilities in product design and functionality.
Key Takeaways:
- Precise Planning: Careful consideration of layer stackup, material selection, and mechanical design is essential for successful Rigid-Flex PCBs.
- Material Knowledge: Understanding the properties and interactions of various materials used in Rigid-Flex construction is crucial for optimal performance.
- Design Tools: Leveraging advanced PCB design software, like Altium Designer, can greatly simplify the complex task of Rigid-Flex layout and simulation.
- Manufacturing Awareness: Close collaboration with PCB fabricators and understanding of manufacturing constraints are vital for producing reliable Rigid-Flex boards.
- Continuous Learning: As technology evolves, staying updated on new materials, design techniques, and manufacturing processes is essential for innovation in Rigid-Flex PCB design.
Final Tips:
- Prioritize early stackup planning to avoid costly redesigns later in the development process.
- Utilize simulation tools to validate electrical and mechanical performance before committing to production.
- Foster strong relationships with PCB manufacturers to leverage their expertise and capabilities.
- Consider the entire product lifecycle, from assembly to field use, when making design decisions.
By embracing these principles and continuously refining your approach to Rigid-Flex PCB stackup design, you can create innovative, reliable, and high-performance electronic products that meet the demanding requirements of modern applications.
Appendix: Example Rigid-Flex Stackup Configurations
To further illustrate the concepts discussed in this article, here are some example Rigid-Flex PCB stackup configurations:
1. 4-Layer Rigid-Flex Stackup
Rigid Section:
    - Top Layer (Signal)
    - FR4 Core
    - Inner Layer 1 (Ground)
    - Flexible Polyimide Core
    - Inner Layer 2 (Power)
    - FR4 Core
    - Bottom Layer (Signal)

Flex Section:
    - Top Layer (Signal)
    - Adhesive
    - Inner Layer 1 (Ground)
    - Flexible Polyimide Core
    - Inner Layer 2 (Power)
    - Adhesive
    - Bottom Layer (Signal)
2. 6-Layer Rigid-Flex Stackup
Rigid Section:
    - Top Layer (Signal)
    - FR4 Prepreg
    - Inner Layer 1 (Signal)
    - FR4 Core
    - Inner Layer 2 (Ground)
    - Flexible Polyimide Core
    - Inner Layer 3 (Power)
    - FR4 Core
    - Inner Layer 4 (Signal)
    - FR4 Prepreg
    - Bottom Layer (Signal)

Flex Section:
    - Top Layer (Signal)
    - Adhesive
    - Inner Layer 1 (Signal)
    - Adhesive
    - Inner Layer 2 (Ground)
    - Flexible Polyimide Core
    - Inner Layer 3 (Power)
    - Adhesive
    - Inner Layer 4 (Signal)
    - Adhesive
    - Bottom Layer (Signal)
3. Complex Hybrid Stackup (8 Layers with Multiple Flex Layers)
Rigid Section:
    - Top Layer (Signal)
    - FR4 Prepreg
    - Inner Layer 1 (Signal)
    - FR4 Core
    - Inner Layer 2 (Ground)
    - Flexible Polyimide Core 1
    - Inner Layer 3 (Power)
    - Adhesive
    - Inner Layer 4 (Signal)
    - Flexible Polyimide Core 2
    - Inner Layer 5 (Ground)
    - FR4 Core
    - Inner Layer 6 (Signal)
    - FR4 Prepreg
    - Bottom Layer (Signal)

Flex Section:
    - Top Layer (Signal)
    - Adhesive
    - Inner Layer 1 (Signal)
    - Adhesive
    - Inner Layer 2 (Ground)
    - Flexible Polyimide Core 1
    - Inner Layer 3 (Power)
    - Adhesive
    - Inner Layer 4 (Signal)
    - Flexible Polyimide Core 2
    - Inner Layer 5 (Ground)
    - Adhesive
    - Inner Layer 6 (Signal)
    - Adhesive
    - Bottom Layer (Signal)
Tips for Custom Designs:
- Always consider the neutral bend axis when designing your stackup.
- Symmetry in the stackup can help reduce warping and twisting.
- Use thinner materials in flex areas to improve flexibility and reduce strain.
- Consider impedance requirements when choosing layer thicknesses and materials.
- Consult with your PCB manufacturer to ensure your design is feasible and cost-effective to produce.
Remember, these are general examples, and your specific design may require a custom stackup tailored to your unique requirements and constraints.