The world of retro gaming has seen a resurgence in recent years, with enthusiasts seeking ways to relive their favorite classic games while leveraging modern technology. The Raspberry Pi 2 PiGRRL Pack 2.0, combined with a custom gamepad PCB, offers an exciting solution for DIY gaming enthusiasts. This article will explore the components, assembly process, and customization options for creating your own portable gaming device using the Raspberry Pi 2 PiGRRL Pack 2.0 and a custom gamepad PCB.
Understanding the Raspberry Pi 2 PiGRRL Pack 2.0
What is the PiGRRL Pack 2.0?
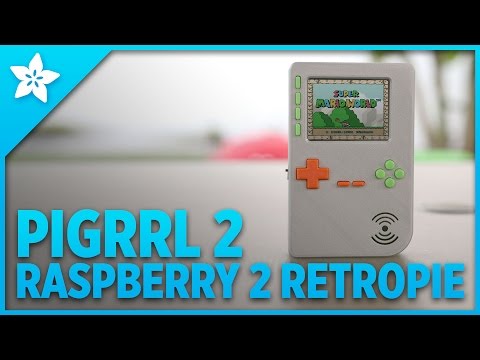
The PiGRRL Pack 2.0 is a comprehensive kit designed to transform a Raspberry Pi 2 into a portable gaming console. It builds upon the success of the original PiGRRL project, offering improved features and easier assembly.
Components of the PiGRRL Pack 2.0
The PiGRRL Pack 2.0 typically includes the following components:
| Component | Purpose | |———–|———| | 3D printed case | Houses all components | | 3.5″ TFT display | Serves as the game screen | | PowerBoost 1000C | Manages power and charging | | 2000mAh LiPo battery | Provides portable power | | Mini speaker | Outputs game audio | | Tactile buttons | Used for game controls | | Various wires and connectors | For internal connections |
Advantages of the PiGRRL Pack 2.0
- Compact design
- Improved battery life
- Better screen quality
- More ergonomic button layout
- Easier assembly process
The Custom Gamepad PCB
Why Use a Custom Gamepad PCB?
A custom gamepad PCB offers several advantages over traditional wiring methods:
- Cleaner internal layout
- Reduced wiring complexity
- Improved reliability
- Easier maintenance and troubleshooting
- Potential for additional features
Designing the Custom Gamepad PCB
Key Considerations
When designing a custom gamepad PCB for the PiGRRL Pack 2.0, consider the following:
- Button layout and ergonomics
- Compatibility with Raspberry Pi 2 GPIO pins
- Integration with PiGRRL Pack 2.0 components
- Potential for future upgrades or modifications
Essential Components
A typical custom gamepad PCB for the PiGRRL Pack 2.0 might include:
| Component | Purpose | |———–|———| | Microcontroller | Manages button inputs | | Tactile switches | Serve as game buttons | | Resistors | For button debouncing | | Connectors | Interface with Raspberry Pi and other components | | LED indicators | Provide visual feedback |
PCB Manufacturing Process
- Schematic design
- PCB layout
- Gerber file generation
- PCB fabrication
- Component sourcing
- PCB assembly
Assembling the Raspberry Pi 2 PiGRRL Pack 2.0 with Custom Gamepad PCB
Preparation
Before beginning the assembly process, ensure you have the following tools:
- Soldering iron and solder
- Wire strippers
- Screwdrivers
- Multimeter
- Heat shrink tubing
- Tweezers
Step-by-Step Assembly Guide
1. Prepare the 3D Printed Case
- Clean up any 3D printing artifacts
- Test-fit components to ensure proper alignment
2. Install the Display
- Carefully mount the 3.5″ TFT display in the case
- Secure with appropriate screws or mounting brackets
3. Prepare the Raspberry Pi 2
- Install the required operating system (typically RetroPie)
- Configure GPIO pins for gamepad input
4. Install the Custom Gamepad PCB
- Mount the custom PCB in the designated area of the case
- Connect to Raspberry Pi GPIO pins using appropriate cables
5. Power Management Setup
- Install the PowerBoost 1000C
- Connect the LiPo battery
- Wire power to Raspberry Pi and display
6. Audio Installation
- Mount the mini speaker
- Connect audio output from Raspberry Pi
7. Final Assembly
- Carefully route all wires
- Secure components with screws or mounting brackets
- Close up the case
Software Configuration
Operating System Setup
- Download and install RetroPie
- Configure RetroPie for the 3.5″ display
- Set up Wi-Fi (if applicable)
Gamepad Configuration
- Access RetroPie configuration menu
- Navigate to “Input” settings
- Follow on-screen instructions to map buttons
ROM Installation
- Prepare a list of legally owned game ROMs
- Transfer ROMs to Raspberry Pi using Wi-Fi or USB
- Organize ROMs into appropriate folders
Customization Options

Case Modifications
- Custom paint jobs
- Additional button holes
- Improved ventilation
Hardware Upgrades
- Larger battery for extended playtime
- Improved audio amplifier for better sound
- Bluetooth module for wireless controllers
Software Enhancements
- Custom emulator configurations
- Overclocking for improved performance
- Customized boot screens and themes
Troubleshooting Common Issues
Display Problems
| Issue | Possible Solution | |——-|——————-| | No display output | Check connections, verify GPIO configuration | | Distorted image | Adjust display settings in config.txt | | Flickering screen | Ensure stable power supply |
Control Issues
| Issue | Possible Solution | |——-|——————-| | Unresponsive buttons | Verify PCB connections, check GPIO configuration | | Ghost inputs | Improve button debouncing in software or hardware | | Incorrect button mapping | Reconfigure input settings in RetroPie |
Power Problems
| Issue | Possible Solution | |——-|——————-| | Short battery life | Check for power-hungry processes, consider larger battery | | Failure to charge | Verify PowerBoost connections, check USB cable | | Sudden shutdowns | Ensure stable power supply, check for overheating |
Performance Optimization
Overclocking
- Carefully adjust CPU and GPU clock speeds
- Monitor temperatures to prevent overheating
- Test stability with demanding games
Emulator-Specific Tweaks
- Research optimal settings for each emulator
- Balance performance and accuracy
- Consider using lower resolution for smoother gameplay
System Optimization
- Disable unnecessary services
- Use lightweight themes
- Regularly update software for bug fixes and improvements
Community and Resources
Online Forums
- RetroPie forums
- Raspberry Pi forums
- 3D printing communities
Video Tutorials
- YouTube channels dedicated to Raspberry Pi projects
- Step-by-step assembly guides
- Troubleshooting walkthroughs
Documentation
- Official Raspberry Pi documentation
- RetroPie wikis
- Custom gamepad PCB design resources
Future Developments
Potential Upgrades
- Integration with newer Raspberry Pi models
- Support for more advanced displays
- Improved power management systems
Emerging Technologies
- Incorporation of mini HDMI for external display support
- USB-C for faster charging and data transfer
- Potential for cloud game streaming integration
Conclusion
The Raspberry Pi 2 PiGRRL Pack 2.0, combined with a custom gamepad PCB, offers an exciting platform for DIY gaming enthusiasts. By following the steps outlined in this article, you can create a unique, portable gaming device that blends retro charm with modern technology. The customization options and active community support ensure that your PiGRRL project can continue to evolve and improve over time.
Frequently Asked Questions (FAQ)
1. Can I use a different Raspberry Pi model with the PiGRRL Pack 2.0?
While the PiGRRL Pack 2.0 is designed specifically for the Raspberry Pi 2, it may be possible to use other models with some modifications. However, this could require changes to the case design, power management, and software configuration. It’s generally recommended to stick with the Raspberry Pi 2 for the best compatibility and performance with this particular pack.
2. How difficult is it to design and manufacture a custom gamepad PCB?
Designing and manufacturing a custom gamepad PCB requires some knowledge of electronics and PCB design. For beginners, it can be challenging, but there are many resources available online to help. You’ll need to learn how to use PCB design software, understand basic circuit design, and familiarize yourself with the PCB manufacturing process. Alternatively, you can start with existing open-source designs and modify them to suit your needs.
3. What’s the typical battery life of a completed PiGRRL 2.0 project?
The battery life of a PiGRRL 2.0 project can vary depending on several factors, including the efficiency of your components, the types of games you’re playing, and any additional features you’ve added. With the standard 2000mAh LiPo battery, you can typically expect 2-4 hours of gameplay. This can be extended by using a larger capacity battery or implementing more aggressive power-saving measures.
4. Can I add additional features like Wi-Fi or Bluetooth to my PiGRRL 2.0?
Yes, it’s possible to add features like Wi-Fi or Bluetooth to your PiGRRL 2.0 project. The Raspberry Pi 2 has built-in support for these technologies, so it’s mainly a matter of configuring the software and ensuring you have the necessary antennas or modules. Keep in mind that adding these features may impact battery life and could require modifications to the case design to accommodate any additional hardware.
5. Is it legal to play ROMs on the PiGRRL 2.0?
The legality of playing ROMs is a complex issue that varies by jurisdiction. Generally, it’s considered legal to play ROMs of games you own physical copies of, for personal use. However, downloading ROMs of games you don’t own is typically not legal. It’s important to research and comply with the copyright laws in your area. Many retro gaming enthusiasts choose to focus on open-source or homebrew games to avoid legal issues.