PCB soldering is a fundamental skill in electronics manufacturing and repair. Whether you’re a hobbyist working on a DIY project or a professional in the electronics industry, mastering PCB soldering techniques is crucial for creating reliable and high-quality electronic devices. In this comprehensive guide, we’ll explore the essentials of PCB soldering, from basic concepts to advanced techniques, and highlight common mistakes to avoid.
What is PCB Soldering?

PCB soldering is the process of joining electronic components to a printed circuit board (PCB) using a metal alloy called solder. This process creates both an electrical connection and a mechanical bond, ensuring that the components stay in place and function properly within the circuit.
The Importance of Proper PCB Soldering
Proper PCB soldering is critical for several reasons:
- Electrical Conductivity: Good solder joints ensure optimal electrical connections between components and the PCB.
- Mechanical Strength: Well-soldered joints provide physical stability, preventing components from detaching due to vibration or mechanical stress.
- Reliability: Properly soldered connections are less likely to fail over time, increasing the overall reliability of the electronic device.
- Performance: Poor soldering can lead to issues like signal noise, voltage drops, and intermittent connections, all of which can affect device performance.

Equipment and Materials for Soldering
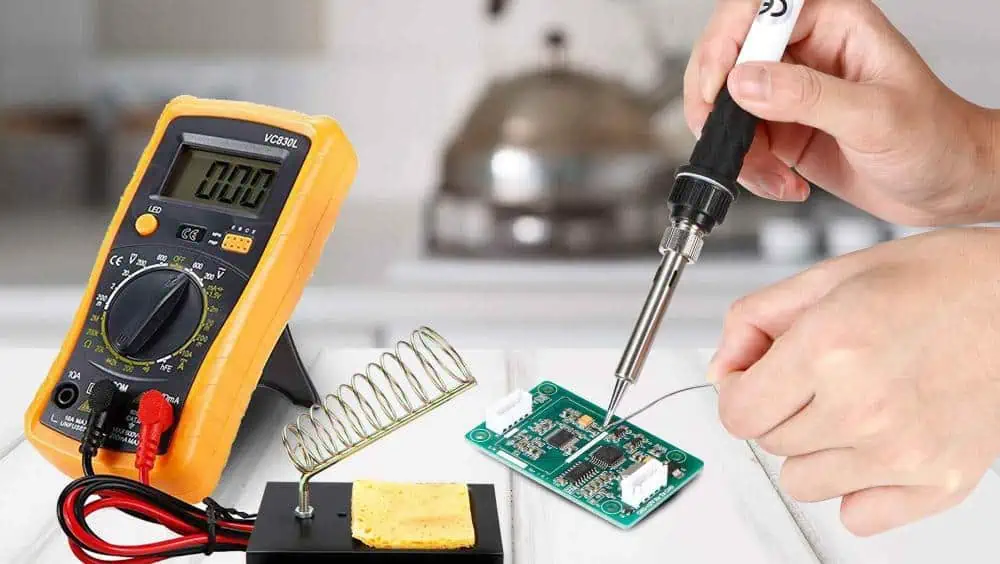
To perform PCB soldering effectively, you’ll need the right tools and materials. Here’s a list of essential equipment:
Soldering Iron
The soldering iron is your primary tool. Look for these features:
- Temperature control
- Interchangeable tips
- Comfortable grip
- Adequate power (typically 20-60 watts for most PCB work)
Solder
Choose the right type of solder for your project:
- Lead-based solder (60/40 or 63/37 tin-lead alloys)
- Lead-free solder (typically containing tin, copper, and silver)
Flux
Flux helps improve solder flow and removes oxides. Options include:
- Rosin flux
- No-clean flux
- Water-soluble flux
Other Essential Tools
- Soldering iron stand
- Sponge or brass wool tip cleaner
- Desoldering pump or solder wick
- Tweezers
- Magnifying glass or microscope
- Fume extractor
Types of Soldering Techniques

There are several soldering techniques used in PCB assembly, each suited to different applications and production volumes.
1. Soft Soldering
Soft soldering is the most common technique for PCB assembly.
- Uses low-temperature solder (typically melting below 450°C)
- Suitable for most electronic components
- Can be done manually or with automated equipment
2. Hard Soldering
Hard soldering, also known as brazing, is less common in PCB assembly but may be used for specific applications.
- Uses higher-temperature alloys (typically melting above 450°C)
- Provides stronger joints
- Usually not necessary for standard PCB work
3. Wave Soldering
Wave soldering is an automated process used for through-hole components in large-scale production.
- PCBs pass over a wave of molten solder
- Efficient for boards with many through-hole components
- Requires careful control of temperature and wave height
4. Reflow Soldering
Reflow soldering is the primary method for surface-mount component assembly.
- Uses solder paste applied to PCB pads
- Components are placed on the paste
- Entire board is heated in a reflow oven
- Ideal for high-density, surface-mount assemblies
Read more about:
How to Solder Through-Hole Components on a PCB

Let’s walk through the process of manually soldering a through-hole component to a PCB.
1. Tin the Soldering Iron
- Clean the tip of your soldering iron
- Apply a small amount of solder to the tip
- This process, called “tinning,” improves heat transfer
2. Prepare the PCB Surface
- Ensure the PCB is clean and free from contaminants
- If necessary, use isopropyl alcohol to clean the board
3. Position Your Components
- Insert the component leads through the appropriate holes
- If working on the component side, bend the leads slightly to hold the component in place
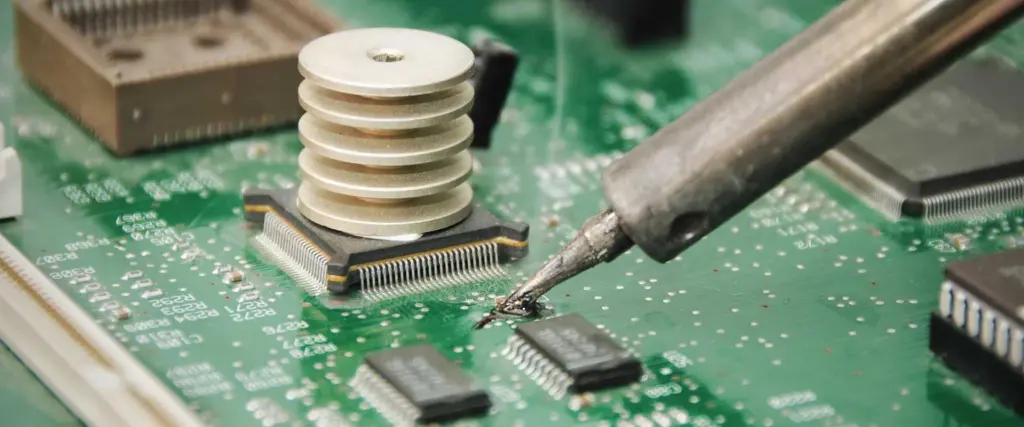
4. Heat the Joint
- Place the soldering iron tip so it contacts both the pad and the component lead
- Hold for 2-3 seconds to heat both surfaces
5. Solder the Joint
- Apply solder to the joint, not the iron tip
- The solder should flow smoothly, forming a concave fillet
- Remove the solder, then the iron
6. Inspect the Joint and Trim the Leads
- Check for a smooth, shiny solder joint
- Trim excess lead length with flush cutters
13 Types of PCB Soldering Defects and Solutions

Even experienced technicians can encounter soldering defects. Here are 13 common issues and how to address them:
1. Bridging of Solder
Problem: Solder connects two points that should be separate. Solution: Use a smaller soldering tip, apply less solder, or use solder wick to remove excess.
2. Excess of Solder
Problem: Too much solder on a joint, forming a ball or blob. Solution: Remove excess with solder wick or a desoldering pump.
3. Balling of Solder
Problem: Small balls of solder scatter around the work area. Solution: Clean the area, use flux, and ensure proper heating of the joint.
4. Heat Loss Analysis
Problem: Insufficient heat transfer to form a good joint. Solution: Use a higher wattage iron or increase temperature settings.
5. Tombstoning
Problem: One end of a surface-mount component lifts off the board. Solution: Ensure even heating and proper solder paste application.
6. Pins and Connector Connections
Problem: Poor connections on multi-pin components. Solution: Use appropriate flux, ensure proper heating, and consider using a hot air rework station.
7. Surface Mount Issues
Problem: Misalignment or poor connections on SMD components. Solution: Use a stencil for solder paste application, and consider using a reflow oven or hot air station.
8. Skipped Solder
Problem: Solder fails to wet a pad or lead. Solution: Clean the surfaces, use flux, and ensure proper heating.
9. Lifted Pads
Problem: Copper pad separates from the PCB. Solution: Avoid overheating, use proper technique, and consider board repair if necessary.
10. Pinholes and Blowholes
Problem: Small holes or voids in the solder joint. Solution: Ensure proper flux application and adjust soldering temperature.
11. Chemical Flow Issues
Problem: Improper flux activation or cleaning. Solution: Use the correct type of flux and follow proper cleaning procedures.
12. Faulty Wire Breakage
Problem: Wires break at the solder joint due to stress. Solution: Use strain relief techniques and avoid overheating insulation.
13. Insufficient Heat
Problem: Cold solder joints due to inadequate heating. Solution: Increase iron temperature, use a larger tip, or heat the joint for a longer time.
How to Get Soldering Training
Improving your soldering skills is an ongoing process. Here are some ways to get training:
- Online Courses: Platforms like Coursera, Udemy, and SkillShare offer soldering courses.
- Local Workshops: Check with community colleges or maker spaces for hands-on classes.
- Manufacturer Training: Some equipment manufacturers offer training programs.
- Certification Programs: Organizations like IPC offer professional certification in soldering.
- Practice Projects: Start with simple kits and gradually tackle more complex projects.
Quick Tips and Tricks for Soldering
To wrap up, here are some valuable tips to improve your soldering technique:
- Keep It Clean: Regularly clean your soldering iron tip and work area.
- Use Flux: Flux improves solder flow and joint quality.
- Temperature Matters: Use the correct temperature for your solder type and components.
- Steady Hands: Use helping hands or PCB holders to keep your work steady.
- Inspect Your Work: Use magnification to check your joints regularly.
- Practice Heat Control: Learn to apply heat quickly and efficiently.
- Choose the Right Tip: Different tip shapes suit different tasks.
- Avoid Breathing Fumes: Use a fume extractor to protect your health.
- Learn to Read Joints: Develop an eye for identifying good and bad solder joints.
- Stay Updated: Keep learning about new techniques and technologies in PCB assembly.
Conclusion
PCB soldering is a critical skill in electronics manufacturing and repair. By understanding the fundamentals, using the right tools and techniques, and being aware of common defects, you can significantly improve the quality and reliability of your electronic assemblies. Remember that mastering PCB soldering takes time and practice, so don’t be discouraged if you encounter challenges along the way. Keep refining your skills, stay curious, and always prioritize quality in your work.
Whether you’re a hobbyist working on DIY projects or a professional in the electronics industry, the principles and techniques covered in this guide will help you achieve better results in your PCB soldering endeavors. As electronics continue to evolve, with components becoming smaller and more complex, your soldering skills will become increasingly valuable. Embrace the learning process, and you’ll be well-equipped to tackle even the most challenging PCB assembly tasks.