Introduction
The ESP8266 has revolutionized the world of Wi-Fi IoT projects, becoming the go-to choice for makers, hobbyists, and professionals alike. This tiny yet powerful esp8266 wifi module has democratized Internet of Things development by providing affordable, reliable Wi-Fi connectivity that was once exclusive to expensive industrial solutions.
Since its introduction by Espressif Systems, the esp wifi chip has sparked an unprecedented boom in DIY smart home projects, environmental monitoring systems, and connected device prototypes. What makes the esp module so compelling is its perfect balance of functionality, affordability, and ease of use – factors that have made it the backbone of countless IoT innovations worldwide.
The ESP8266’s popularity stems from its impressive feature set packed into a compact form factor. With built-in Wi-Fi capabilities, adequate processing power, and multiple GPIO pins, this microcontroller can handle everything from simple sensor readings to complex web server operations. The vibrant ecosystem surrounding the ESP8266 includes popular development boards like the NodeMCU, Wemos D1 Mini, and the compact ESP-01, each designed to make Wi-Fi connectivity accessible to developers of all skill levels.
As IoT continues to reshape industries from agriculture to healthcare, the ESP8266 remains at the forefront of this transformation. Its low power consumption makes it ideal for battery-powered applications, while its robust Wi-Fi performance ensures reliable connectivity in demanding environments. Whether you’re building a smart irrigation system, home security network, or industrial monitoring solution, the ESP8266 provides the foundation for bringing your connected device ideas to life.
The chip’s compatibility with familiar development environments like Arduino IDE has lowered the barrier to entry for IoT development. This accessibility, combined with extensive community support and comprehensive documentation, explains why the ESP8266 continues to be the first choice for Wi-Fi-enabled projects. Even with newer alternatives like the ESP32 available, the ESP8266’s proven reliability and cost-effectiveness ensure its continued relevance in the rapidly evolving IoT landscape.
What is the ESP8266?
The ESP8266 is a low-cost Wi-Fi microcontroller chip developed by Espressif Systems that has become synonymous with affordable IoT connectivity. At its core, the esp8266ex features a 32-bit Xtensa LX106 processor running at 80MHz (overclockable to 160MHz), coupled with integrated 802.11 b/g/n Wi-Fi capabilities. This combination provides developers with both computational power and wireless connectivity in a single, compact package.
The architecture of the esp8266mod is designed for efficiency and versatility. The chip includes 64KB of instruction RAM, 96KB of data RAM, and external flash memory support ranging from 512KB to 16MB depending on the specific module variant. This memory configuration allows the ESP8266 to run complex applications while maintaining its low-power profile, making it suitable for battery-operated IoT devices that need to operate for months or even years on a single charge.
One common misconception involves the term esp2866, which is actually a typographical error for ESP8266. The correct designation is ESP8266, and various modules like the esp8266 mini variants maintain this naming convention while offering different form factors and pin configurations to suit diverse project requirements.
Espressif Systems introduced the ESP8266 in 2014, initially targeting the Chinese market before its global adoption exploded in 2015. The chip’s development history reflects Espressif’s commitment to democratizing IoT connectivity by providing enterprise-grade Wi-Fi capabilities at consumer-friendly prices. This strategic approach disrupted the embedded Wi-Fi market, which had previously been dominated by expensive solutions from established semiconductor companies.
Understanding the relationship between ESP8266 variants is crucial for selecting the right chip for your project. The esp8285 represents an integrated version of the ESP8266 with 1MB of flash memory built directly into the package, eliminating the need for external flash storage. This integration makes the ESP8285 more compact but less flexible in terms of memory expansion.
The comparison between esp8266 esp32 chips reveals important distinctions for project planning. While the esp32 esp8266 discussion often focuses on the ESP32’s superior processing power and Bluetooth connectivity, the ESP8266 maintains advantages in power efficiency, cost-effectiveness, and proven stability for Wi-Fi-only applications. The ESP32 features dual-core processing and additional peripherals, but these enhancements come with increased power consumption and complexity that may be unnecessary for simpler IoT projects.
The ESP8266’s Wi-Fi implementation supports multiple connection modes, including station mode for connecting to existing networks, access point mode for creating its own network, and a combined mode that enables both simultaneously. This flexibility allows developers to create sophisticated networking topologies, from simple sensor nodes that report to cloud services to mesh networks that can extend Wi-Fi coverage across large areas.
ESP8266 Variants and Development Boards
The ESP8266 ecosystem encompasses numerous module variants and development boards, each optimized for specific use cases and project requirements. Understanding these options is essential for selecting the most appropriate hardware for your IoT applications.
ESP-01 and ESP-01S Series
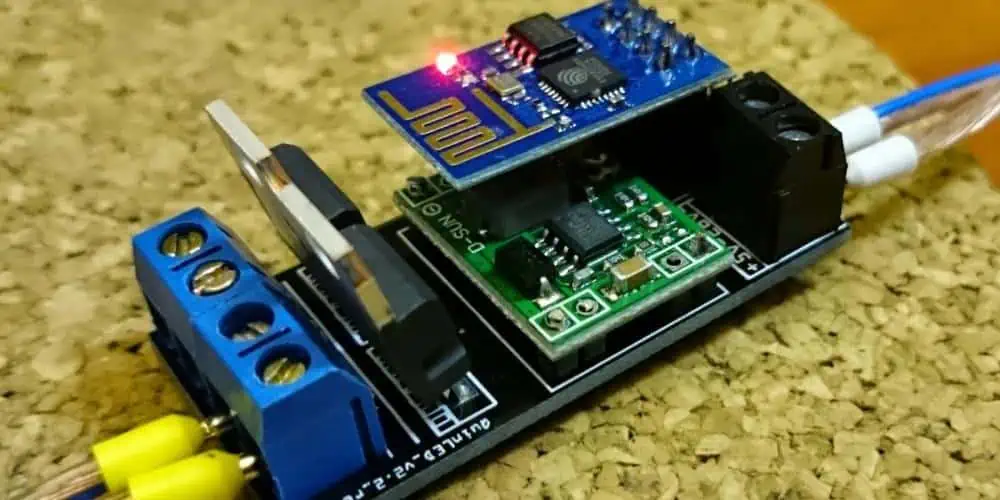
The esp 01 represents the most compact and cost-effective entry point into ESP8266 development. The original esp 01s module features a minimal pin count with only GPIO0, GPIO2, TX, RX, VCC, GND, CH_PD, and RST accessible through its 8-pin header. Despite this limitation, the esp8266 esp 01 has found widespread use in applications where space constraints are paramount and only basic I/O functionality is required.
The esp01s variant improves upon the original design with better antenna performance and more reliable operation. The esp 01 8266 modules are particularly popular for retrofitting existing devices with Wi-Fi connectivity due to their small footprint and low cost. However, developers must work within the constraints of limited GPIO availability, making these modules best suited for simple sensor readings or relay control applications.
ESP-07 and ESP-07S with External Antenna Support
The esp 07 and esp 07s modules address the antenna limitations of smaller variants by providing both onboard ceramic antenna and external antenna connector options. This dual-antenna approach makes these modules ideal for applications requiring extended Wi-Fi range or operation in challenging RF environments. The additional GPIO pins compared to ESP-01 modules provide more flexibility for interfacing with sensors and actuators.
ESP-12 Series: Enhanced GPIO and Flash Memory
The ESP-12 family, including esp 12, esp 12e, and esp 12f variants, represents a significant step up in capability and convenience. The esp8266 12f and esp8266 12e modules feature more accessible GPIO pins, larger onboard flash memory options, and improved antenna designs. These modules strike an excellent balance between functionality and cost, making them popular choices for prototype development and small-scale production.
The ESP-12F variant includes additional improvements in antenna design and pin layout that enhance both performance and ease of use. The extra GPIO pins available on these modules enable more complex projects involving multiple sensors, displays, and communication interfaces without requiring external multiplexers or I/O expanders.
Wemos D1 Series: Arduino-Compatible Form Factors
The wemos d1 mini has achieved legendary status among ESP8266 development boards due to its compact size and Arduino Uno-compatible pin spacing. The wemos d1 mini pro extends this design with additional features like external antenna connector and more robust power regulation. The wemos mini form factor has inspired countless shield designs, creating an ecosystem of stackable modules for rapid prototyping.
The evolution from wemos d1 to wemos d1 r1 and wemos d1 r2 versions reflects continuous improvements in USB connectivity, power management, and build quality. The d1 mini and d1 mini pro variants maintain the popular compact form factor while incorporating lessons learned from earlier designs. The esp d1 mini nomenclature is sometimes used interchangeably with Wemos D1 Mini, reflecting the board’s association with ESP8266 development.
The wemos esp8266 boards have become synonymous with reliable, easy-to-use ESP8266 development platforms. The esp8266 d1 mini format’s popularity has led to numerous compatible boards from various manufacturers, creating a de facto standard for compact ESP8266 development boards.
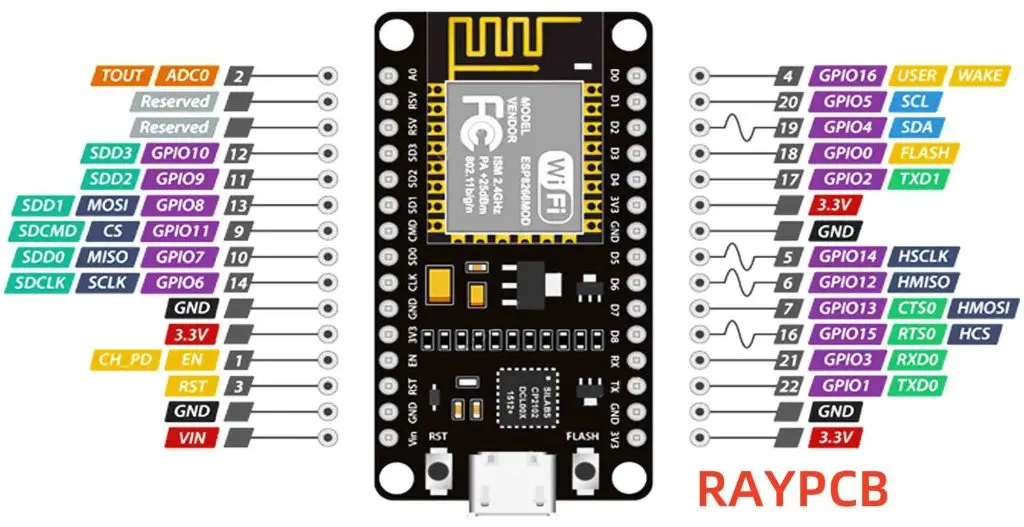
NodeMCU: The Developer-Friendly Standard
The nodemcu platform revolutionized ESP8266 development by providing a complete development board with USB connectivity, voltage regulation, and breadboard-friendly pin layout. The nodemcu esp8266 boards come in several versions, with nodemcu v3, lolin nodemcu v3, nodemcu amica, and nodemcu v2 being the most common variants. Each version offers slight improvements in layout, components, or build quality while maintaining compatibility with the established NodeMCU pinout.
The nodemcu 8266 designation emphasizes the ESP8266-based nature of these boards, distinguishing them from ESP32-based NodeMCU variants. The node mcu8266 boards have become the de facto standard for ESP8266 education and prototyping due to their plug-and-play nature and extensive documentation.
ESP32-Based Alternatives
While this guide focuses on ESP8266, understanding ESP32 alternatives helps inform hardware selection decisions. The espwroom32 and other esp32 module variants offer increased processing power, Bluetooth connectivity, and more GPIO pins at the cost of higher power consumption and increased complexity.
The node mcu esp 32, node mcu esp32s, node mcu 32s, and esp32 node mcu boards extend the familiar NodeMCU form factor to ESP32 hardware. The esp32 8266 comparison often comes down to project requirements: choose ESP8266 for simple, power-efficient Wi-Fi applications, and ESP32 for projects requiring additional processing power, Bluetooth, or numerous GPIO pins. The wifi esp32 capabilities surpass ESP8266 in raw performance but may be overkill for many IoT applications.
Getting Started: Programming ESP8266 with Arduino IDE
Setting up your development environment for ESP8266 programming through Arduino IDE is straightforward and provides access to the familiar Arduino programming model. This approach makes ESP8266 development accessible to anyone with basic Arduino experience while leveraging the extensive Arduino library ecosystem.
Begin by installing the ESP8266 board package in Arduino IDE through the Board Manager. Navigate to File > Preferences and add the ESP8266 board package URL to the Additional Board Manager URLs field. After updating the board manager list, search for “ESP8266” and install the community-maintained package that provides support for various ESP8266 development boards.
The arduino ide nodemcu integration is seamless once the board package is installed. Select your specific board variant from the Tools > Board menu – options include NodeMCU variants, Wemos D1 boards, and generic ESP8266 modules. The esp8266 ide arduino combination provides access to specialized libraries and examples designed specifically for ESP8266 hardware.
Connecting your esp8266 arduino development board varies by model, but most modern boards like NodeMCU and Wemos D1 Mini include USB-to-serial converters for direct computer connection. The arduino esp8266 nodemcu setup requires selecting the correct COM port and upload speed (typically 115200 baud) in the Arduino IDE Tools menu.
Your first project should verify the complete toolchain functionality. Create a simple LED blink program that demonstrates both code compilation and hardware interaction. Most ESP8266 development boards include an onboard LED connected to GPIO2 or GPIO16, making this an ideal starting point for beginners. The familiar Arduino digitalWrite() and delay() functions work identically on ESP8266, easing the transition for Arduino users.
Advanced arduino esp8266 nodemcu programming involves leveraging ESP8266-specific libraries for Wi-Fi connectivity, web server functionality, and cloud integration. The ESP8266WiFi library provides comprehensive network connectivity options, while libraries like ESPAsyncWebServer enable sophisticated web-based interfaces for IoT projects.
Read more about:
ESP8266 Project Ideas and Tutorials
The versatility of ESP8266 modules enables an enormous range of IoT projects, from simple sensor monitoring to complex home automation systems. These project examples demonstrate practical applications while highlighting the capabilities that make ESP8266 the preferred choice for Wi-Fi-enabled devices.
Home Automation with Relay Control
Controlling household appliances through Wi-Fi represents one of the most popular ESP8266 applications. The relay module arduino combination with ESP8266 creates powerful automation systems capable of switching high-voltage devices safely. The esp8266 relay interface typically uses a single GPIO pin to control relay coils, while the relay contacts handle the actual load switching.
Simple esp01 relay projects can control individual appliances like lamps or fans, while more complex systems using 8 relay module boards can manage entire rooms or small buildings. These projects often incorporate web-based control interfaces or smartphone app integration for remote operation. Safety considerations are paramount when working with relay-controlled mains voltage systems, requiring proper electrical isolation and protective enclosures.
Wi-Fi Temperature and Environmental Monitoring
Environmental monitoring projects showcase the ESP8266’s ability to collect sensor data and transmit it wirelessly to cloud services or local databases. Temperature and humidity sensors like the DHT22 connect easily to ESP8266 GPIO pins, while the esp8266 wifi connectivity enables regular data uploads to services like ThingSpeak, Blynk, or custom web servers.
These projects often implement deep sleep functionality to extend battery life in remote monitoring applications. The ESP8266’s ultra-low power modes can reduce current consumption to microamperes, enabling months of operation on battery power while still providing regular data updates.
Smart Lighting and Display Projects
LED strip control and OLED display integration represent visually engaging ESP8266 projects that combine connectivity with immediate visual feedback. WS2812B addressable LED strips work excellently with ESP8266 modules, creating colorful lighting effects controllable through web interfaces or smartphone apps. The esp8266 wifi module arduino combination provides the processing power needed for complex lighting animations while maintaining Wi-Fi connectivity for remote control.
OLED display projects often combine local sensor readings with internet-sourced information like weather data or time synchronization. These projects demonstrate the ESP8266’s ability to function as both data collector and information display device, creating self-contained IoT solutions that provide immediate value to users.
Security and Monitoring Applications
IoT security projects leverage the ESP8266’s connectivity for remote monitoring and alert systems. Camera integration using ESP32-CAM modules (which extend ESP8266 concepts) creates wireless security cameras, while door/window sensors connected to ESP8266 modules can send instant notifications when security perimeters are breached.
Motion detection projects using PIR sensors connected to ESP8266 modules demonstrate how simple sensors can create sophisticated monitoring systems. These projects often incorporate email or SMS notifications, showcasing the ESP8266’s ability to integrate with various internet services and APIs.
The esp8266 wifi module arduino architecture excels in these applications due to its balance of processing capability and power efficiency. Security applications often require 24/7 operation while maintaining minimal power consumption, making the ESP8266’s sleep modes and wake-on-interrupt capabilities particularly valuable.
The wifi shield for arduino concept takes on new meaning with ESP8266 modules, as they provide not just connectivity but complete processing capability that can often replace traditional Arduino boards entirely. This integration simplifies project architectures while reducing cost and power consumption compared to separate microcontroller and Wi-Fi shield combinations.
ESP8266 vs. ESP32: Which Should You Choose?
The decision between ESP8266 and ESP32 depends on specific project requirements, with each platform offering distinct advantages for different types of IoT applications. Understanding these differences ensures optimal hardware selection for your development needs.
The ESP8266 excels in applications requiring basic Wi-Fi connectivity with minimal power consumption and cost. Its single-core architecture running at 80MHz provides sufficient processing power for sensor data collection, simple control logic, and web server operations. The ESP8266’s proven stability and extensive community support make it ideal for straightforward IoT projects where reliability and simplicity are priorities.
In contrast, the esp32 module platform offers significantly more processing power with its dual-core Xtensa LX6 processor running at up to 240MHz. The esp32 home automation applications benefit from this additional computational capability when handling multiple simultaneous tasks, complex algorithms, or real-time processing requirements. The ESP32’s Bluetooth Low Energy support adds connectivity options that ESP8266 cannot provide.
Memory differences between platforms significantly impact project capabilities. ESP8266 modules typically include 4MB of flash memory and limited RAM, sufficient for most IoT applications but constraining for data-intensive projects. ESP32 modules generally provide more flash memory options and substantially more RAM, enabling larger programs and more sophisticated data handling.
GPIO availability represents another crucial distinction. ESP8266 modules provide approximately 9-11 usable GPIO pins depending on the specific variant, while ESP32 modules offer 25+ GPIO pins with more diverse functionality including multiple ADC channels, DAC outputs, and specialized communication interfaces. Projects requiring numerous sensors or actuators often necessitate ESP32’s expanded I/O capabilities.
Power consumption patterns differ significantly between platforms. ESP8266 achieves lower deep sleep current consumption, making it superior for battery-powered applications requiring months or years of operation between battery replacements. ESP32’s higher performance comes with increased power requirements, though its advanced power management features can mitigate consumption in optimized applications.
Cost considerations often favor ESP8266 for price-sensitive applications. ESP8266 modules typically cost 30-50% less than equivalent ESP32 modules, making them attractive for large-scale deployments or educational projects with tight budgets. However, the ESP32’s additional capabilities may justify its higher cost in applications that can leverage its enhanced features.
The esp8266 esp32 decision ultimately depends on balancing project requirements against platform capabilities. Choose ESP8266 for simple, low-power, cost-effective Wi-Fi connectivity. Select ESP32 for projects requiring additional processing power, Bluetooth connectivity, extensive GPIO options, or future expandability. Both platforms maintain active development communities and comprehensive library support, ensuring long-term viability for either choice.
Interfacing with Arduino: ESP8266 as a Wi-Fi Shield
The ESP8266’s versatility extends beyond standalone operation to serving as a Wi-Fi module for traditional Arduino boards. This approach leverages the ESP8266’s connectivity capabilities while maintaining the familiar Arduino development environment and existing code bases.
Using arduino and esp8266 combinations typically involves connecting an ESP-01 module to Arduino Uno or Mega boards through serial communication. The esp arduino interface uses AT commands for basic operations like connecting to Wi-Fi networks, establishing TCP connections, and sending HTTP requests. This approach treats the ESP8266 as a peripheral device controlled by the Arduino’s main processor.
The esp 01s arduino connection requires careful attention to voltage levels, as ESP8266 modules operate at 3.3V while Arduino boards typically use 5V logic. Level shifters or voltage dividers ensure proper signal compatibility between platforms. The esp01s arduino interface uses the ESP8266’s UART pins for communication with the Arduino’s serial port or SoftwareSerial library.
More sophisticated arduino and nodemcu integrations involve custom firmware that provides enhanced functionality beyond basic AT commands. The nodemcu and arduino combination can implement specialized protocols, data preprocessing, or intelligent connection management that simplifies the Arduino’s programming requirements.
The nodemcu to arduino communication can occur through various interfaces including UART, SPI, or I2C depending on project requirements and available pins. The arduino node mcu integration often implements the ESP8266 as an intelligent I/O expander that handles Wi-Fi communication while the Arduino manages real-time control tasks.
Serial communication between arduino esp 01 combinations requires careful baud rate configuration and proper AT command formatting. The arduino uno wifi module concept using ESP8266 creates powerful IoT-enabled systems that combine Arduino’s extensive shield ecosystem with ESP8266’s connectivity capabilities.
Arduino mega wifi projects benefit from the Mega’s additional serial ports, allowing dedicated ESP8266 communication while maintaining debug output through the USB serial connection. This configuration simplifies development and troubleshooting compared to single-serial-port Arduino Uno implementations.
Custom firmware development for ESP8266 modules used as Arduino accessories can implement project-specific protocols that optimize performance and simplify Arduino programming. This approach requires ESP8266 development expertise but can create highly optimized solutions for specific applications.
Best Tools & Resources for ESP8266 Development
Successful ESP8266 development relies on selecting appropriate tools and resources that streamline the development process while providing reliable results. Understanding available options helps optimize your development workflow and project outcomes.
Arduino IDE remains the most accessible development environment for ESP8266 programming, offering familiar syntax and extensive library support. The ESP8266 Arduino Core provides comprehensive hardware abstraction while maintaining compatibility with existing Arduino libraries. This approach minimizes the learning curve for developers transitioning from traditional Arduino platforms.
PlatformIO represents a more advanced development environment that provides superior project management, library handling, and multi-platform support. PlatformIO’s intelligent build system and integrated debugging capabilities make it preferred by professional developers working on complex ESP8266 projects. The platform’s library manager simplifies dependency management compared to manual Arduino library installation.
ESPHome offers a YAML-based configuration approach that eliminates traditional programming for many IoT applications. This tool excels for home automation projects where standardized sensor and actuator configurations can be described declaratively rather than programmatically. ESPHome’s automatic OTA update capabilities and Home Assistant integration make it powerful for smart home deployments.
Essential libraries significantly expand ESP8266 capabilities beyond basic Arduino functions. The WiFiManager library provides captive portal functionality for easy network configuration without hardcoding credentials. PubSubClient enables MQTT communication for IoT messaging protocols, while ESPAsyncWebServer creates sophisticated web interfaces with minimal resource consumption.
Hardware tools facilitate reliable ESP8266 development and debugging. USB-to-TTL serial adapters enable programming and communication with ESP8266 modules that lack integrated USB connectivity. Quality breadboards and jumper wires ensure reliable prototype connections, while oscilloscopes and logic analyzers help debug timing-sensitive communication issues.
Flashing tools like esptool.py provide command-line firmware update capabilities essential for production deployment and advanced development workflows. GUI alternatives like ESP8266 Flash Download Tool offer user-friendly interfaces for firmware management and module configuration.
Development accessories enhance project reliability and debugging capabilities. External antennas improve Wi-Fi performance in challenging environments, while power supplies with current monitoring help optimize battery life in portable applications. Sensor breakout boards simplify prototyping while providing reliable connections for production deployment.
ESP8266 Pricing and Availability
Understanding ESP8266 pricing structures and sourcing options helps optimize project budgets while ensuring reliable component availability for both prototyping and production deployment.
ESP8266 price varies significantly based on module type, quantity, and supplier. Basic ESP-01 modules typically cost $2-4 in single quantities from major electronics distributors, while bulk purchases can reduce per-unit costs to under $1.50. These price points make ESP8266 modules extremely cost-effective for IoT applications compared to alternative connectivity solutions.
NodeMCU price ranges from $3-8 depending on version and supplier quality. Genuine NodeMCU boards from established manufacturers typically cost more than generic alternatives but offer better build quality and more reliable operation. The node mcu esp8266 price premium reflects the added value of integrated USB connectivity, voltage regulation, and breadboard-friendly form factors.
Development board pricing reflects the additional components and engineering required for user-friendly operation. Wemos D1 Mini boards typically cost $3-6, while more sophisticated development boards with advanced features may cost $8-15. These prices remain competitive compared to traditional microcontroller development boards while providing integrated Wi-Fi connectivity.
Bulk pricing becomes attractive for production deployments or educational institutions. Quantities of 100+ units often provide 20-40% discounts compared to single-unit pricing, while quantities of 1000+ units can achieve even greater savings. Direct supplier relationships may provide additional cost reductions for high-volume applications.
Availability varies by region and supplier, with major electronics distributors like DigiKey, Mouser, and element14 providing reliable stock and fast shipping for most ESP8266 variants. Chinese suppliers through platforms like AliExpress offer lower prices but longer shipping times and variable quality control.
Regional pricing differences can be significant, with North American and European markets typically showing higher prices than Asian markets. Shipping costs, import duties, and local taxes affect total project costs and should be considered in budget planning.
Troubleshooting and Common Errors
ESP8266 development occasionally presents challenges that can frustrate beginners and experienced developers alike. Understanding common issues and their solutions accelerates project development and reduces debugging time.
Flashing failures represent the most common ESP8266 development obstacle. These issues typically result from incorrect boot mode selection, inadequate power supply, or improper serial connection. ESP8266 modules must enter programming mode through specific GPIO pin configurations during power-up or reset. GPIO0 must be pulled low while GPIO2 remains high during programming mode entry.
Power supply problems cause numerous mysterious ESP8266 behaviors including boot failures, Wi-Fi connection issues, and random resets. ESP8266 modules require stable 3.3V power with sufficient current capability – typically 200mA continuous with 400mA peak current during Wi-Fi transmission. USB ports from computers often cannot provide adequate current, necessitating dedicated power supplies for reliable operation.
Serial communication issues frequently arise from incorrect baud rate settings, inadequate level shifting, or unreliable connections. ESP8266 modules communicate at 3.3V logic levels, requiring proper level conversion when interfacing with 5V Arduino boards. Connection integrity becomes critical at higher baud rates, with loose breadboard connections causing intermittent communication failures.
Arduino IDE board detection problems often result from missing or incorrect USB drivers, improper board selection, or COM port conflicts. Windows systems frequently require manual driver installation for USB-to-serial chips used on ESP8266 development boards. Board selection must match the specific ESP8266 variant being programmed, as different modules require different memory and GPIO configurations.
Wi-Fi connection failures can result from network compatibility issues, power supply inadequacy, or antenna problems. ESP8266 modules support only 2.4GHz Wi-Fi networks and may have difficulty with some enterprise network configurations. Antenna placement and orientation significantly affect Wi-Fi performance, particularly with modules using ceramic chip antennas.
Memory-related errors often manifest as random crashes or boot failures in larger programs. ESP8266’s limited RAM requires careful memory management, particularly when using large libraries or processing substantial data. String handling requires special attention, as dynamic memory allocation can fragment the limited heap space.
Conclusion & Final Thoughts
The ESP8266 continues to reign as the king of affordable Wi-Fi IoT connectivity, maintaining its position as the preferred platform for makers, educators, and professionals developing connected devices. Its remarkable combination of functionality, reliability, and cost-effectiveness has democratized IoT development and enabled countless innovations that were previously economically unfeasible.
Throughout this comprehensive guide, we’ve explored the ESP8266’s versatility across numerous modules and development boards, each optimized for specific applications and use cases. From the compact ESP-01 perfect for space-constrained retrofits to the developer-friendly NodeMCU boards ideal for prototyping and education, the ESP8266 ecosystem provides solutions for virtually every Wi-Fi IoT requirement.
The platform’s strength lies not just in its technical capabilities but in its accessible development environment and vibrant community support. The Arduino IDE integration has lowered barriers to entry while maintaining access to advanced features for sophisticated applications. This accessibility, combined with extensive documentation and project examples, ensures that developers of all skill levels can successfully implement ESP8266-based solutions.
As IoT continues evolving toward edge computing and more sophisticated applications, the ESP8266 maintains relevance through its proven reliability and power efficiency. While newer platforms like ESP32 offer additional capabilities, many IoT applications require only the core functionality that ESP8266 provides excellently. The platform’s maturity and stability make it particularly valuable for production deployments where reliability outweighs cutting-edge features.
For developers beginning their IoT journey, experimenting with different ESP8266 modules provides invaluable hands-on experience with the fundamental concepts underlying all connected device development. The skills and knowledge gained through ESP8266 projects translate directly to more advanced platforms while providing a solid foundation in wireless communication, sensor integration, and cloud connectivity.
The future of ESP8266 development looks bright, with continued community support, regular Arduino Core updates, and expanding library ecosystem ensuring long-term viability. Whether you’re building your first Wi-Fi temperature sensor or deploying a fleet of industrial monitoring devices, the ESP8266 provides the reliable, cost-effective connectivity foundation your projects need to succeed.
Frequently Asked Questions
What’s the difference between ESP8266 and NodeMCU? ESP8266 refers to the microcontroller chip itself, while NodeMCU is a development board that incorporates the ESP8266 chip along with USB connectivity, voltage regulation, and a breadboard-friendly form factor. NodeMCU makes ESP8266 development more accessible by eliminating the need for external components and complex wiring.
Can ESP8266 work with Arduino? Yes, ESP8266 works excellently with Arduino IDE through the ESP8266 Arduino Core package. This integration provides familiar Arduino programming syntax while accessing ESP8266-specific features like Wi-Fi connectivity. ESP8266 can also function as a Wi-Fi module for traditional Arduino boards through serial communication.
Is ESP8266 good for home automation? ESP8266 is exceptional for home automation applications due to its Wi-Fi connectivity, low cost, and adequate processing power for typical smart home tasks. Its ability to control relays, read sensors, and communicate with cloud services makes it ideal for DIY home automation projects ranging from simple switch control to comprehensive monitoring systems.
How much does an ESP8266 cost? ESP8266 module costs vary from $1.50-4 for basic ESP-01 modules to $3-8 for development boards like NodeMCU or Wemos D1 Mini. Bulk quantities provide significant discounts, with 1000+ unit orders often achieving sub-$1 pricing for basic modules. Development boards cost more due to additional components but provide greater convenience.
What is the best ESP8266 module for beginners? NodeMCU or Wemos D1 Mini represent the best ESP8266 options for beginners due to their integrated USB connectivity, voltage regulation, and breadboard compatibility. These boards eliminate the complexity of external components while providing easy programming and reliable operation, making them ideal starting points for ESP8266 development.