The world of printed circuit boards (PCBs) is a vast and complex one, with many types and components that each have a particular purpose. A typical example of this is the V-groove PCB, which involves carving a V-shaped groove into the board, usually to stabilize the placement of resistors and capacitors. A V-Groove PCB can initially seem challenging, but it can be easier with the appropriate instructions. This article will explore the advantages of V-Groove PCBs and the variables that impact their thickness, in addition to offering a comprehensive and simple tutorial for making them.
What is a V-Groove PCB?
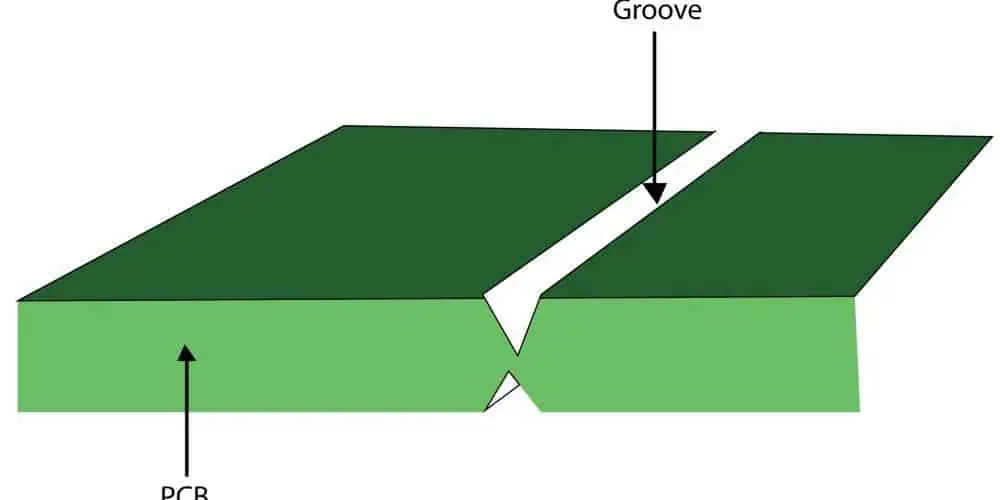
V Groove PCBs are a particular kind of Printed Circuit Board (PCB) created by carving a V-shaped groove out of the board. Components like capacitors and resistors typically hold in place by this groove. Soldering the components onto the board is easy using the cut-out groove, which also serves as a secure connecting point for them.
Rules for manufacturing the V-Groove PCB
You must ensure that you satisfy the following conditions for your V-scoring process to be successful:
- The V-scoring line has to be perfectly straight and uninterrupted. The complete panel’s dimensions should range from 75mm by 75mm to 450mm by 1245mm. Additionally, the V-cut line must be the same as the board outline, and there must be a 0mm gap between individual sub-boards. The distance between the V-cut line and the outline, or the minimum breakaway rail, is 5.0mm. The typical V-scoring angle is 30 degrees. Only when the board thickness is larger than 0.6mm do we advise utilizing V-scoring. One-sided V-scoring is preferable when the board thickness is under 0.6mm.
- Place tall components and parts with extensive connection areas further away from the V-cut line. This action will help to protect them from harm throughout the V-scoring procedure.
- It is crucial to ensure the V-score line is straight and in the exact location on each board. This is because the boards might not split properly in the alternative.
- Use a clean, flat surface for the V-scoring procedure. The board could fail to separate appropriately if debris or dust is on the surface.
- Ensure that you carry out the V-scoring procedure in a well-ventilated room. If breathed in, the dust produced during the operation may be dangerous.
- Use a high-pressure machine to perform the V-scoring operation. This aspect will guarantee that the boards divide correctly and that the V-score line is deep enough.
- It’s crucial to check each board after the V-scoring procedure is complete to ensure it took place correctly.
How to Make a V-Groove PCB

The following steps will enable you easily make a V-Groove PCB:
- First, create a schematic diagram: The V-groove PCB’s diagram shows the connections between the electrical parts and components graphically. Software for circuit design, such as KiCad or Eagle, can help in this. The schematic should list every component required for the circuit and their values and connections.
- Layout: Once you have created the schematic diagram, design the PCB. Making a physical copy of the schematic is necessary for this. Trace routing, component placement, and the required drill holes should all be part of the plan. It should also incorporate extra features like solder paste layers, masks, and silk screening. PCB layouts can be easily made with layout programs like KiCad or Eagle.
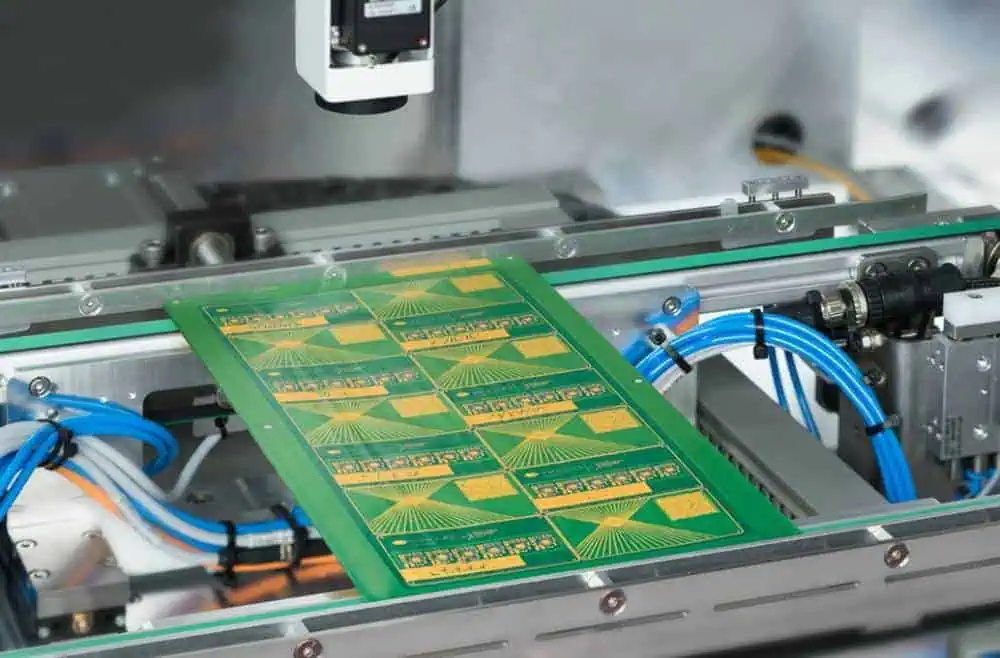
- Printing the PCB: After the PCB layout is complete, you can use it to print a copper-clad board. A laser printer or a printer made expressly for producing PCBs can be helpful in this. All required parts, their connections, and drill holes should be on the printed board.
- Trace Etching: Following the printing of the PCB, the traces need etching. This etching is easy after coating the copper-clad board with a chemical solution that removes the extra copper. There are available specialized etching machines that can help quickly etch the traces.
- Assembling the Components: Following the etching of the traces, now proceed to assemble and mount the components on the board. This entails attaching the parts, such as resistors and capacitors, to the board using solder. It also entails mounting any extra parts, including connectors or switches.
- Routing: Routing the traces helps finish a V-groove PCB. To accomplish this, route the traces between the components using specialized routing tools. Please do the routing carefully to reduce the chance of crosstalk or interference. It is also vital to verify the traces to link correctly.
Benefits of V-Groove PCBs
V-groove PCBs offer several advantages over traditional PCBs, including:
1. Increased Time Efficiency: V-scoring is a rapid and effective method that takes little time to separate various sections from an assembled whole. This efficiency helps limit the amount of effort and labor required, as well as production time and cost.
2. Cost Savings: By creating numerous boards on a single PCB, V-scoring is a cost-effective manufacturing method that helps lower production costs. Manufacturing has become more inexpensive and a feasible choice for enterprises as a result of the huge reduction in cost.
3. Compact Design: V-scoring makes it possible to fit multiple circuits through a single assembly, which facilitates precision subassembly. Handling and transportation are simpler due to the increased efficiency and compactness of the assembly.
4. Simple Maintenance: V-scoring tools are affordable and require little upkeep. They become less time and effort-intensive to use and maintain as a result.
5. Greater Accuracy: V-scoring aids in the exact cutting and division of various sections. This feature ensures excellent accuracy, making it simpler to get the required results.
6, Versatility: V-scoring applies to multiple materials, including copper, aluminum, and other alloys. This flexibility makes it a more adaptable and affordable instrument.
7. Space Efficiency: V-scoring makes better use of a PCB surface. This aspect makes it simpler to utilize every square foot of space by helping to build a more effective and efficient space.
Factors That Affect the Thickness of a V-Groove in a PCB
The following are the factors that determine the thickness of any PCB’s V-Groove:
1. Size and Weight
The thickness of a V-groove on a printed circuit board (PCB) will depend on its size and weight. The V-groove will thicken as the board’s weight rises since the board will have to support the added weight. In contrast, as the board material must be strengthened to withstand the load, the V-groove will get thinner as the board size lowers. The number of layers in the PCB will also impact the thickness of the V-groove. The V-groove will thicken as more layers are added to support the extra weight.
2. The thickness of the copper
In a PCB, the V-groove thickness depends on the copper’s thickness. For the V-grooves to sustain the added weight of the heavier copper layers, they must be thicker. The board’s ability to transport current and its overall electrical performance depends on the copper’s thickness. More current may flow safely as copper thickness rises, improving electrical performance.
3. Board Materials
The V-thickness grooves also depend on the board material used in a PCB. Thermo- and electrical conductivity, strength, and weight are the only characteristics that differ between board materials. The board’s material must be durable enough to handle the weight of the board and all of its parts and thick enough to allow efficient thermal and electrical conductivity. Therefore, v-grooves must have a specific thickness for each type of board material to sustain the additional weight and offer the necessary electrical performance.
Conclusion
V-Groove PCBs are a superior, more economical, and cost-effective option to conventional PCBs. Engineers and designers can benefit from the various advantages of a V-Groove PCB by understanding the prerequisites, components, and processes. It is not surprising that V-Groove PCBs are rising in popularity in the industry, given their compact, quick, and precise design. You may quickly and easily develop a V-Groove PCB that is ideal for your design demands if you have the necessary information, abilities, and tools.