Soldermask is a thin layer of polymer applied to printed circuit boards (PCBs) to protect the copper traces from oxidation and prevent solder bridges between closely spaced solder pads. While soldermask is crucial for most PCB applications, there are instances where its removal becomes necessary. This comprehensive guide will explore various methods, tools, and precautions for removing soldermask from PCBs effectively and safely.
Understanding Soldermask
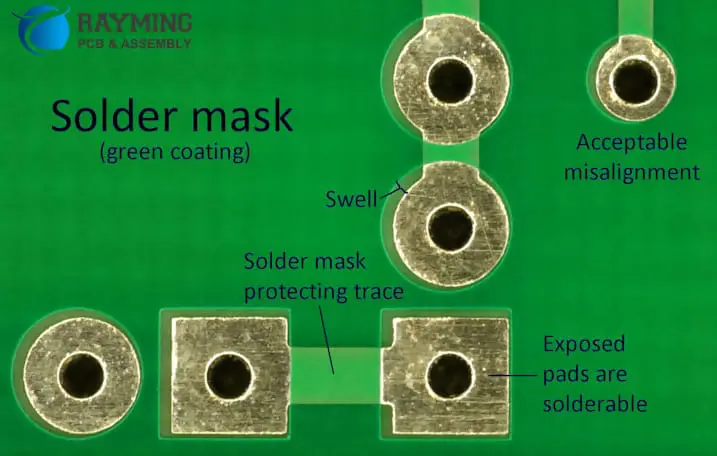
What is Soldermask?
Soldermask, also known as solder resist, is a thin layer of polymer applied to the copper traces of a PCB. Its primary functions include:
- Protecting copper traces from oxidation
- Preventing solder bridges between adjacent pads
- Improving the board’s appearance
- Providing electrical insulation
Types of Soldermask
| Type | Characteristics | Common Applications |
| Liquid Photoimageable (LPI) | UV-curable, high resolution | Most commercial PCBs |
| Dry Film | Pre-formed film, uniform thickness | High-end PCBs, flexible circuits |
| Epoxy-based | Heat-curable, durable | Industrial and military applications |
| Acrylic-based | Fast curing, flexible | Consumer electronics |
Reasons for Removing Soldermask
Common Scenarios
- Repair and rework of PCBs
- Modification of existing circuits
- Improving electrical connections
- Exposing copper for grounding purposes
- Reverse engineering
Considerations Before Removal
- Necessity of removal
- Extent of removal (partial or complete)
- PCB material and soldermask type
- Available tools and equipment
- Safety precautions
Methods for Removing Soldermask
Mechanical Removal
Scraping
- Use a sharp craft knife or scalpel
- Gently scrape the soldermask layer
- Be careful not to damage underlying copper
Pros:
- Simple and inexpensive
- Precise control over removal area
Cons:
- Time-consuming for large areas
- Risk of damaging copper traces
Sanding
- Use fine-grit sandpaper (400-600 grit)
- Gently sand the soldermask in circular motions
- Clean debris with compressed air or brush
Pros:
- Effective for larger areas
- Relatively quick
Cons:
- Less precise than scraping
- May thin copper layer if not careful
Chemical Removal
Soldermask Remover Solutions
- Apply commercial soldermask remover
- Allow to sit for recommended time
- Scrub gently with a soft brush
- Rinse thoroughly with water
- Neutralize if required
Pros:
- Effective for large areas
- Less risk of mechanical damage
Cons:
- Chemical exposure risks
- May affect other components
Acetone or Paint Stripper
- Apply acetone or paint stripper to a cloth
- Rub gently on soldermask area
- Repeat until soldermask is removed
- Clean thoroughly with isopropyl alcohol
Pros:
- Readily available materials
- Effective on some soldermask types
Cons:
- May not work on all soldermask types
- Can potentially damage certain PCB materials
Thermal Removal
Heat Gun Method
- Set heat gun to appropriate temperature (300-400°C)
- Apply heat evenly to soldermask area
- Scrape softened soldermask with a plastic tool
- Clean residue with isopropyl alcohol
Pros:
- Effective for stubborn soldermask
- Can cover larger areas quickly
Cons:
- Risk of overheating and damaging board
- Requires careful temperature control
Soldering Iron Method
- Set soldering iron to medium-high temperature
- Gently rub the iron tip over soldermask
- Scrape away softened soldermask
- Clean area with isopropyl alcohol
Pros:
- Precise control for small areas
- Common tool in most electronics workshops
Cons:
- Time-consuming for large areas
- Risk of overheating nearby components
Laser Removal
- Use a laser engraving machine with appropriate settings
- Program the area for soldermask removal
- Run the laser removal process
- Clean the area with compressed air and alcohol
Pros:
- Highly precise and controllable
- Minimal risk of mechanical damage
Cons:
- Expensive equipment required
- Learning curve for proper settings
Tools and Materials
| Tool | Purpose |
| Craft knife or scalpel | Scraping and precision removal |
| Fine-grit sandpaper | Larger area removal |
| Heat gun | Thermal removal method |
| Soldering iron | Precision thermal removal |
| Plastic scraper | Removing softened soldermask |
| Soft-bristled brush | Cleaning and scrubbing |
Essential Tools
Materials
- Isopropyl alcohol
- Acetone (for some methods)
- Commercial soldermask remover
- Safety equipment (gloves, goggles, mask)
- Lint-free cloths
- Compressed air canister
Step-by-Step Guide to Soldermask Removal
Preparation
- Identify the area for soldermask removal
- Choose the appropriate method based on area size and PCB characteristics
- Gather necessary tools and materials
- Set up a well-ventilated workspace
- Put on safety equipment
Removal Process
For Mechanical Removal:
- Start with the gentlest method (scraping)
- Gradually increase pressure or move to sanding if necessary
- Frequently clean the area to monitor progress
- Be extra cautious around delicate traces and components
For Chemical Removal:
- Apply chemical remover according to manufacturer’s instructions
- Allow proper dwell time
- Gently scrub with a soft brush
- Rinse thoroughly and neutralize if required
- Repeat if necessary
For Thermal Removal:
- Set equipment to appropriate temperature
- Apply heat evenly to the target area
- Use plastic scraper to remove softened soldermask
- Clean area thoroughly after removal
Post-Removal Cleanup
- Inspect the area for complete soldermask removal
- Clean thoroughly with isopropyl alcohol
- Use compressed air to remove any debris
- Inspect copper traces for any damage
- Apply conformal coating if leaving copper exposed
Safety Precautions
General Safety
- Work in a well-ventilated area
- Wear appropriate personal protective equipment (PPE)
- Keep a first aid kit nearby
- Be aware of fire hazards when using thermal methods
Chemical Safety
- Read and follow all material safety data sheets (MSDS)
- Use chemical-resistant gloves
- Avoid skin contact or inhalation of fumes
- Have an eyewash station or sink nearby
Electrical Safety
- Disconnect PCB from power sources before working
- Be cautious of static electricity when handling sensitive components
- Use ESD-safe tools and workspace when necessary
Best Practices and Tips
- Always start with the least aggressive method
- Test the chosen method on a small, non-critical area first
- Take frequent breaks to avoid fatigue-induced mistakes
- Keep tools clean and in good condition
- Document the process, especially for complex boards
- Consider professional services for critical or valuable PCBs
Environmental Considerations
Proper Disposal
- Dispose of chemical waste according to local regulations
- Recycle PCB scrap when possible
- Use environmentally friendly cleaning products when available
Minimizing Waste
- Remove only as much soldermask as necessary
- Use precision tools to minimize overspray or excess removal
- Reuse cleaning cloths when possible
Alternatives to Soldermask Removal
When to Consider Alternatives
- If removal risks damaging the PCB
- When only temporary access is needed
- If full removal is not necessary for the task
Alternative Approaches
- Using conductive paint for small connections
- Careful drilling for via access
- Adding new traces or jumper wires
- Using press-fit hardware for grounding points
Reapplying Soldermask
When to Reapply
- After completing necessary modifications
- To protect exposed copper from oxidation
- When restoring board to original specifications
Reapplication Methods
- UV-curable liquid soldermask
- Epoxy-based soldermask pens
- Aerosol soldermask sprays
Troubleshooting Common Issues
| Issue | Possible Cause | Solution |
| Incomplete removal | Insufficient time or pressure | Repeat process or try a more aggressive method |
| Damage to copper traces | Excessive force or heat | Use gentler techniques, consider professional repair |
| Chemical residue | Inadequate cleaning | Thorough cleaning with appropriate solvents |
| Uneven removal | Inconsistent technique | Practice on scrap boards, use guides for evenness |
| Soldermask not softening | Wrong removal method for type | Research soldermask type and choose appropri |
Conclusion
Removing soldermask from PCBs is a delicate process that requires careful consideration of the board’s characteristics, the reason for removal, and the available tools and methods. By following the techniques outlined in this guide and adhering to safety precautions, you can successfully remove soldermask when necessary. Remember to always start with the least aggressive method and prioritize the integrity of the PCB and its components throughout the process.
Frequently Asked Questions
Q1: Can I remove soldermask from a populated PCB?
A1: While it’s possible, it’s generally not recommended to remove soldermask from a populated PCB due to the risk of damaging components. If necessary, use extreme caution, opt for precise methods like careful scraping or chemical removal, and protect surrounding components with masking tape or conformal coating. Consider desoldering sensitive components before soldermask removal if possible.
Q2: How do I identify the type of soldermask on my PCB?
A2: Identifying the exact type can be challenging without specialized equipment, but you can make educated guesses based on appearance and board origin. Green LPI soldermask is most common in commercial PCBs. Glossy finishes often indicate epoxy-based masks, while matte finishes might be acrylic. For precise identification, consult the PCB manufacturer or consider sending a sample for analysis if critical.
Q3: Is it safe to use a laser engraver for soldermask removal?
A3: Laser engraving can be an effective and precise method for soldermask removal, but it requires proper equipment and expertise. Use a laser engraver designed for PCB work, ensure proper ventilation due to fumes, and carefully calibrate power and speed settings to avoid damaging the underlying copper or FR-4 substrate. Always start with conservative settings and test on a non-critical area first.
Q4: How do I remove soldermask from flexible PCBs?
A4: Flexible PCBs require extra care due to their delicate nature. Chemical methods are often preferred, using solvents specifically designed for flexible PCB soldermask. Mechanical methods risk damaging the flexible substrate. If using thermal methods, use very low temperatures and be extremely cautious. Always support the flexible PCB on a flat surface during the removal process to prevent bending or stress.
Q5: Can soldermask removal affect the PCB’s electrical characteristics?
A5: Yes, removing soldermask can potentially affect a PCB’s electrical characteristics, especially in high-frequency applications. Soldermask acts as a dielectric layer and its removal can change impedance characteristics, increase susceptibility to noise, and potentially lead to short circuits if conductive debris bridges traces. After removal, consider applying a conformal coating to protect exposed copper and maintain some of the electrical isolation properties.