Introduction
In the rapidly evolving world of IoT and embedded systems, the ESP32 microcontroller has emerged as a powerful and versatile platform for developers. This comprehensive guide will take you through the intricacies of ESP32 programming, covering everything from the basics to advanced topics, ensuring you’re well-equipped to tackle any ESP32 project.
What is ESP32?
The ESP32 is a series of low-cost, low-power system on a chip (SoC) microcontrollers with integrated Wi-Fi and dual-mode Bluetooth capabilities. Developed by Espressif Systems, the ESP32 has become a go-to choice for IoT and embedded projects due to its robust features and affordable price point.
Why Learn ESP32 Programming?
- Versatility: ESP32 can be used in a wide range of applications, from home automation to industrial IoT.
- Cost-effective: ESP32 modules are incredibly affordable, making them accessible for hobbyists and professionals alike.
- Rich feature set: With built-in Wi-Fi, Bluetooth, and numerous peripherals, ESP32 is a complete solution for many projects.
- Strong community support: A vast ecosystem of libraries, forums, and resources is available for ESP32 developers.
- Future-proof skills: As IoT continues to grow, expertise in ESP32 programming will remain valuable.
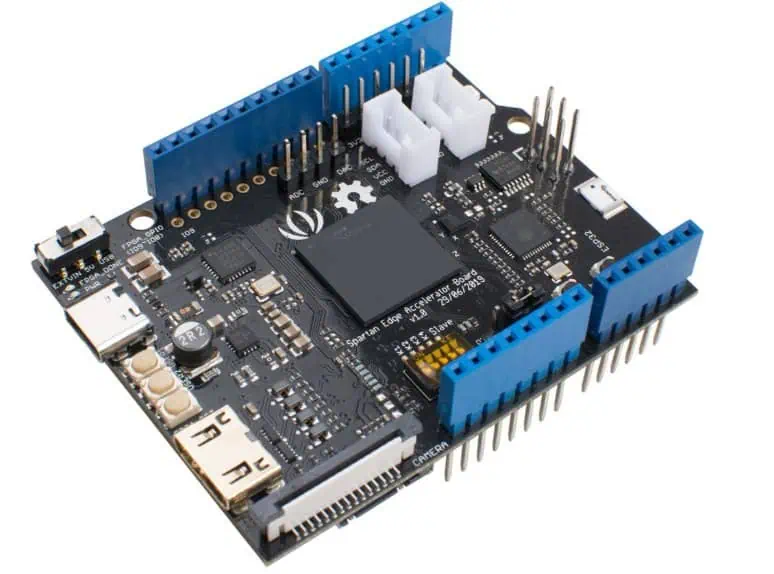
Overview of ESP32 Family: ESP32-C3, S3, WROOM, CAM Modules
The ESP32 family includes several variants, each tailored for specific use cases:
- ESP32-C3: A cost-effective, RISC-V based variant with Wi-Fi and Bluetooth LE support.
- ESP32-S3: High-performance variant with AI acceleration capabilities.
- ESP32-WROOM: The classic module with a wide range of I/O options.
- ESP32-CAM: Integrated camera module for vision-based projects.
Tools You Need for ESP32 Development
To get started with ESP32 programming, you’ll need:
- An ESP32 development board
- Micro-USB cable
- Computer (Windows, macOS, or Linux)
- Arduino IDE or ESP-IDF (Espressif IoT Development Framework)
- ESP32 add-on for Arduino IDE

Chapter 1: Getting Started with ESP32
ESP32 Features and Specifications
The ESP32 boasts an impressive set of features:
- Dual-core or single-core Tensilica LX6 microprocessor
- Up to 240 MHz clock frequency
- 520 KB SRAM
- Integrated 2.4 GHz Wi-Fi and Bluetooth
- Rich set of peripherals: ADC, DAC, I²C, SPI, UART, etc.
- Ultra-low power consumption with multiple power modes
ESP32 Variants Explained (C3, S3, WROOM, CAM)
- ESP32-C3:
- RISC-V single-core processor
- Bluetooth LE 5.0
- Ideal for cost-sensitive applications
- ESP32-S3:
- Dual-core processor
- AI acceleration
- USB OTG support
- Perfect for AI-enabled IoT devices
- ESP32-WROOM:
- Classic ESP32 module
- Dual-core processor
- Extensive I/O options
- Suitable for a wide range of applications
- ESP32-CAM:
- Integrated OV2640 camera
- MicroSD card support
- Ideal for computer vision projects
Setting Up Your Development Environment
Installing Arduino IDE
- Visit the Arduino website and download the latest version for your operating system.
- Install the Arduino IDE following the on-screen instructions.
Adding ESP32 Board Support in Arduino IDE
- Open Arduino IDE
- Go to File > Preferences
- In “Additional Board Manager URLs”, add:
https://dl.espressif.com/dl/package_esp32_index.json - Click OK
- Go to Tools > Board > Boards Manager
- Search for “ESP32” and install the “ESP32 by Espressif Systems” package
Choosing the Right Board and Port
- Connect your ESP32 board to your computer via USB
- In Arduino IDE, go to Tools > Board and select your specific ESP32 board
- Go to Tools > Port and select the COM port associated with your ESP32
Chapter 2: ESP32 Basics: Your First Program
Flashing Your First Sketch: “Hello World” (Blink LED)
Let’s start with the classic “Blink” program to ensure everything is set up correctly:
const int LED_PIN = 2;  // Most ESP32 boards have an onboard LED on GPIO 2

void setup() {
  pinMode(LED_PIN, OUTPUT);
}

void loop() {
  digitalWrite(LED_PIN, HIGH);
  delay(1000);
  digitalWrite(LED_PIN, LOW);
  delay(1000);
}
Upload this sketch to your ESP32. You should see the onboard LED blinking every second.
Understanding ESP32 Pinouts
ESP32 pinouts vary depending on the specific module. However, some general guidelines apply:
- GPIO pins are multi-functional and can be configured for various purposes.
- Some pins have specific functions (e.g., ADC, DAC, touch sensors).
- Be aware of strapping pins (GPIO 0, 2, 4, 5, 12, 15) which affect boot mode.
How to Use the Serial Monitor
The Serial Monitor is crucial for debugging and communication:
- Add
Serial.begin(115200);in yoursetup()function. - Use
Serial.println("Your message");to print messages. - Open the Serial Monitor (Tools > Serial Monitor) and set the baud rate to 115200.
Common ESP32 Errors and How to Fix Them
- Failed to connect to ESP32: Ensure the correct board and port are selected.
- Brownout detector was triggered: Check your power supply; ESP32 needs a stable 3.3V.
- ESP32 timed out waiting for packet header: Press the boot button while uploading.
Chapter 3: Deep Dive into ESP32 Programming
Digital Input and Output
ESP32 offers numerous GPIO pins for digital I/O. Here’s a simple example:
const int BUTTON_PIN = 4;
const int LED_PIN = 2;
void setup() {
pinMode(BUTTON_PIN, INPUT_PULLUP);
pinMode(LED_PIN, OUTPUT);
}
void loop() {
if (digitalRead(BUTTON_PIN) == LOW) {
digitalWrite(LED_PIN, HIGH);
} else {
digitalWrite(LED_PIN, LOW);
}
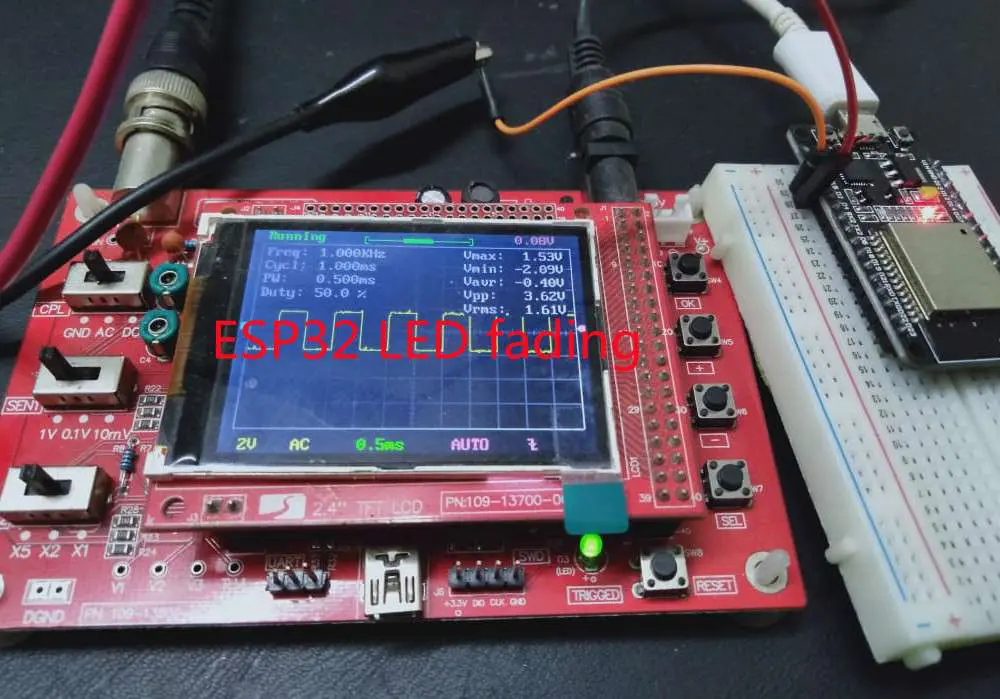
}PWM (Pulse Width Modulation)
ESP32 supports PWM on many pins. Here’s how to create a fading LED:
const int LED_PIN = 2;
const int FREQ = 5000;
const int LED_CHANNEL = 0;
const int RESOLUTION = 8;

void setup() {
  ledcSetup(LED_CHANNEL, FREQ, RESOLUTION);
  ledcAttachPin(LED_PIN, LED_CHANNEL);
}

void loop() {
  for (int dutyCycle = 0; dutyCycle <= 255; dutyCycle++) {
    ledcWrite(LED_CHANNEL, dutyCycle);
    delay(15);
  }
  for (int dutyCycle = 255; dutyCycle >= 0; dutyCycle--) {
    ledcWrite(LED_CHANNEL, dutyCycle);
    delay(15);
  }
}
ADC (Analog to Digital Conversion)
ESP32 has multiple ADC channels. Here’s how to read an analog value:
const int ANALOG_PIN = 34;

void setup() {
  Serial.begin(115200);
  analogReadResolution(12);  // Set ADC resolution to 12 bits
}

void loop() {
  int adcValue = analogRead(ANALOG_PIN);
  Serial.println(adcValue);
  delay(1000);
}
DAC (Digital to Analog Conversion)
ESP32 has two 8-bit DAC channels on GPIO 25 and 26:
const int DAC_PIN = 25;

void setup() {
  // DAC doesn't need setup
}

void loop() {
  for (int value = 0; value <= 255; value++) {
    dacWrite(DAC_PIN, value);
    delay(15);
  }
}
Touch Sensor Programming
ESP32 has built-in capacitive touch sensors:
cpp复制const int TOUCH_PIN = T0;  // GPIO 4

void setup() {
  Serial.begin(115200);
}

void loop() {
  int touchValue = touchRead(TOUCH_PIN);
  Serial.println(touchValue);
  delay(1000);
}
Read more about:
Chapter 4: Communication Protocols with ESP32
UART Communication (Serial Communication)
ESP32 supports multiple UART interfaces. Here’s a basic example:
void setup() {
  Serial.begin(115200);  // Default UART0
  Serial2.begin(9600, SERIAL_8N1, 16, 17);  // UART2 on pins 16 (RX) and 17 (TX)
}

void loop() {
  if (Serial2.available()) {
    char c = Serial2.read();
    Serial.write(c);  // Echo received data to Serial Monitor
  }
}
I2C Communication (Connecting Sensors and Modules)
I2C is widely used for connecting sensors. Here’s how to set up I2C:
#include <Wire.h>

void setup() {
  Wire.begin(21, 22);  // SDA on GPIO 21, SCL on GPIO 22
  Serial.begin(115200);
}

void loop() {
  Wire.beginTransmission(0x68);  // Example I2C address
  Wire.write(0x00);  // Register address
  Wire.endTransmission(false);

  Wire.requestFrom(0x68, 1);
  if (Wire.available()) {
    byte data = Wire.read();
    Serial.println(data);
  }
  delay(1000);
}
SPI Communication (Faster Peripheral Communication)
SPI is used for high-speed communication with peripherals:
#include <SPI.h>

const int CS_PIN = 5;

void setup() {
  SPI.begin();
  pinMode(CS_PIN, OUTPUT);
  digitalWrite(CS_PIN, HIGH);
}

void loop() {
  digitalWrite(CS_PIN, LOW);
  SPI.transfer(0x55);  // Example data
  digitalWrite(CS_PIN, HIGH);
  delay(1000);
}
Using Wi-Fi: Basics and First Wi-Fi Project
Let’s create a simple Wi-Fi client that connects to a network:
#include <WiFi.h>

const char* ssid = "YourWiFiSSID";
const char* password = "YourWiFiPassword";

void setup() {
  Serial.begin(115200);
  WiFi.begin(ssid, password);

  while (WiFi.status() != WL_CONNECTED) {
    delay(1000);
    Serial.println("Connecting to WiFi...");
  }

  Serial.println("Connected to WiFi");
  Serial.print("IP Address: ");
  Serial.println(WiFi.localIP());
}

void loop() {
  // Your Wi-Fi-related code here
}
Chapter 5: ESP32-C3 and S3 Specific Programming

Key Differences in Programming ESP32-C3 and S3
- ESP32-C3:
- RISC-V architecture (different from classic ESP32)
- Limited GPIO pins
- Bluetooth LE 5.0 support
- ESP32-S3:
- Dual-core Xtensa LX7 processor
- Enhanced security features
- USB OTG support
- AI acceleration capabilities
Programming with ESP-IDF vs Arduino IDE
While Arduino IDE offers simplicity, ESP-IDF provides more control and access to advanced features:
- Arduino IDE:
- Easier for beginners
- Extensive library support
- Limited access to some ESP32-specific features
- ESP-IDF:
- Full access to ESP32 capabilities
- Better performance optimization
- Steeper learning curve
Working with BLE (Bluetooth Low Energy) on ESP32-C3
Here’s a basic BLE server example for ESP32-C3:
#include <BLEDevice.h>
#include <BLEServer.h>
#include <BLEUtils.h>
#include <BLE2902.h>

BLEServer* pServer = NULL;
BLECharacteristic* pCharacteristic = NULL;
bool deviceConnected = false;

class MyServerCallbacks : public BLEServerCallbacks {
    void onConnect(BLEServer* pServer) {
      deviceConnected = true;
    };

    void onDisconnect(BLEServer* pServer) {
      deviceConnected = false;
    }
};

void setup() {
  Serial.begin(115200);

  BLEDevice::init("ESP32-C3");
  pServer = BLEDevice::createServer();
  pServer->setCallbacks(new MyServerCallbacks());

  BLEService *pService = pServer->createService(BLEUUID("4fafc201-1fb5-459e-8fcc-c5c9c331914b"));
  pCharacteristic = pService->createCharacteristic(
                      BLEUUID("beb5483e-36e1-4688-b7f5-ea07361b26a8"),
                      BLECharacteristic::PROPERTY_READ |
                      BLECharacteristic::PROPERTY_WRITE
                    );

  pService->start();
  BLEAdvertising *pAdvertising = BLEDevice::getAdvertising();
  pAdvertising->addServiceUUID(pService->getUUID());
  pAdvertising->setScanResponse(false);
  pAdvertising->setMinPreferred(0x0);
  BLEDevice::startAdvertising();
  Serial.println("Waiting for a client connection to notify...");
}

void loop() {
  if (deviceConnected) {
    pCharacteristic->setValue("Hello from ESP32-C3");
    pCharacteristic->notify();
    delay(1000);
  }
}
USB-OTG Programming on ESP32-S3
ESP32-S3 supports USB OTG, allowing it to act as a USB device or host. Here’s a simple USB Serial example:
cpp复制#include "USB.h"
#include "USBCDC.h"

USBCDC USBSerial;

void setup() {
  USB.begin();
  USBSerial.begin();
  Serial.begin(115200);
}

void loop() {
  if (USBSerial.available()) {
    String received = USBSerial.readStringUntil('\n');
    Serial.println("Received: " + received);
    USBSerial.println("You sent: " + received);
  }
}
Chapter 6: Advanced ESP32 Programming Topics
Multi-Tasking with FreeRTOS on ESP32
ESP32 supports FreeRTOS, allowing for true multitasking. Here’s an example of creating two tasks:
#include <Arduino.h>

void Task1(void *pvParameters) {
  while (1) {
    Serial.println("Task 1 running");
    vTaskDelay(1000 / portTICK_PERIOD_MS);
  }
}

void Task2(void *pvParameters) {
  while (1) {
    Serial.println("Task 2 running");
    vTaskDelay(2000 / portTICK_PERIOD_MS);
  }
}

void setup() {
  Serial.begin(115200);

  xTaskCreate(
    Task1,    // Function to implement the task
    "Task1",  // Name of the task
    10000,    // Stack size in words
    NULL,     // Task input parameter
    1,        // Priority of the task
    NULL      // Task handle
  );

  xTaskCreate(
    Task2,    // Function to implement the task
    "Task2",  // Name of the task
    10000,    // Stack size in words
    NULL,     // Task input parameter
    1,        // Priority of the task
    NULL      // Task handle
  );
}

void loop() {
  // Empty. Things are done in Tasks.
}
Deep Sleep and Low Power Modes
ESP32 offers various sleep modes to conserve power. Here’s how to use deep sleep:
#define uS_TO_S_FACTOR 1000000  // Conversion factor for micro seconds to seconds
#define TIME_TO_SLEEP  5        // Time ESP32 will go to sleep (in seconds)

RTC_DATA_ATTR int bootCount = 0;

void setup() {
  Serial.begin(115200);
  delay(1000);

  ++bootCount;
  Serial.println("Boot number: " + String(bootCount));

  esp_sleep_enable_timer_wakeup(TIME_TO_SLEEP * uS_TO_S_FACTOR);
  Serial.println("Going to sleep now");
  Serial.flush();
  esp_deep_sleep_start();
}

void loop() {
  // This is not going to be called
}
Using ESP32 Timers and Interrupts
ESP32 provides hardware timers for precise timing operations:
hw_timer_t * timer = NULL;
volatile SemaphoreHandle_t timerSemaphore;
portMUX_TYPE timerMux = portMUX_INITIALIZER_UNLOCKED;

volatile uint32_t isrCounter = 0;
volatile uint32_t lastIsrAt = 0;

void IRAM_ATTR onTimer() {
  portENTER_CRITICAL_ISR(&timerMux);
  isrCounter++;
  lastIsrAt = millis();
  portEXIT_CRITICAL_ISR(&timerMux);
  xSemaphoreGiveFromISR(timerSemaphore, NULL);
}

void setup() {
  Serial.begin(115200);

  timerSemaphore = xSemaphoreCreateBinary();
  timer = timerBegin(0, 80, true);
  timerAttachInterrupt(timer, &onTimer, true);
  timerAlarmWrite(timer, 1000000, true);
  timerAlarmEnable(timer);
}

void loop() {
  if (xSemaphoreTake(timerSemaphore, 0) == pdTRUE) {
    uint32_t isrCount = 0, isrTime = 0;
    portENTER_CRITICAL(&timerMux);
    isrCount = isrCounter;
    isrTime = lastIsrAt;
    portEXIT_CRITICAL(&timerMux);
    Serial.print("onTimer no. ");
    Serial.print(isrCount);
    Serial.print(" at ");
    Serial.print(isrTime);
    Serial.println(" ms");
  }
}
OTA (Over-The-Air) Programming for ESP32
OTA updates allow you to update your ESP32 firmware wirelessly:
#include <WiFi.h>
#include <ArduinoOTA.h>

const char* ssid = "YourWiFiSSID";
const char* password = "YourWiFiPassword";

void setup() {
  Serial.begin(115200);
  WiFi.mode(WIFI_STA);
  WiFi.begin(ssid, password);
  while (WiFi.waitForConnectResult() != WL_CONNECTED) {
    Serial.println("Connection Failed! Rebooting...");
    delay(5000);
    ESP.restart();
  }

  ArduinoOTA.onStart([]() {
    String type;
    if (ArduinoOTA.getCommand() == U_FLASH) {
      type = "sketch";
    } else {  // U_SPIFFS
      type = "filesystem";
    }
    Serial.println("Start updating " + type);
  });
  ArduinoOTA.onEnd([]() {
    Serial.println("\nEnd");
  });
  ArduinoOTA.onProgress([](unsigned int progress, unsigned int total) {
    Serial.printf("Progress: %u%%\r", (progress / (total / 100)));
  });
  ArduinoOTA.onError([](ota_error_t error) {
    Serial.printf("Error[%u]: ", error);
    if (error == OTA_AUTH_ERROR) Serial.println("Auth Failed");
    else if (error == OTA_BEGIN_ERROR) Serial.println("Begin Failed");
    else if (error == OTA_CONNECT_ERROR) Serial.println("Connect Failed");
    else if (error == OTA_RECEIVE_ERROR) Serial.println("Receive Failed");
    else if (error == OTA_END_ERROR) Serial.println("End Failed");
  });
  ArduinoOTA.begin();
  Serial.println("OTA Initialized");
  Serial.print("IP address: ");
  Serial.println(WiFi.localIP());
}

void loop() {
  ArduinoOTA.handle();
}
Secure OTA Updates (HTTPS)
For enhanced security, you can implement OTA updates over HTTPS:
#include <WiFi.h>
#include <HTTPClient.h>
#include <HTTPUpdate.h>

const char* ssid = "YourWiFiSSID";
const char* password = "YourWiFiPassword";
const char* firmware_url = "https://your-server.com/firmware.bin";

void setup() {
  Serial.begin(115200);
  WiFi.begin(ssid, password);

  while (WiFi.status() != WL_CONNECTED) {
    delay(1000);
    Serial.println("Connecting to WiFi...");
  }

  Serial.println("Connected to WiFi");

  if (WiFi.status() == WL_CONNECTED) {
    HTTPClient http;
    http.begin(firmware_url);

    int httpCode = http.GET();
    if (httpCode > 0) {
      if (httpCode == HTTP_CODE_OK) {
        t_httpUpdate_return ret = httpUpdate.update(http, firmware_url);

        switch (ret) {
          case HTTP_UPDATE_FAILED:
            Serial.printf("HTTP_UPDATE_FAILED Error (%d): %s\n", httpUpdate.getLastError(), httpUpdate.getLastErrorString().c_str());
            break;
          case HTTP_UPDATE_NO_UPDATES:
            Serial.println("HTTP_UPDATE_NO_UPDATES");
            break;
          case HTTP_UPDATE_OK:
            Serial.println("HTTP_UPDATE_OK");
            break;
        }
      }
    } else {
      Serial.printf("HTTP GET failed, error: %s\n", http.errorToString(httpCode).c_str());
    }
    http.end();
  }
}

void loop() {
  // Your main code here
}
Chapter 7: ESP32-CAM: Camera Projects
Introduction to ESP32-CAM Module
The ESP32-CAM is a compact camera module based on the ESP32-S chip. It features:
- OV2640 camera
- MicroSD card slot
- Onboard flash LED
- Several GPIO pins for expansion
Capturing and Streaming Images
Here’s a basic example of capturing and streaming images with ESP32-CAM:
#include "esp_camera.h"
#include <WiFi.h>

// Camera pins
#define PWDN_GPIO_NUM     32
#define RESET_GPIO_NUM    -1
#define XCLK_GPIO_NUM      0
#define SIOD_GPIO_NUM     26
#define SIOC_GPIO_NUM     27
#define Y9_GPIO_NUM       35
#define Y8_GPIO_NUM       34
#define Y7_GPIO_NUM       39
#define Y6_GPIO_NUM       36
#define Y5_GPIO_NUM       21
#define Y4_GPIO_NUM       19
#define Y3_GPIO_NUM       18
#define Y2_GPIO_NUM        5
#define VSYNC_GPIO_NUM    25
#define HREF_GPIO_NUM     23
#define PCLK_GPIO_NUM     22

const char* ssid = "YourWiFiSSID";
const char* password = "YourWiFiPassword";

void startCameraServer();

void setup() {
  Serial.begin(115200);

  camera_config_t config;
  config.ledc_channel = LEDC_CHANNEL_0;
  config.ledc_timer = LEDC_TIMER_0;
  config.pin_d0 = Y2_GPIO_NUM;
  config.pin_d1 = Y3_GPIO_NUM;
  config.pin_d2 = Y4_GPIO_NUM;
  config.pin_d3 = Y5_GPIO_NUM;
  config.pin_d4 = Y6_GPIO_NUM;
  config.pin_d5 = Y7_GPIO_NUM;
  config.pin_d6 = Y8_GPIO_NUM;
  config.pin_d7 = Y9_GPIO_NUM;
  config.pin_xclk = XCLK_GPIO_NUM;
  config.pin_pclk = PCLK_GPIO_NUM;
  config.pin_vsync = VSYNC_GPIO_NUM;
  config.pin_href = HREF_GPIO_NUM;
  config.pin_sscb_sda = SIOD_GPIO_NUM;
  config.pin_sscb_scl = SIOC_GPIO_NUM;
  config.pin_pwdn = PWDN_GPIO_NUM;
  config.pin_reset = RESET_GPIO_NUM;
  config.xclk_freq_hz = 20000000;
  config.pixel_format = PIXFORMAT_JPEG;

  if(psramFound()){
    config.frame_size = FRAMESIZE_UXGA;
    config.jpeg_quality = 10;
    config.fb_count = 2;
  } else {
    config.frame_size = FRAMESIZE_SVGA;
    config.jpeg_quality = 12;
    config.fb_count = 1;
  }

  // Camera init
  esp_err_t err = esp_camera_init(&config);
  if (err != ESP_OK) {
    Serial.printf("Camera init failed with error 0x%x", err);
    return;
  }

  // Wi-Fi connection
  WiFi.begin(ssid, password);
  while (WiFi.status() != WL_CONNECTED) {
    delay(500);
    Serial.print(".");
  }
  Serial.println("");
  Serial.println("WiFi connected");

  startCameraServer();

  Serial.print("Camera Ready! Use 'http://");
  Serial.print(WiFi.localIP());
  Serial.println("' to connect");
}

void loop() {
  // Do nothing. Everything is done in another task by the web server
  delay(10000);
}
Building a Simple ESP32-CAM Security Camera
To create a basic security camera, you can modify the above code to:
- Detect motion using frame differencing
- Send alerts (e.g., via email or push notification)
- Store images on a microSD card when motion is detected
Face Recognition and Detection Basics
For face detection, you can use the built-in face detection feature of the ESP32-CAM:
#include "esp_camera.h"
#include "fd_forward.h"

mtmn_config_t mtmn_config = {0};

void setup() {
  Serial.begin(115200);

  // Camera initialization code (as shown in previous example)

  mtmn_config.type = FAST;
  mtmn_config.min_face = 80;
  mtmn_config.pyramid = 0.707;
  mtmn_config.pyramid_times = 4;
  mtmn_config.p_threshold.score = 0.6;
  mtmn_config.p_threshold.nms = 0.7;
  mtmn_config.p_threshold.candidate_number = 20;
  mtmn_config.r_threshold.score = 0.7;
  mtmn_config.r_threshold.nms = 0.7;
  mtmn_config.r_threshold.candidate_number = 10;
  mtmn_config.o_threshold.score = 0.7;
  mtmn_config.o_threshold.nms = 0.7;
  mtmn_config.o_threshold.candidate_number = 1;
}

void loop() {
  camera_fb_t * fb = esp_camera_fb_get();
  if (!fb) {
    Serial.println("Camera capture failed");
    return;
  }

  dl_matrix3du_t *image_matrix = dl_matrix3du_alloc(1, fb->width, fb->height, 3);
  fmt2rgb888(fb->buf, fb->len, fb->format, image_matrix->item);

  box_array_t *net_boxes = face_detect(image_matrix, &mtmn_config);

  if (net_boxes) {
    Serial.printf("Found %d face(s)\n", net_boxes->len);
    free(net_boxes->box);
    free(net_boxes->landmark);
    free(net_boxes);
  }

  esp_camera_fb_return(fb);
  dl_matrix3du_free(image_matrix);

  delay(1000);
}
Chapter 8: Internet of Things (IoT) with ESP32
Building IoT Projects with ESP32
ESP32’s built-in Wi-Fi capabilities make it ideal for IoT projects. Some popular applications include:
- Smart home devices
- Environmental monitoring systems
- Industrial automation
- Wearable technology
MQTT Protocol Basics and Example
MQTT is a lightweight messaging protocol often used in IoT. Here’s a basic MQTT client for ESP32:
#include <WiFi.h>messageTemp += (char)message[i]; } Serial.println();
#include <PubSubClient.h>
const char* ssid = "YourWiFiSSID";
const char* password = "YourWiFiPassword";
const char* mqtt_server = "broker.mqtt.com";
WiFiClient espClient;
PubSubClient client(espClient);
void setup_wifi() {
WiFi.begin(ssid, password);
while (WiFi.status() != WL_CONNECTED) {
delay(500);
Serial.print(".");
}
Serial.println("WiFi connected");
}
void callback(char* topic, byte* message, unsigned int length) {
Serial.print("Message arrived on topic: ");
Serial.print(topic);
Serial.print(". Message: ");
String messageTemp;
for (int i = 0; i < length; i++) {
Serial.print((char)message[i]);
messageTemp +=
// Add your logic here to handle incoming messages }
void reconnect() { while (!client.connected()) { Serial.print(“Attempting MQTT connection…”); if (client.connect(“ESP32Client”)) { Serial.println(“connected”); client.subscribe(“esp32/topic”); } else { Serial.print(“failed, rc=”); Serial.print(client.state()); Serial.println(” try again in 5 seconds”); delay(5000); } } }
void setup() { Serial.begin(115200); setup_wifi(); client.setServer(mqtt_server, 1883); client.setCallback(callback); }
void loop() { if (!client.connected()) { reconnect(); } client.loop();
// Publish a message every 30 seconds static unsigned long lastMsg = 0; if (millis() – lastMsg > 30000) { lastMsg = millis(); client.publish(“esp32/temperature”, “25.5”); } }
### Sending Sensor Data to the Cloud

To send sensor data to a cloud platform like AWS IoT or Google Cloud IoT, you'll need to:

1. Set up a cloud account and create a device
2. Obtain necessary credentials (certificates, keys)
3. Use a library like `MQTT` or platform-specific libraries to connect and send data

Here's a simplified example using AWS IoT:

```cpp
#include <WiFiClientSecure.h>
#include <MQTTClient.h>
#include <ArduinoJson.h>
#include "WiFi.h"
#include "secrets.h"

#define AWS_IOT_PUBLISH_TOPIC   "esp32/pub"
#define AWS_IOT_SUBSCRIBE_TOPIC "esp32/sub"

WiFiClientSecure net = WiFiClientSecure();
MQTTClient client = MQTTClient(256);

void connectAWS()
{
  WiFi.mode(WIFI_STA);
  WiFi.begin(WIFI_SSID, WIFI_PASSWORD);

  Serial.println("Connecting to Wi-Fi");

  while (WiFi.status() != WL_CONNECTED){
    delay(500);
    Serial.print(".");
  }

  // Configure WiFiClientSecure to use the AWS IoT device credentials
  net.setCACert(AWS_CERT_CA);
  net.setCertificate(AWS_CERT_CRT);
  net.setPrivateKey(AWS_CERT_PRIVATE);

  // Connect to the MQTT broker on the AWS endpoint we defined earlier
  client.begin(AWS_IOT_ENDPOINT, 8883, net);

  // Create a message handler
  client.onMessage(messageHandler);

  Serial.print("Connecting to AWS IOT");

  while (!client.connect(THINGNAME)) {
    Serial.print(".");
    delay(100);
  }

  if(!client.connected()){
    Serial.println("AWS IoT Timeout!");
    return;
  }

  // Subscribe to a topic
  client.subscribe(AWS_IOT_SUBSCRIBE_TOPIC);

  Serial.println("AWS IoT Connected!");
}

void publishMessage()
{
  StaticJsonDocument<200> doc;
  doc["time"] = millis();
  doc["sensor_a0"] = analogRead(0);
  char jsonBuffer[512];
  serializeJson(doc, jsonBuffer); // print to client

  client.publish(AWS_IOT_PUBLISH_TOPIC, jsonBuffer);
}

void messageHandler(String &topic, String &payload) {
  Serial.println("incoming: " + topic + " - " + payload);

  // Add your custom message handling here
}

void setup() {
  Serial.begin(115200);
  connectAWS();
}

void loop() {
  publishMessage();
  client.loop();
  delay(1000);
}
Building a Web Server with ESP32
ESP32 can act as a web server, allowing you to create interactive web interfaces for your projects:
#include <WiFi.h>
#include <WebServer.h>

const char* ssid = "YourWiFiSSID";
const char* password = "YourWiFiPassword";

WebServer server(80);

void handleRoot() {
  String html = "<html><body>";
  html += "<h1>ESP32 Web Server</h1>";
  html += "<p>GPIO 2 LED: <a href=\"/led/on\">ON</a> | <a href=\"/led/off\">OFF</a></p>";
  html += "</body></html>";
  server.send(200, "text/html", html);
}

void handleLED() {
  String state = server.pathArg(0);
  digitalWrite(2, state == "on" ? HIGH : LOW);
  server.sendHeader("Location", "/");
  server.send(303);
}

void setup() {
  Serial.begin(115200);
  pinMode(2, OUTPUT);

  WiFi.begin(ssid, password);
  while (WiFi.status() != WL_CONNECTED) {
    delay(1000);
    Serial.println("Connecting to WiFi...");
  }
  Serial.println("Connected to WiFi");
  Serial.print("IP address: ");
  Serial.println(WiFi.localIP());

  server.on("/", handleRoot);
  server.on("/led/{}", HTTP_GET, handleLED);

  server.begin();
  Serial.println("HTTP server started");
}

void loop() {
  server.handleClient();
}
Chapter 9: Debugging, Testing, and Optimizing Your Code
Common ESP32 Programming Mistakes
- Incorrect pin assignments
- Not accounting for ESP32’s 3.3V logic level
- Misuse of delay() in critical sections
- Improper use of interrupts
- Not handling Wi-Fi reconnections
How to Debug ESP32 Projects
- Use Serial.print() for basic debugging
- Utilize ESP32’s built-in debugging capabilities with ESP-IDF
- Use logic analyzers for complex timing issues
- Implement error logging and remote debugging
Improving Performance and Reducing Power Consumption
- Use appropriate sleep modes (light sleep, deep sleep)
- Optimize Wi-Fi power management
- Utilize ESP32’s DMA capabilities for faster data transfers
- Implement efficient algorithms and data structures
- Use appropriate RTOS task priorities and stack sizes
Best Practices for ESP32 Development
- Always check return values and handle errors
- Use appropriate abstraction layers (e.g., libraries for complex peripherals)
- Implement over-the-air (OTA) updates for easier maintenance
- Follow secure coding practices, especially for IoT devices
- Regularly update ESP32 SDK and libraries
Chapter 10: Real-World ESP32 Projects
Smart Home Automation Using ESP32
Build a smart home system that controls lights, monitors temperature, and manages security:
- Use relays to control lights and appliances
- Implement MQTT for communication between devices
- Create a mobile app or web interface for control
- Integrate with popular platforms like Home Assistant or Apple HomeKit
Wireless Weather Station with ESP32
Create a weather station that measures temperature, humidity, pressure, and air quality:
- Use sensors like BME280 for temperature, humidity, and pressure
- Implement a web server to display real-time data
- Send data to weather services like Weather Underground
- Use deep sleep to extend battery life for remote installations
ESP32-Based Robot Controller
Develop a versatile robot controller:
- Implement motor control using PWM
- Use MPU6050 for orientation sensing
- Add ultrasonic sensors for obstacle detection
- Create a Wi-Fi interface for remote control
AI and Machine Learning on the Edge with ESP32-S3
Leverage the ESP32-S3’s AI capabilities:
- Implement TensorFlow Lite for microcontrollers
- Create a voice recognition system using the onboard microphone
- Develop a simple object detection system using a camera module
- Build a predictive maintenance system using sensor data and machine learning
Chapter 11: Moving Beyond Arduino IDE
Introduction to ESP-IDF (Official SDK)
ESP-IDF offers more control and features compared to Arduino:
- Set up ESP-IDF development environment
- Understand the project structure and build system
- Utilize FreeRTOS features for advanced multitasking
- Access low-level hardware features not available in Arduino
Using PlatformIO for ESP32 Development
PlatformIO provides a more professional development experience:
- Install PlatformIO IDE (VS Code extension)
- Create and manage ESP32 projects
- Utilize PlatformIO’s library management system
- Implement continuous integration for ESP32 projects
Customizing Bootloaders and Flash Partitions
Advanced ESP32 development often requires custom bootloaders and partition schemes:
- Understand the ESP32 boot process
- Create custom partition tables
- Implement secure boot for enhanced security
- Develop custom bootloaders for specific applications
Conclusion
Summary of Key ESP32 Programming Concepts
- GPIO and peripheral management
- Wi-Fi and Bluetooth connectivity
- Power management and sleep modes
- RTOS and multitasking
- OTA updates and security considerations
Next Steps: Where to Go From Here
- Explore more advanced ESP32 features (e.g., Ethernet, CAN bus)
- Contribute to open-source ESP32 projects
- Develop commercial products using ESP32
- Explore other microcontrollers and compare with ESP32
Resources and Communities for ESP32 Developers
- Espressif’s official documentation and forums
- ESP32 community on Reddit and Stack Overflow
- GitHub repositories with ESP32 projects and libraries
- Online courses and tutorials for advanced ESP32 topics
Appendices
A: ESP32 Pinout Diagrams
(Include detailed pinout diagrams for popular ESP32 modules)
B: Glossary of ESP32 Terms
(List and define common ESP32-related terms and acronyms)
C: Useful ESP32 Libraries and Tools
(Provide a curated list of popular libraries and development tools)
D: Troubleshooting FAQ for ESP32 Programming
(Address common issues and their solutions)
This comprehensive guide covers the essentials of ESP32 programming, from basic concepts to advanced topics. By following this guide, readers will gain a solid understanding of ESP32 capabilities and be well-equipped to develop a wide range of projects using this versatile microcontroller.