Atmel, a prominent producer of microcontrollers that use various electronic appliances, features two highly sought-after microcontrollers: the Attiny85 and Atmega328P, both hailing from an AVR family. Despite sharing certain similarities, these microcontrollers exhibit notable differences in terms of their programming, which we will delve into in this piece.
It’s widely accepted that Arduino development circuit boards are a go-to option for novices in electronics, and with good reason. These boards facilitate effortless connectivity with other components and can be easily programmed via a user-friendly IDE and a simple USB cable. Additionally, they are in open-source form and boast a vast, dynamic association that is ever ready to offer assistance.
The boards themselves are also crafted in a manner that emphasizes sound design. Provided one essential basic prudence, it’s unlikely that they will cause permanent damage to the Arduino board. As a starting point for those interested in circuit design or programming, the Arduino circuit platform is an excellent way to gain initial exposure to these areas.

As projects become more complex or when creating products for consumer sale, the limitations of the Arduino platform become more evident.
In this article, we delve into the Attiny84, ATtiny85, and ATtiny2313 AVR microcontrollers, which are commonly used to move beyond Arduino-based prototypes to refined or optimized projects. We also compare these chips to an ATmega328 found in an Arduino Uno.
Disadvantages of Using an Arduino Programming

Compared to a microcontroller IC, Arduino circuit boards are pretty bulky, making it challenging to integrate and embed into projects. Typically, shields incorporate Arduinos into larger projects by plugging into headers on the top of an Arduino. However, this approach often results in bulky assemblies that may not fit seamlessly into other aspects of a project.
The second drawback of Arduino boards is their relatively high cost compared to building custom boards with the microcontroller IC or associated passive elements. Relying on a model, Arduino circuit boards range from $20 – $30, while the microcontrollers applied in those circuit boards cost around or under two dollars. Additionally, the specifications of Arduino boards may be excessive For the activities they are commonly used for. Upon examining a selection of typical Arduino projects, it becomes apparent that many of the Arduino’s I/O pins remain unused, or the Programs executing on board Do not measure up to filling a Microcontroller’s flash storage.
ATtiny85 Microcontroller & Its Working
It is a viable substitute for the ATmega328P in small projects where only a few I/O pins are required. It is because using the ATmega328P’s limited I/O pins for small projects may not be efficient. In contrast, ATtiny85 microcontrollers can be utilized for small projects that require all available I/O pins. This article overviews the ATtiny85 microcontroller, including its pin diagram, advantages, specifications, disadvantages, and applications.
ATtiny85 is a high-performance, compact AVR microcontroller that utilizes the RISC CPU. It comes in two packages commonly used for interfacing and controlling various sensors or devices. The microcontroller also boasts Low-power usage through its MSSP and 10-bit ADC. The instruction code for this microcontroller is stored in RAM – 512 bytes and EEROM – 8kb. Alternatives to the ATtiny85 microcontroller include the ATtiny45, ATtiny25, ATtiny25V, ATtiny45V, and ATtiny85V.
Functions of ATtiny85 Microcontroller
The ATtiny85 microcontroller can perform multiple functions within a single IC. Specific pins on the microcontroller are useful for more than one function. Some of the primary functions of the microcontroller comprise timers, BOD, I2C communication, SPI communication, Interrupt, and ADC. The ATtiny85 microcontroller also features various memory types, such as FLASH, EEPROM, and SRAM.
Runing ATtiny85 Microcontroller Carefully

Microcontrollers are delicate components that require careful handling to achieve optimal performance and longevity in any software.
It is crucial to ensure that the electrical supply for the controller does not exceed 5.5V. Before connecting the controller to the digital multimeter, it is essential to confirm the accuracy of a voltage source output using the accurate digital multimeter. It is crucial to note that the DC output for each input/output pin must not exceed 40mA, while the DC output for GND pins and positive supply should not exceed 200mA.
To ensure a proper power supply, it’s essential to confirm the polarity of the microcontroller pins beforehand. To locate the microcontroller, an integrated circuit socket can be utilized on a circuit or breadboard. By doing so, the microcontroller is protected from the heat generated during soldering.
The Storage temperature limits for this controller span from -65°C-+150°C, while the operating temperature range is between -55°C to-+125°C.
Advantages of ATtiny85 Microcontroller
Here are some benefits of using an ATtiny85 microcontroller:
- The power consumption is lower.
- Easily Available
- Less cost
- Its small and compact size allows for easy arrangement within the tiny boards.
- This microcontroller provides readily accessible reference data for convenient usage
- Capable of integration via Arduino IDE.
- Various power-saving modes enable this controller to function in battery-powered applications.
- Despite having fewer pins, this provides numerous features.
- This microcontroller possesses much program memory to meet the requirements of various applications.
Applications of ATtiny85 Microcontroller
The following are among the functions of the ATtiny85 Microcontroller.
- Various engineering projects can be designed utilizing this microcontroller, depending on specific requirements.
- The following are examples of commercial and educational applications that can be utilized.
- Applications related to security and automobiles.
- Industrial machinery control systems.
- Systems involving weather sensors.
Programming an AVR ATmega328P with an Arduino
The Arduino Uno microcontroller board is powered by the ATmega328P microcontroller, which enables easy pin interfacing. The Arduino microcontroller board includes a USB serial interface and a 16 MHz clock, features not found on a standalone microcontroller. Arduino boards are ideal for prototyping, as they facilitate rapid iterations of designs. However, for finalized projects, they can be excessive depending on the features employed. Official Arduino Uno boards cost $20, while standalone ATmega328P microcontrollers cost about $2. Therefore, after completing the prototype phase with an Arduino, the project can be migrated to using the independent ATmega328P.
One potential challenge is the inability to link the ATmega328P to a computer for program uploads directly. To address this issue, a separate programmer is required. Fortunately, if an Arduino is available, it can be utilized as the programmer for an ATmega328P. So this guide outlines how to code the standalone ATmega328P by leveraging an Arduino or the Arduino development environment, using pure C code except for the built-in functionalities provided by the Arduino development environment.
Preparing and Connecting the Arduino
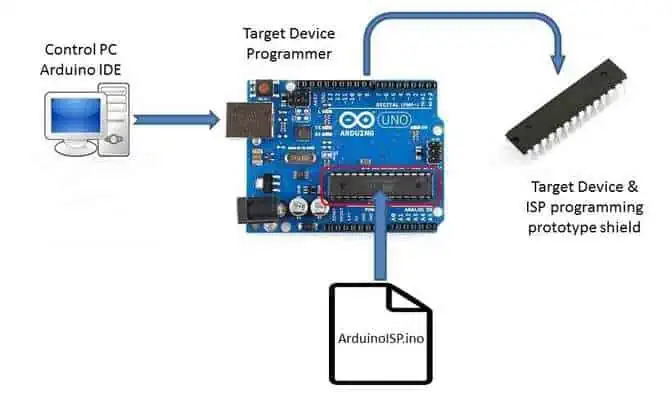
Before an Arduino Uno can function as an ISP, a specific sketch must be uploaded. Once uploaded, the Arduino Uno will be capable of programming the ATmega328P. To set up the Arduino Uno as an ISP, the following process must be taken:
To access the ArduinoISP software navigate to File -> Examples -> ArduinoISP -> “ArduinoISP.”
Upload an ArduinoISP sketch to the Arduino in the typical manner used for any additional sketch.
Having configured the Arduino as the ISP, it can now be utilized to code the ATmega328P. The SPI bus will link the Arduino to an ATmega328P by accurately linking the SPI connectors. However, this can be a complex task as the pin no. on an Arduino does not correspond directly with the pin no. on the ATmega328Peven, though the Arduino employs an ATmega328P chip itself. To ensure that the appropriate pins are connected, a comparison must be made between the PINs of the Arduino and those of ATmega328P. The image below displays the necessary pin connections for SPI, illustrating how these Arduino connectors correspond with those of the ATmega328P.
Differences Attiny85 programming Vs. atmega328p programming
1. Flash Memory:
The primary disparity between Atmega328P and Attiny85 is the quantity of flash storage accessible. Attiny85 possesses a mere 8 KB of flash memory, whereas Atmega328P contains 32 KB. Consequently, Attiny85 can accommodate a smaller number of commands than Atmega328P. Programmers must, therefore, produce more optimized code and maximize the limited memory capacity in Attiny85.
To surpass this constraint, programmers working with Attiny85 often employ optimization techniques like function performance optimization, data structure performance optimization, and loop unrolling. These methods assist in reducing the memory needed by the code, making it possible for Attiny85 to manage more complex applications.
Pins:
A significant distinction between Atmega328P and Attiny38 refers to their pin count. While Attiny85 has only 8 pins, Atmega328P has twenty-eight pins. It implies that Attiny85 has a limited number of input/output pins, which can restrict the number of elements linked to it.
Due to its limited number of pins, Attiny85 programmers must find innovative ways to connect components to the microcontroller. They may use multiplexers to enhance the I/O pins, shift to expand output pins, or analog signal multiplexers to share pins among multiple components.
2. Clock Speed:
The high speed of Attiny85 is 20 MHz, while Atmega328P is 16 MHz. Therefore, Attiny85 can execute instructions at a higher speed than Atmega328P. Although, the advantage of the higher clock speed is negated by the fact that Attiny85 has less flash memory available than Atmega328P.
Attiny85 programmers should be cautious in choosing the clock rate since it can affect the energy usage of microcontrollers. A faster clock rate may result in greater electrical consumption, which could be problematic for battery-operated applications.
3. Peripheral Support:
It has peripherals compared to Attiny85, including USART, API, and I2C interfaces, providing more comprehensive support for communication protocols and devices without requiring additional components. It is not the case for Attiny85, which has limited built-in peripherals, making it less versatile in device support.
Attiny85 microcontroller has smaller integrated peripherals than Atmega328P, including USART, SPI, and I2C interfaces. This makes it challenging for Attiny85 to support various devices and communication protocols without additional components. Therefore, Attiny85 operation may have to use external Serial Peripheral Interface (SPI) interfaces or software-based Inter-Integrated Circuit (I2C) protocols to interact with other equipment.
4. Programming Language:

C is the programming language supported by both Attiny85 /Atmega328P, but there are differences in how a code is optimized and compiled for every microcontroller. Programmers using Attiny85 require a specialized compiler, like the AVR-GCC compiler. It is useful for AVR architecture.
It must know how to make its programs use less memory and run faster to work appropriately on the microcontroller. They also need to know what parts of a microcontroller they can use and how they can use them to make the program work well.
5. Programming Environment:
Attiny85 and Atmega328P use different programming environments. The Arduino integrated development environment is commonly useful by Attiny85 programmers as it provides an easy-to-use interface for compiling, writing, or updating code to a microcontroller. The Arduino integrated development environment (IDE)also has pre-built examples and libraries.
Conclusion
To summarize, Attiny85 or Atmega328P have commonly used microcontrollers with different functions. Attiny85 has less memory, less number of pins, or a faster clock speed. Therefore, Attiny85 programmers must optimize their code, use creative methods for connecting components, and consider power consumption when Choosing the clock speed.
Atmega328P has more built-in functions than Attiny85, which makes it better suited for appliances that need to work with more types of devices or communication methods. Both microcontrollers are programable using the same language, but the Attiny85 programmers require a specific compiler and know how to use optimization techniques effectively.
In summary, the decision to use Attiny85 or Atmega328P depends on the specific needs of the tool. If additional memory capacity and support for more peripherals are essential, Atmega328P can be better. However, if a smaller size is essential, Attiny85 can be a good option. Both microcontrollers provide developers with excellent capabilities or flexibility for various applications.