X7R vs C0G Ceramic Capacitor: When to Use Each

X7R vs C0G ceramic capacitors โ€” learn the real electrical differences, DC bias derating risks, and exactly which dielectric to use for your PCB application.

If you’ve spent any time selecting capacitors for a PCB design, you’ve almost certainly stared at a datasheet wondering whether to grab an X7R or a C0G. They’re both ceramic capacitors, they look identical on the reel, and a junior engineer swapping one for the other can silently break a design without a single error message. This guide walks through the real-world differences from a PCB design perspective โ€” what these codes actually mean, where each dielectric shines, and where it will let you down.

What Do X7R and C0G Actually Mean?

Before diving into the comparison, it helps to understand the naming system. Both X7R and C0G follow the EIA RS-198 standard for ceramic capacitor dielectrics.

Decoding the C0G Code

C0G is a Class 1 dielectric. The code breaks down like this:

  • Cย = significant figure of temperature coefficient: 0 (zero)
  • 0ย = multiplier: ร—1 (so 0 ร— 1 = 0 ppm/ยฐC)
  • Gย = tolerance on the temperature coefficient: ยฑ30 ppm/ยฐC

The result: a capacitor whose capacitance shifts by 0 ยฑ30 ppm/ยฐC across temperature. Over the full -55ยฐC to +125ยฐC range, that’s less than ยฑ0.3% change in capacitance. C0G is also called NP0 (Negative-Positive-Zero) in military and European standards โ€” same component, different label. Both the “0” in C0G and the “0” in NP0 are the numeral zero, not the letter O.

Decoding the X7R Code

X7R is a Class 2 dielectric. The code breaks down differently:

  • Xย = lower operating temperature: -55ยฐC
  • 7ย = upper operating temperature: +125ยฐC
  • Rย = maximum capacitance change: ยฑ15%

So across -55ยฐC to +125ยฐC, an X7R capacitor can drift up to ยฑ15% from its nominal value. That sounds manageable, but there’s more to the story โ€” temperature is only one of the variables you have to worry about.

X7R vs C0G: Side-by-Side Comparison

PropertyC0G (NP0)X7R
Dielectric ClassClass 1Class 2
Temperature Range-55ยฐC to +125ยฐC-55ยฐC to +125ยฐC
Capacitance Change vs. Temp0 ยฑ30 ppm/ยฐC (< ยฑ0.3%)ยฑ15% max
DC Bias EffectNoneSignificant โ€” can lose 50โ€“80%
AgingNegligible~1% per decade
Piezoelectric EffectNoneYes (microphonics)
Typical Max Capacitance~10 nF to 100 nF (per case size)Up to 47 ยตF
Typical Toleranceยฑ1%, ยฑ2%, ยฑ5%ยฑ10%, ยฑ20%
Relative CostHigherLower
Package Size for Same ValueLargerSmaller
Dielectric Absorption< 0.6%Higher
Q Factor>1000Lower
Best ForPrecision, RF, timingDecoupling, bulk bypass

The Hidden X7R Problem: DC Bias Derating

This is the one that catches engineers off guard, especially those coming from simulation backgrounds. Class 2 capacitors lose capacitance as you apply DC voltage. This is not a small effect.
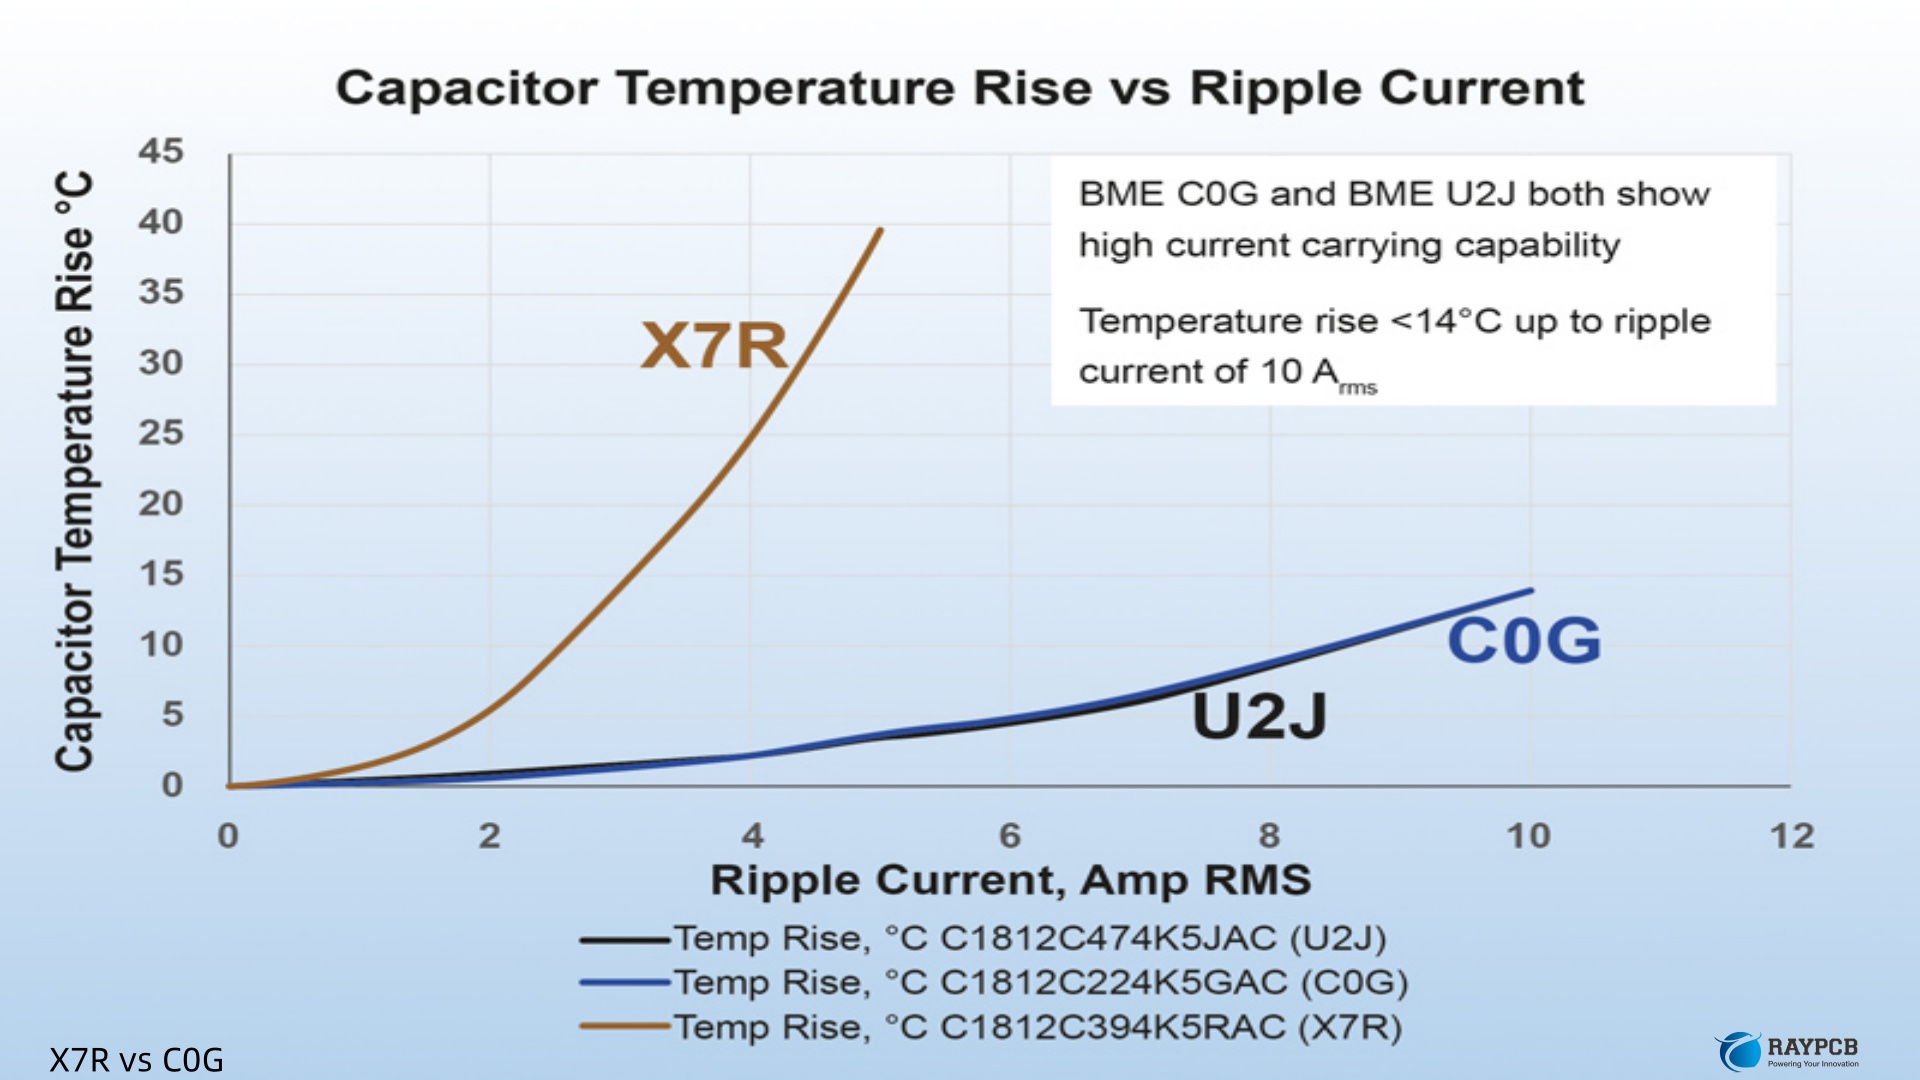
A 10 ยตF X7R capacitor rated at 16V can behave like a 2 ยตF capacitor when 12V is applied across it. The ferroelectric dielectric in X7R responds to the electric field, and its effective permittivity drops โ€” taking your capacitance with it. Some manufacturers’ datasheets show derating curves that drop 70% or more at rated voltage.

The practical takeaway: if you’re using an X7R capacitor in a power rail decoupling application, always check the manufacturer’s DC bias derating curve and derate accordingly. A rule of thumb many engineers use is to select a voltage rating at least twice the actual operating voltage to stay in the flat portion of the derating curve. C0G capacitors have no measurable DC bias effect โ€” what you see on the datasheet is what you get in the circuit.

Capacitance Stability: Where C0G Has No Competition

For any application where the capacitor value must stay predictable, C0G is the clear choice. Here’s why the ยฑ30 ppm/ยฐC number is genuinely impressive:

Over the full -55ยฐC to +125ยฐC range (a 180ยฐC swing), the capacitance changes by just ยฑ0.54%. Capacitance drift and hysteresis are below ยฑ0.05%. Dielectric absorption is less than 0.6% โ€” comparable to mica capacitors, which have been the gold standard for precision applications for decades. The Q factor for C0G routinely exceeds 1000, making it ideal at RF frequencies.

X7R capacitance, by contrast, follows a nonlinear curve with temperature, shifts with applied voltage, and ages over time โ€” losing roughly 1% per decade, or about 5% over 10 years. None of these effects are disqualifying for the right application. But in precision timing, filtering, or RF circuits, they add up fast.

When to Use C0G: Application Checklist

C0G is the right call when the capacitor value directly affects circuit performance.

Timing and Oscillator Circuits

Any RC timing network, crystal oscillator load capacitor, or ceramic resonator application needs a stable C value. A ยฑ15% drift in an X7R timing capacitor means your oscillator frequency shifts with temperature. Use C0G.

RF Tuning and Matching Networks

At radio frequencies, capacitor Q and stability are critical. C0G’s high Q (>1000) and predictable temperature behavior make it the standard for RF tuning, impedance matching, and tank circuits in LNA and VCO designs.

Active Filters with Precision Frequency Response

Sallen-Key, multiple feedback, and other active filter topologies rely on accurate capacitor ratios to set pole frequency and Q. X7R will shift your cutoff frequency across temperature. C0G holds the filter response tight.

High-Impedance Analog Nodes

Precision ADC input networks, sample-and-hold circuits, and op-amp feedback networks benefit from C0G’s negligible dielectric absorption. High dielectric absorption causes charge retention errors that show up as settling time issues in high-resolution converters.

Low-Noise Sensitive Circuits

X7R capacitors exhibit piezoelectric behavior โ€” mechanical vibration causes voltage noise. In audio circuits, precision instrumentation, and low-noise analog front ends, this “microphonics” effect can inject ยตV-level noise. C0G is not piezoelectric and is immune to this.

When to Use X7R: Application Checklist

X7R is not a second-choice dielectric โ€” it’s the right tool for high-value bypass and decoupling applications.

Power Supply Decoupling

The bulk of MLCC decoupling on a modern PCB is X7R. You need large capacitance values in small packages, and X7R delivers. Just derate the voltage rating properly and check the DC bias curve.

Bypass Capacitors on Digital ICs

Digital logic doesn’t care whether its bypass cap is exactly 100 nF or 88 nF. The ยฑ15% temperature drift of X7R has no meaningful effect on the performance of a digital power pin. Use X7R here โ€” it’s smaller, cheaper, and fits the job.

Bulk Input/Output Filtering

Buck converter input capacitors, LDO output capacitors, and EMI filter capacitors all benefit from X7R’s high capacitance density. Use multiple X7R capacitors in parallel and derate their voltage ratings.

Coupling Capacitors (Non-Critical)

Interstage coupling where the exact capacitance value is not critical to gain or frequency response is a perfectly reasonable X7R application. If the coupling cap just needs to block DC and you have bandwidth to spare, X7R works fine.

X7R vs C0G: Application Decision Table

ApplicationRecommended DielectricReason
Crystal oscillator load capsC0GFrequency stability
RF tank / tuning circuitsC0GHigh Q, stable
Active filter (precision)C0GStable pole frequency
Sample and holdC0GLow dielectric absorption
Low-noise analog (microphonics concern)C0GNon-piezoelectric
Power supply bypass (bulk)X7RHigh capacitance density
Digital IC decouplingX7RCost/size efficient
Buck converter input capX7R (derated)High bulk capacitance
LDO output capX7RHigh value in small package
Non-critical AC couplingX7RAdequate stability
High-temperature (>150ยฐC)C0G (special grade)X7R degrades severely

Package Size Realities

One practical constraint engineers run into is that C0G capacitors top out at much lower capacitance values for a given package size. If you search a distributor for a 0.1 ยตF 0805 ceramic capacitor, you’ll find hundreds of X7R results and virtually zero C0G options. For 100 nF and above, X7R is often the only practical MLCC option in standard package sizes.

This is a materials limitation: the high-permittivity ferroelectric dielectric in X7R can pack far more capacitance into the same volume. C0G is fundamentally limited by its lower dielectric constant (below 150 for TiO2-based formulations), while X7R dielectric constants can exceed 2000.

For low-value capacitors โ€” anything from 1 pF to a few nanofarads โ€” C0G is readily available in standard 0402 and 0603 packages and is the preferred choice whenever stability matters.

A Note on Identifying Them in the Field

This comes up in manufacturing and rework. Both C0G and X7R MLCCs can look physically identical once they’re off the tape. A common industry observation is that C0G caps tend to have a grey color while X7R parts are more brown โ€” but this is manufacturer-dependent and should never be relied upon for positive identification. Always cross-reference the part number against the manufacturer datasheet. Swapping an X7R for a C0G may work fine, but swapping a C0G for an X7R in a precision circuit can introduce subtle failures that are very hard to debug.

Frequently Asked Questions

Q1: Can I substitute C0G for X7R in a decoupling application?

Yes, in most cases. C0G will perform at least as well as X7R for bypass and decoupling. The only practical issue is that you may not find C0G options in the large capacitance values (1 ยตF and above) needed for bulk decoupling, and C0G parts cost more. For small-value bypass caps, C0G is a perfectly fine substitute.

Q2: Can I substitute X7R for C0G in a timing or filter circuit?

Generally no, and this is where designs get into trouble. The ยฑ15% capacitance variation with temperature, plus DC bias derating and aging, can shift timing and filter frequencies enough to cause circuit failures. Unless you’ve verified the tolerance is acceptable for your design, stick with C0G for precision applications.

Q3: Why does an X7R capacitor measure much lower than rated capacitance on my bench LCR meter?

Your LCR meter may be applying a test voltage, and X7R capacitance drops significantly under DC bias. Also, X7R capacitance changes with the AC measurement signal frequency and amplitude. Measure at the actual operating conditions when possible, or consult the manufacturer’s derating curves.

Q4: What is the difference between C0G and NP0?

They are the same capacitor specified under two different standards. C0G is the EIA designation (used predominantly in North America). NP0 (Negative-Positive-Zero) is used in military standards and commonly seen in European documentation. The “0” in both designations is the numeral zero, though it is frequently written as the letter O, especially as “NPO.”

Q5: Do X7R capacitors really make noise in audio circuits?

Yes. X7R and other Class 2 ceramics are ferroelectric and exhibit piezoelectric behavior. Board vibrations (from fans, motors, or speakers) can physically flex the capacitor, generating a small voltage. In sensitive audio circuits, this appears as audible noise or hum. C0G is not piezoelectric, which is one reason it’s preferred in precision analog and audio reference circuits.

Useful Resources

ResourceDescriptionLink
Murata SimSurfingSimulate capacitor behavior under DC bias, frequency, and temperaturemurata.com
KEMET KSIMKEMET’s capacitor simulation tool with derating curvesksim3.kemet.com
TDK Product SelectorSearch TDK MLCC by dielectric, capacitance, voltageproduct.tdk.com
AVX (Kyocera) Parametric SearchFilter by C0G or X7R, size, voltageavx.com
Digi-Key MLCC FilterDistributor search with dielectric filterdigikey.com
EIA RS-198 Standard SummaryBackground on EIA ceramic capacitor classificationAvailable via IHS Markit
TI Precision Hub โ€” Microphonics SeriesDetailed explanation of piezoelectric noise in MLCCse2e.ti.com

Summary

The X7R vs C0G decision comes down to one question: does the capacitor value matter to your circuit’s performance?

If you need stability โ€” for timing, filtering, RF tuning, or precision analog โ€” C0G is the answer. Its temperature stability (0 ยฑ30 ppm/ยฐC), zero DC bias effect, high Q, non-piezoelectric behavior, and negligible aging make it the reference-grade dielectric for work where accuracy matters. The trade-off is cost and limited availability at high capacitance values.

If you need bulk capacitance in a tight space for power decoupling, bypass, or non-critical coupling โ€” X7R is the right tool. It’s cost-effective, widely available in values up to 47 ยตF, and entirely adequate when the exact capacitor value is not critical to the function. Just derate the voltage rating and check the DC bias curve before committing to a value.

Most PCBs need both. Use C0G at precision analog nodes, oscillator pins, and RF sections. Use X7R everywhere else.

Tantalum vs Ceramic Capacitor: Key Differences Explained

Tantalum vs ceramic capacitor: a PCB engineer’s guide to key differences in ESR, DC bias, aging, failure modes, cost, and when to use each in your design.

When you’re laying out a new PCB and you hit that familiar decision point โ€” tantalum or ceramic? โ€” the wrong choice can cost you in rework, reliability headaches, or even a field failure. As a PCB engineer, I’ve been at that crossroads more times than I can count. The tantalum vs ceramic capacitor debate isn’t one with a single right answer. It depends heavily on your application, operating environment, budget, and how much risk you’re willing to tolerate.

This guide breaks down everything you need to know: construction, electrical behavior, reliability, cost, and the practical design rules that separate good decisions from expensive ones.

What Is a Tantalum Capacitor?

A tantalum capacitor is a type of electrolytic capacitor that uses tantalum metal as the anode. The anode is formed from sintered tantalum powder pressed into a porous pellet, which gives it a massive surface area relative to its physical size. That surface gets anodized to grow a thin layer of tantalum pentoxide (Taโ‚‚Oโ‚…), which serves as the dielectric. The cathode is typically manganese dioxide (MnOโ‚‚) in traditional solid tantalum types, or a conductive polymer in modern low-ESR variants.

The result is a polarized capacitor with an exceptional capacitance-per-volume ratio, stable long-term performance, and no known wear-out mechanism under normal operating conditions. Tantalum capacitors come in surface-mount chip packages (the most common today) and through-hole versions, though chip tantalum dominates modern PCB designs.

Key characteristics at a glance:

  • Polarized (DC only โ€” incorrect polarity can cause catastrophic failure)
  • High volumetric efficiency
  • Very stable capacitance over temperature and time
  • Higher ESR than ceramic MLCCs
  • Typically limited to voltages below 50V (most common in the 4Vโ€“35V range)
  • More expensive than ceramic equivalents

What Is a Ceramic Capacitor (MLCC)?

Ceramic capacitors โ€” specifically Multilayer Ceramic Capacitors (MLCCs) โ€” are the most produced passive component on the planet, used in roughly one billion electronic devices per year. They’re constructed from hundreds of alternating layers of ceramic dielectric and metallic electrodes, co-fired into a monolithic block. The dielectric constant of the ceramic material largely defines their performance characteristics.

MLCCs are non-polarized, meaning they work with AC and DC without polarity concerns. They’re available in capacitance values ranging from a few picofarads up to hundreds of microfarads, and in voltage ratings from a few volts to thousands of volts.

Two key dielectric classes matter here:

  • Class 1 (e.g., C0G/NP0):ย Very stable, low loss, virtually no capacitance change with temperature or voltage. Lower capacitance density. Used in precision timing, filtering, and RF circuits.
  • Class 2 (e.g., X5R, X7R, Y5V):ย Higher capacitance density using ferroelectric materials like barium titanate (BaTiOโ‚ƒ). But capacitance shifts significantly with temperature, applied voltage, and time (aging).

For a deeper look at how capacitors work on a PCB and how they’re selected, that’s a great starting reference.

Tantalum vs Ceramic Capacitor: Construction Comparison

Understanding how each type is built explains most of their behavioral differences.

FeatureTantalum CapacitorCeramic Capacitor (MLCC)
Anode MaterialSintered tantalum powderLayered ceramic dielectric (BaTiOโ‚ƒ, TiOโ‚‚)
DielectricTantalum pentoxide (Taโ‚‚Oโ‚…)Ceramic oxides
CathodeMnOโ‚‚ or conductive polymerN/A (non-electrolytic)
StructurePorous sintered pelletStacked multilayer monolith
PolarityPolarizedNon-polarized
Package TypesSMD chip (Aโ€“E case), through-holeSMD 0201, 0402, 0603, 1206, etc.

The porous sintered anode of a tantalum capacitor is what gives it such high capacitance density โ€” the effective surface area is enormous compared to the physical footprint. MLCCs compensate with dielectric materials that have extremely high permittivity values (barium titanate can reach ฮตr of 10,000+), even though their individual layers are thicker and their plate area smaller.

Key Electrical Differences

Capacitance Stability Over Voltage (DC Bias Effect)

This is one of the most important and frequently overlooked differences in practical PCB design.

Tantalum capacitors show consistent capacitance across their rated voltage range. You get what you spec.

Class 2 ceramic capacitors (X5R, X7R, Y5V) lose significant capacitance as applied DC voltage increases. High-permittivity ceramics can lose 70% or more of their rated capacitance at rated voltage. A 10ยตF X5R cap at 6.3V might only deliver 3โ€“4ยตF in a 5V circuit. This catches engineers off-guard, especially when they’re designing decoupling networks and bulk capacitance counts.

Class 1 ceramics (C0G/NP0) don’t exhibit this behavior. Their capacitance is essentially independent of applied voltage โ€” much like tantalum.

Capacitance Stability Over Temperature

Both types offer acceptable stability across typical operating ranges, but with different profiles:

  • Tantalum capacitors have a linear temperature response, typically staying within ยฑ10% across the operating range.
  • Class 1 ceramics are extremely stable (essentially zero TC for C0G).
  • Class 2 ceramics show a non-linear, sometimes erratic, temperature response that becomes more problematic at the extremes of their rated range.
ParameterTantalumClass 1 Ceramic (C0G)Class 2 Ceramic (X7R)
DC Bias EffectMinimalNoneSignificant (up to 70% loss)
Temperature StabilityLinear, ยฑ10%Excellent, ยฑ30ppm/ยฐCยฑ15% over rated range
AgingNone (no known wear-out)Very lowLogarithmic degradation
Frequency RangeUp to ~500kHzExcellent into GHzGood up to several hundred MHz

ESR and ESL

ESR (Equivalent Series Resistance): Ceramic MLCCs have significantly lower ESR than tantalum capacitors, particularly at higher frequencies. This makes ceramics the go-to choice for high-frequency decoupling, noise filtering, and PDN (Power Delivery Network) design where minimizing impedance peaks is critical. Polymer tantalum caps close this gap somewhat but still can’t match a well-placed 0402 MLCC for RF performance.

ESL (Equivalent Series Inductance): The package inductance of ceramic MLCCs is also much lower than tantalum, mainly because tantalum surface-mount packages use lead frames internally, which add parasitic inductance. This is one more reason ceramics dominate bypass/decoupling applications on fast digital logic.

Aging

Tantalum capacitors have no known wear-out mechanism. They essentially don’t age under normal operating conditions.

Class 2 ceramic capacitors exhibit logarithmic aging โ€” capacitance decreases over time as the dielectric crystalline structure relaxes after firing. This is predictable and can be accounted for in design, but it’s a factor that tantalum capacitors simply don’t impose on the designer.

Reliability and Failure Modes

Tantalum Capacitor Failure

The biggest concern with tantalum capacitors is their short-circuit failure mode, which can be catastrophic. The failure mechanism starts with defects in the Taโ‚‚Oโ‚… dielectric โ€” impurities, micro-cracks, or pinholes introduced during manufacturing or PCB assembly soldering. When a high-energy transient hits these weak points, local heating converts the amorphous dielectric to crystalline form, which has lower density. This creates cracks and a conductive path.

In MnOโ‚‚-based solid tantalum capacitors, the failure can result in burning or outright ignition if sufficient energy is available. This is why the industry standard is to derate voltage by 50% for MnOโ‚‚ tantalum caps. A 5V rail should use a 10V-rated part. Polymer tantalum capacitors have a more benign failure mode โ€” the polymer becomes non-conductive at the failure site, turning a potential short into an open circuit. This allows polymer tantalum to be derated to only 80โ€“90% of rated voltage.

Additionally, tantalum caps are vulnerable to surge currents during power-on. Inrush current limiting (a series resistor of at least 3ฮฉ is a common rule of thumb) is strongly recommended in designs using tantalum capacitors.

PCB assembly issues also contribute to failures. Soldering temperatures above 300ยฐC, improper preheating, or repeated thermal cycling during rework can crack the internal structure and reduce breakdown threshold โ€” leaving a part that passes AOI but fails in the field during the first power-on transient.

Ceramic Capacitor Failure

MLCCs fail primarily through mechanical cracking of the ceramic dielectric. Their rigid monolithic body makes them brittle. Common failure triggers include:

  • Thermal shock during reflow soldering
  • PCB flexure during depaneling, board handling, or screw-mounting
  • Microcrack propagation under sustained voltage stress

MLCC failures often introduce short circuits as well, releasing energy locally. <br>The key difference is that the failure mode is usually seeded during assembly rather than during normal operation. MLCCs also exhibit the microphonic effect (piezoelectric noise) โ€” BaTiOโ‚ƒ-based caps generate audible noise under AC signals, which is relevant in audio applications and sensitive analog circuits.

Cost and Availability

From a raw cost standpoint, ceramic MLCCs win decisively for most common capacitance values. A 100nF 0402 X7R MLCC costs fractions of a cent in volume. Equivalent tantalum parts cost significantly more โ€” often 5โ€“20ร— more per unit depending on capacitance and case size.

That said, at higher capacitance values (10ยตF and above), the gap narrows โ€” and tantalum actually delivers more reliable, stable capacitance at those values compared to Class 2 ceramics suffering severe DC bias derating.

Supply chain note: The MLCC shortage that hit the industry hard in 2018โ€“2019 drove many engineers to qualify tantalum as an alternative. That experience highlighted that both technologies have supply vulnerabilities. Tantalum raw material comes largely from regions with geopolitical risk, and the component supply chain is narrower than MLCC.

Practical Applications: When to Use Each

Use Tantalum Capacitors When:

  • You need high capacitance in a small footprintย with stable, reliable values (e.g., bulk decoupling on low-power microcontroller boards)
  • Your circuit operates in harsh environmentsย where ceramic aging or DC bias derating would be problematic
  • You’re designing for medical devices, aerospace, or militaryย applications requiring proven long-term stability
  • You’re replacing aluminum electrolytic capacitors in designs where leakage, dry-out, or size is a concern
  • The operating frequency is below ~500kHz and precise, predictable capacitance is more important than absolute ESR minimization

Use Ceramic Capacitors (MLCCs) When:

  • You’re doing high-frequency decoupling or bypass capacitanceย on digital logic, FPGAs, or microprocessors
  • You need non-polar capacitorsย for AC-coupled circuits or signal filtering
  • The circuit operates at RF or microwave frequenciesย where low ESR and ESL are critical
  • You need precision timing circuitsย (Class 1 C0G/NP0)
  • Cost sensitivityย is a primary constraint
  • You’re designing circuits with voltages above 50Vย (ceramics handle this range better)

Side-by-Side Application Summary

ApplicationBest ChoiceReason
Bulk decoupling (โ‰ฅ10ยตF)TantalumStable actual capacitance, no DC bias loss
High-frequency bypass (100nF, 10nF)Ceramic MLCCLow ESR/ESL, excellent at MHz+
Precision timing/oscillatorClass 1 Ceramic (C0G)Zero aging, no voltage coefficient
Audio signal couplingCeramic (Class 1) or FilmAvoids tantalum polarity issues, avoids MLCC microphonics
Medical/aerospace bulk capTantalum (polymer)Long-term stability, no dry-out
Power supply filtering (output cap)Tantalum or Polymer MLCCApplication-dependent ESR requirements
RF impedance matchingCeramic (C0G)Precision, stability, low loss
Automotive electronicsCeramic (AEC-Q200)Wide availability, qualified parts

Tantalum vs Ceramic Capacitor: Master Comparison Table

PropertyTantalum CapacitorCeramic MLCC (Class 2)Ceramic MLCC (Class 1)
PolarizationPolarizedNon-polarizedNon-polarized
Capacitance Range0.1ยตF โ€“ 2200ยตF1pF โ€“ 100ยตF+1pF โ€“ ~10ยตF
Voltage RangeTypically 2V โ€“ 50V1.5V โ€“ 5000V+1.5V โ€“ 5000V+
Capacitance/VolumeVery HighHighLow-Moderate
ESRModerate (higher)Very LowVery Low
ESLModerateVery LowVery Low
Temperature StabilityGood, linearModerate, non-linearExcellent
DC Bias EffectNoneSignificantNone
AgingNoneLogarithmicVery Low
Frequency PerformanceUp to ~500kHzGHz rangeGHz range
Failure ModeShort circuit (can burn)Mechanical crack / shortMechanical crack / short
Cost (relative)HighLowModerate
Mechanical FragilityModerateHigh (brittle ceramic)High (brittle ceramic)
Microphonic EffectNonePresent (BaTiOโ‚ƒ)Minimal

PCB Design Rules: Practical Tips from the Bench

For Tantalum Capacitors:

  1. Derate voltage by at least 50%ย for MnOโ‚‚ types. A 5V supply rail โ†’ use a 10V or 16V rated part. Polymer types allow derating to 80โ€“90%.
  2. Add a series resistorย (minimum 3ฮฉ) to limit inrush current, especially near the power entry point.
  3. Never reverse polarityย โ€” mark the positive terminal clearly on your PCB silkscreen and verify your footprint. A reversed tantalum in a live circuit can fail violently.
  4. Avoid manual soldering if possible.ย Use reflow with proper thermal profiling and preheat to prevent thermal shock cracking.
  5. Check leakage current specsย across your operating temperature range โ€” high-temperature leakage is a key reliability indicator.

For Ceramic MLCCs:

  1. Verify actual capacitance at operating voltageย for Class 2 types. Especially critical for X5R and Y5V. Use vendor simulation tools or measure directly.
  2. Place decoupling caps as close to the power pins as possibleย โ€” short return paths minimize ESL.
  3. Avoid placing MLCCs across PCB breakaway tabs or near board edgesย where flex stress is high.
  4. Use C0G/NP0 for timing and filter circuitsย where ยฑ5% or better tolerance matters over the full temperature range.
  5. Consider the microphonic effectย in audio or sensitive analog sections โ€” Class 1 or film caps are preferable there.

Useful Resources for Engineers

These references are worth bookmarking for deeper dives:


Frequently Asked Questions

1. Can I replace a tantalum capacitor with a ceramic capacitor?

In many cases, yes โ€” but not automatically. The main concerns are: the ceramic equivalent must deliver the same actual capacitance at operating voltage (accounting for DC bias derating), the capacitor must fit the footprint, and if the tantalum was specifically chosen for its low-impedance bulk decoupling role at lower frequencies, a ceramic may need a larger value to compensate for its DC bias loss. For applications requiring AC voltage or high-frequency operation, ceramics are actually superior replacements.

2. Why do tantalum capacitors explode or catch fire?

Traditional MnOโ‚‚-type solid tantalum capacitors have a catastrophic short-circuit failure mode. When a dielectric defect is subjected to high energy โ€” from overvoltage, surge current, or reverse polarity โ€” localized heating converts the dielectric to a lower-resistance crystalline form, creating a runaway short. The energy stored in the capacitor (and supplied by the circuit) dissipates rapidly, causing the part to smoke or ignite. Proper voltage derating (50%), current limiting, and using polymer tantalum (which fails benignly to open-circuit) largely eliminate this risk in practice.

3. Which capacitor is better for power supply decoupling?

It depends on the frequency range and capacitance value. For high-frequency noise (above ~1MHz) on digital power rails, ceramic MLCCs (X5R or X7R in 0402/0603 packages) are the right choice due to their very low ESR and ESL. For bulk decoupling (10ยตFโ€“100ยตF range) where you need a stable capacitance value you can count on, tantalum polymer capacitors are a strong choice. In practice, most modern designs use both โ€” ceramics for HF decoupling, with a larger tantalum or polymer electrolytic for bulk storage.

4. How do I choose between X7R and C0G/NP0 ceramic capacitors?

Use C0G/NP0 when capacitance stability over temperature, voltage, and time is critical โ€” timing circuits, oscillators, RF filters, and precision analog applications. Use X7R (or X5R) when you need higher capacitance values in a small package and can tolerate some variation with temperature and DC bias โ€” general decoupling, AC coupling, and bypass applications. Always check actual capacitance at your operating voltage for X7R/X5R using the manufacturer’s simulation tool.

5. Are tantalum capacitors still relevant today, or are ceramics replacing them?

Tantalum capacitors remain highly relevant, particularly in applications demanding long-term stability, high capacitance density with predictable values, and reliability in harsh environments. Medical devices, aerospace electronics, and industrial controls still widely specify tantalum โ€” often polymer tantalum for its improved ESR and safer failure mode. While MLCC technology has pushed into capacitance values once dominated by tantalum, the DC bias derating issue means that at practical operating voltages, a “100ยตF” MLCC may deliver only 30โ€“40ยตF, while a 100ยตF tantalum delivers 100ยตF. That fundamental advantage keeps tantalum firmly on the BOM for demanding designs.

Summary

The tantalum vs ceramic capacitor question doesn’t have a universal winner โ€” it has a context-dependent answer. Here’s the one-line engineering rule of thumb:

If you need stable, high capacitance at low-to-mid frequencies in a small space โ†’ tantalum. If you need low-ESR, high-frequency filtering, non-polar operation, or cost efficiency โ†’ ceramic MLCC.

Real-world PCBs almost always use both. Understanding the DC bias derating of Class 2 ceramics, the voltage derating and surge sensitivity of tantalum, and the aging behavior of each type will keep your designs reliable from first prototype through years in the field.

This article reflects the practical experience of working PCB engineers and technical data from industry white papers and manufacturer application notes.

Supercapacitor vs Battery: Energy Storage Comparison

Supercapacitor vs battery: a PCB engineer’s guide comparing energy density, power density, cycle life, cost, safety, and when to use each technology in your design.

If you’ve spent any time designing power systems โ€” whether it’s a PCB for an IoT node, an EV powertrain, or an industrial UPS โ€” you’ve probably wrestled with the supercapacitor vs battery question at some point. Both technologies store energy. Both can power electronics. But they do it through completely different mechanisms, and treating them as interchangeable alternatives is a mistake that shows up fast in real-world performance.

This guide covers every meaningful dimension of the comparison: how they work, what their specs actually mean in practice, where each technology shines, and how to decide which belongs in your design. We’ll also look at why the smartest answer is increasingly “both.”

What Is a Supercapacitor? Understanding the Technology

A supercapacitor โ€” also called an ultracapacitor, electric double-layer capacitor (EDLC), or electrochemical capacitor โ€” stores energy electrostatically rather than chemically. When voltage is applied across its two electrodes, ions from the electrolyte accumulate at the electrode surface, forming an electrostatic double layer (the Helmholtz layer). No chemical reaction takes place. Energy is stored physically in the charge separation.

The electrodes are typically made from activated carbon or graphene-based materials with extremely high surface area โ€” often exceeding 1,000 mยฒ per gram. That enormous surface area is what gives supercapacitors their headline advantage: capacitance values measured in Farads (sometimes thousands of Farads), compared to the millifarad and microfarad values of conventional capacitors on a PCB.

There are three main types:

  • Electric Double Layer Capacitors (EDLCs):ย The most common type. Energy is stored purely electrostatically. Very long cycle life and fast charge/discharge.
  • Pseudocapacitors:ย Use a mix of electrostatic and faradaic (chemical) storage. Higher energy density than EDLCs, but reduced cycle life.
  • Hybrid supercapacitors (lithium-ion capacitors):ย One battery-type electrode, one capacitor-type electrode. Bridge the gap between supercapacitors and batteries in the energy-power Ragone plot.

How Supercapacitors Charge and Discharge

Because no electrochemical reaction is involved, supercapacitors can charge and discharge extremely rapidly โ€” often in seconds. There’s no phase change in the electrode material, no ion intercalation, no thermal runaway risk from a mismanaged reaction. The process is highly reversible, which is why EDLC supercapacitors can sustain hundreds of thousands to millions of charge/discharge cycles with minimal degradation.

The voltage across a supercapacitor drops linearly as it discharges โ€” unlike batteries, which maintain a relatively flat discharge voltage curve. This characteristic matters for your power management circuit design, as we’ll cover later.

What Is a Battery? The Electrochemical Baseline

A battery stores energy chemically. In a lithium-ion cell, lithium ions shuttle between a graphite anode and a lithium metal oxide cathode through a liquid electrolyte during charge and discharge. This intercalation chemistry is governed by Faraday’s laws of electrolysis โ€” the process is slow compared to electrostatic storage, and every cycle causes incremental degradation of the electrode materials and electrolyte.

Battery types most relevant to modern electronics and energy systems:

  • Lithium-Ion (Li-ion):ย Dominant in portable electronics and EVs. High energy density (150โ€“250 Wh/kg), moderate cycle life (500โ€“2,000 cycles), good output voltage (3.6V nominal).
  • Lithium Iron Phosphate (LFP):ย Lower energy density than standard Li-ion but more thermally stable and longer cycle life (2,000โ€“6,000 cycles). Used increasingly in EVs and grid storage.
  • Lead-Acid:ย Mature, cheap, heavy, low cycle life (~300โ€“500 cycles). Still dominant in automotive starting batteries and backup UPS systems.
  • Nickel-Metal Hydride (NiMH):ย Used in hybrid vehicles and some consumer electronics. Better safety profile than Li-ion, lower energy density.

Supercapacitor vs Battery: The Core Technical Comparison

Energy Density vs Power Density

This is the fundamental trade-off in the supercapacitor vs battery debate, best visualized on a Ragone plot (power density vs energy density).

  • Batteries have high energy densityย (how much energy they store per unit weight/volume) โ€” typically 100โ€“300 Wh/kg for Li-ion.
  • Supercapacitors have high power densityย (how much energy they can deliver per unit time per unit weight) โ€” reaching 10,000 W/kg or more, which is 10โ€“100ร— better than most batteries.

The flip side: supercapacitors typically store only 1โ€“10 Wh/kg โ€” a fraction of what a Li-ion battery delivers. A same-weight supercapacitor holds vastly more power capacity but far less energy. Think of a supercapacitor as a large, fast water pipe; a battery as a large, slow tank.

PropertySupercapacitor (EDLC)Li-Ion BatteryLead-Acid Battery
Energy Density (Wh/kg)1โ€“10150โ€“25030โ€“50
Power Density (W/kg)5,000โ€“15,000250โ€“1,00075โ€“300
Charge TimeSeconds to minutes30 min โ€“ several hours8โ€“16 hours
Discharge TimeSeconds to minutesHoursHours
Cycle Life500,000 โ€“ 1,000,000+500 โ€“ 2,000300 โ€“ 500
Self-Discharge RateHigh (~30% per month)Low (~5โ€“10% per month)Moderate (~5% per month)
Operating Temp. Rangeโˆ’40ยฐC to +70ยฐCโˆ’20ยฐC to +60ยฐCโˆ’20ยฐC to +50ยฐC
Voltage per Cell~2.5V3.2โ€“3.7V~2.0V
Failure ModeGradual capacitance fadeChemical degradation, thermal runaway riskSulphation, dry-out
Environmental ImpactLow (carbon-based)High (Li, Co, Ni mining)High (lead, acid)
Cost per WhVery highModerate (falling)Low
Cost per Watt (power)CompetitiveHighModerate

Charge and Discharge Rates

One of the most important practical differences for PCB engineers and system designers is how fast energy flows in and out. Supercapacitors can absorb a full charge in seconds. Li-ion batteries, even with fast-charging technology, take 20โ€“60 minutes at a minimum. This isn’t just a convenience issue โ€” it’s a fundamental physics constraint. Pushing a battery to charge at very high rates causes lithium plating, heat, and accelerated capacity loss.

The discharge side is equally stark. A supercapacitor can dump its stored energy in a pulse that would destroy a battery of the same capacity. This is exactly what makes supercapacitors valuable in high-power transient applications: motor startup, regenerative braking capture, camera flash circuits, and pulsed radar systems.

Cycle Life and Longevity

Batteries wear out. Every charge-discharge cycle incrementally degrades the electrode materials and electrolyte. A quality Li-ion cell might deliver 80% of its original capacity after 1,000 cycles. A lead-acid battery may give you 400โ€“500 cycles before capacity drops to unusable levels.

Supercapacitors, particularly EDLCs, have a virtually unlimited cycle life under normal operating conditions. Because energy storage is electrostatic rather than electrochemical, there is no material phase change with each cycle. Well-designed EDLC supercapacitors can sustain hundreds of thousands of cycles โ€” often exceeding the operational lifetime of the product they’re installed in. This is a decisive advantage in applications that cycle frequently: regenerative braking, elevator drives, load-leveling in industrial equipment, and grid-tied storage systems.

Temperature Performance

Batteries are sensitive to temperature at both ends of the scale. Li-ion cells become sluggish and lose effective capacity in the cold; they become a thermal runaway risk in the heat. Managing temperature adds cost and complexity โ€” battery management systems (BMS), thermal sensors, heating films for cold climates, and cooling plates for high-power applications.

Supercapacitors operate effectively across a much wider temperature range โ€” roughly โˆ’40ยฐC to +70ยฐC โ€” without special thermal management. This makes them attractive for outdoor infrastructure, automotive electronics, and industrial environments where temperature excursions are the norm. The trade-off is that their already-high self-discharge rate worsens at elevated temperatures.

Self-Discharge: A Real Design Concern

A supercapacitor that’s been charged and left on the shelf can lose approximately 30% of its stored energy within a month. A Li-ion battery will lose around 5โ€“10% over the same period. For backup power applications, energy harvesting designs, or any system that needs to hold a charge for extended periods without external power, this is a showstopper for supercapacitors used alone. It’s one of the main reasons they don’t simply replace batteries.

Voltage Behavior During Discharge

This is a critical circuit design issue. A fully charged single EDLC supercapacitor cell has a terminal voltage of about 2.7V. As it discharges, that voltage drops linearly to zero. There’s no flat plateau like you get from a Li-ion or lead-acid cell. This means any circuit powered by a supercapacitor alone needs a wide-input DC-DC converter to maintain a regulated output voltage across the full state-of-charge range. That converter adds cost, board space, and efficiency losses โ€” something to account for early in your power architecture decisions.

Supercapacitor vs Battery: Comprehensive Comparison Table

FactorSupercapacitorBattery
Storage MechanismElectrostatic (physical)Electrochemical (chemical reaction)
Energy DensityLowHigh
Power DensityVery HighLow to Moderate
Response TimeMillisecondsSeconds to minutes
Cycle Life500K โ€“ 1M+500 โ€“ 5,000
Charge TimeSecondsMinutes to hours
Self-DischargeHighLow
Temperature Rangeโˆ’40ยฐC to 70ยฐCNarrower, requires management
Voltage StabilityLinear drop during dischargeRelatively flat plateau
Thermal Runaway RiskNonePresent (Li-ion)
Toxicity / DisposalLow (carbon)Moderate-High (Li, Co, Pb)
MaintenanceNear-zeroPeriodic BMS management needed
Cost per Wh StoredVery highModerate
Cost per W DeliveredCompetitiveExpensive
Typical Lifetime10โ€“15 years3โ€“8 years
Form Factor FlexibilityHigh (thin film possible)Moderate
Circuit Design ComplexityModerate (needs DC-DC)Moderate (needs BMS)

Where Each Technology Wins: Real-World Applications

Applications Where Supercapacitors Excel

Regenerative braking in electric vehicles and trains: When a vehicle brakes, kinetic energy converts to electrical energy that needs to be captured almost instantly โ€” far faster than any battery can absorb. Supercapacitors excel here. Recent research demonstrates that well-designed hybrid energy storage systems using supercapacitors alongside Li-ion batteries can reduce battery peak current demand by over 30%, significantly extending battery cycle life while improving overall energy recovery efficiency.

Industrial UPS and power bridging: In factories and data centers, a momentary grid interruption lasting 20โ€“100 milliseconds can cause controller resets, process interruptions, and data loss. Supercapacitors โ€” often replacing electrolytic capacitors in UPS designs โ€” can bridge these gaps instantly without the complexity or maintenance overhead of a battery system.

Cold-start assist in automotive systems: Starting a diesel engine in arctic conditions demands a massive current pulse that batteries struggle to deliver at low temperature. Supercapacitors integrated alongside the main battery provide this initial current surge reliably even at โˆ’40ยฐC.

Peak power shaving in wireless IoT and meters: Battery-powered devices with wireless transmitters often draw large short-duration current spikes during transmission. A supercapacitor in parallel with the battery smooths these spikes, reducing the stress on the battery and extending its service life.

Smart grid and renewable energy buffering: Solar and wind generation is inherently intermittent. Supercapacitors can smooth out second-to-second variations in output far faster than batteries, reducing the wear on battery systems and improving grid frequency stability.

Medical devices and wearables: Devices that require instantaneous high-power pulses (defibrillators, surgical tools) combined with long standby times benefit from hybrid approaches with supercapacitors handling the pulse delivery.

Applications Where Batteries Remain Dominant

Smartphones, laptops, and portable electronics: You need hours of continuous power in a small, light package. Batteries win decisively on energy density. A supercapacitor large enough to power a smartphone for a day would be enormous.

Electric vehicles โ€” primary energy storage: Even with all the advantages of supercapacitors for transient load management, the driving range of an EV depends on total stored energy. Batteries store 20โ€“100ร— more energy by weight than supercapacitors of the same size. They’re irreplaceable as the primary energy store.

Grid-scale storage (multi-hour discharge): Balancing supply and demand at grid scale requires energy storage that can discharge over hours or days โ€” the territory of batteries and pumped hydro, not supercapacitors.

Implantable medical devices: Low self-discharge and high energy density in a tiny volume are critical for cardiac pacemakers and drug delivery systems. Batteries (specialized lithium primary cells) are the only viable option here.

Consumer electronics backup: Portable power banks, emergency lights, backup power for routers and alarms โ€” these applications need energy stored reliably for weeks or months. Supercapacitors’ self-discharge rate makes them poor standalone choices.

Application Decision Matrix

ApplicationBest ChoiceKey Reason
EV primary energy storageBatteryEnergy density required for range
EV regenerative brakingSupercapacitor (or hybrid)Millisecond capture speed
Industrial UPS bridgingSupercapacitorInstant response, long cycle life
Solar/wind output smoothingSupercapacitor or HybridFast response to fluctuations
Grid multi-hour storageBatteryLong discharge duration needed
Portable electronicsBatteryEnergy density priority
Cold climate cranking assistSupercapacitorPerformance at โˆ’40ยฐC
IoT peak current bufferingSupercapacitor or hybridReduces battery stress
Defibrillator pulse deliverySupercapacitorHigh instantaneous power
Long-term backup (days)BatteryLow self-discharge required
Racing/performance EVsHybrid (both)Acceleration power + range
Medical implantablesBattery (primary lithium)Energy density + reliability

The Hybrid Approach: Why the Best Answer Is Often “Both”

Here’s a perspective worth taking seriously: in many high-performance applications, the question isn’t supercapacitor vs battery โ€” it’s supercapacitor and battery, working as a hybrid energy storage system (HESS).

The logic is compelling. Batteries are excellent energy stores but struggle with high-rate charge/discharge. Supercapacitors are exceptional at rapid energy exchange but can’t store enough energy alone. Pairing them uses each technology for what it does best:

  • The battery handles baseline energy supply and long-term storage.
  • The supercapacitor handles transient peaks โ€” absorbing regenerative energy instantly, delivering burst power for acceleration, buffering load spikes that would otherwise stress and degrade the battery.

In EV applications, research has shown that adding supercapacitors to a battery system can reduce peak battery current demand by more than 30%, translating directly into extended battery pack service life. The supercapacitor effectively acts as a high-speed buffer, protecting the battery from the charge/discharge patterns most damaging to its electrochemistry.

For PCB engineers, this hybrid approach typically means designing a bidirectional DC-DC converter between the two energy stores, a supervisory controller that manages power flow based on real-time demand, and careful voltage management since the supercapacitor’s terminal voltage shifts with state of charge. It adds design complexity, but in applications where battery replacement is expensive, dangerous, or simply impossible (think: remote infrastructure, implanted devices, sealed industrial equipment), that complexity pays dividends.

PCB and System Design Considerations

Voltage Management for Supercapacitors

Because a supercapacitor’s terminal voltage varies continuously from full charge to zero, you almost always need a DC-DC converter downstream to maintain a stable supply rail. Consider a wide-input buck-boost converter if the supercapacitor voltage can swing above and below your target output voltage during operation. Size your converter for the peak discharge current, not just the average โ€” supercapacitors can source enormous peak currents.

Also be aware that EDLC supercapacitors have a maximum cell voltage of about 2.7V. When stacking cells in series to achieve higher voltage, you need voltage balancing circuits across each cell. Without balancing, variations in capacitance between cells will cause some to overvoltage while others remain undercharged, sharply reducing system lifetime and potentially causing failure.

Battery Management System (BMS) vs Supercapacitor Management

Batteries require a BMS for safety and longevity โ€” overcharge protection, over-discharge protection, cell balancing, temperature monitoring, and state-of-charge estimation. This adds board space, cost, and firmware complexity. Supercapacitors have a simpler management burden: overvoltage protection and cell balancing for series stacks. No temperature management, no complex state-of-charge algorithms, no fuel gauge IC needed.

PCB Layout Tips for Supercapacitor Circuits

  • Place supercapacitors physically close to the load they’re buffering. Long trace inductance fights against the fast current pulses that supercapacitors are designed to deliver.
  • Use wide, low-inductance power traces or copper pours for supercapacitor discharge paths.
  • Add soft-start circuitry if the supercapacitor charges from a power rail โ€” the initial inrush to charge a discharged supercapacitor is essentially a short circuit to the source, and without current limiting, it will trigger overcurrent protection or damage the supply.
  • If you’re using a supercapacitor as a backup power source, test the worst-case scenario: the supercapacitor is at minimum usable voltage, the battery or main supply disappears, and your circuit needs to maintain operation for a defined time window. Size the supercapacitor bank from this calculation, not just nominal conditions.

Cost Analysis: Supercapacitor vs Battery

On a cost-per-watt-hour basis, supercapacitors are far more expensive than batteries. A Li-ion battery might cost $100โ€“$200 per kWh at pack level. Supercapacitors run to thousands of dollars per kWh of stored energy. If energy storage volume is your primary design metric, supercapacitors lose this comparison badly.

Flip the metric to cost-per-watt (power delivery) or total cost of ownership over cycle life, and the picture changes. A supercapacitor system that cycles a million times without replacement competes favorably against a battery system requiring replacement every few hundred to few thousand cycles, especially when factoring in maintenance labor, downtime, and the cost of battery disposal.

For industrial systems where a failed or degraded battery forces a maintenance visit โ€” think rail infrastructure, remote telecoms, smart grid installations โ€” the total ownership cost of a supercapacitor-based buffer system can be meaningfully lower than the equivalent battery solution over a 10โ€“15 year horizon.

Environmental Considerations

Supercapacitors have a meaningfully better environmental profile than most batteries. Activated carbon โ€” the primary electrode material in EDLCs โ€” is derived from coal, coconut shells, or wood, and is relatively benign to mine and process. EDLC supercapacitors contain no toxic heavy metals (no lithium, cobalt, nickel, or lead), and their end-of-life disposal is far simpler and less regulated than battery waste.

Li-ion batteries depend on lithium, cobalt, and nickel โ€” materials with complex and often geopolitically fraught supply chains and significant environmental impact from mining. Battery recycling is improving but remains energy-intensive. LFP chemistry reduces the cobalt issue but still requires lithium mining. Lead-acid batteries contain toxic lead and sulfuric acid, requiring strict handling at end of life.

As sustainability becomes a design constraint rather than an afterthought โ€” especially for products sold in the EU and California markets with strict battery disposal regulations โ€” supercapacitors’ cleaner environmental footprint is an increasingly relevant engineering consideration.

Useful Resources for Engineers and Researchers

These references provide deeper technical data for design decisions:

Frequently Asked Questions

1. Can a supercapacitor fully replace a battery?

For most applications today, no. The energy density gap is simply too large. A supercapacitor stores roughly 20โ€“100ร— less energy per kilogram than a Li-ion battery. Where supercapacitors can replace batteries is in applications requiring only short bursts of power: backup for brief power interruptions, cold-crank assist, camera flash circuits, and industrial peak-shaving buffers. In these niche cases, the supercapacitor’s superior cycle life and temperature range make it a better long-term choice than a battery. For applications needing sustained power over minutes, hours, or days, batteries remain essential.

2. How many charge cycles can a supercapacitor endure compared to a battery?

EDLC supercapacitors can typically sustain 500,000 to over 1,000,000 charge/discharge cycles with minimal capacity degradation. A quality Li-ion battery manages 500โ€“2,000 cycles before falling below 80% of original capacity. LFP chemistry extends this to roughly 2,000โ€“6,000 cycles. For applications that cycle constantly โ€” regenerative braking, load leveling in industrial systems, or grid frequency regulation โ€” supercapacitors can deliver decades of service without replacement, while batteries would need replacement multiple times over the same period.

3. Why does a supercapacitor’s voltage drop as it discharges, while a battery stays more constant?

This is a direct consequence of how each technology stores energy. A supercapacitor stores charge electrostatically. The voltage across a capacitor is directly proportional to the stored charge (V = Q/C). As charge is removed, voltage decreases proportionally โ€” a linear decline. A battery’s output voltage, by contrast, is determined primarily by the electrochemistry of the cell reaction, which maintains a relatively stable equilibrium potential through most of the discharge curve before dropping steeply at full depletion. This flat discharge profile from batteries simplifies power management circuit design, while the sloping supercapacitor voltage curve requires a DC-DC converter for regulated applications.

4. Are supercapacitors safe? Can they cause fires like lithium batteries?

In general, supercapacitors are significantly safer than Li-ion batteries. There’s no electrochemical reaction that can run away thermally โ€” no thermal runaway, no risk of combustion from internal short circuits in the way Li-ion cells can experience. An abused or overcharged supercapacitor may vent gas or rupture, but this is far less energetic and hazardous than a Li-ion cell failure. The electrolyte in most EDLCs is organic and flammable, so catastrophic mechanical damage can create a fire hazard, but the failure mode is far more controlled than lithium battery chemistry. This safety advantage is one reason supercapacitors are being evaluated for applications in densely populated transit systems, medical devices, and aircraft.

5. How do you size a supercapacitor for a backup power application?

Start from your load requirements: how much current does your circuit draw (I_load), at what minimum operating voltage (V_min), and for how long (t_hold). The stored energy in a supercapacitor is E = ยฝCVยฒ. Energy available during discharge from V_max (fully charged) to V_min is E = ยฝC(V_maxยฒ โˆ’ V_minยฒ). Account for converter efficiency (ฮท) if using a DC-DC converter. The required capacitance is C = 2 ร— P_load ร— t_hold / (ฮท ร— (V_maxยฒ โˆ’ V_minยฒ)), where P_load = V_load ร— I_load. Add a 20โ€“30% margin for capacitance tolerance, aging, and temperature effects. Also verify the ESR of your chosen supercapacitor โ€” during a large current pulse, the voltage sag at the terminals is I ร— ESR, which adds to the effective minimum voltage requirement.

Summary: Choosing Between Supercapacitor and Battery

The supercapacitor vs battery decision comes down to what your application fundamentally needs. If the answer is stored energy over time โ€” choose a battery. If the answer is fast, powerful bursts of energy with extreme cycle life โ€” choose a supercapacitor. If the answer is both, design a hybrid system.

As a PCB engineer or system designer, the practical rule is: use supercapacitors where you would reach for a very large capacitor bank, not where you would reach for a backup battery. They’re not competing on the same axis. Supercapacitors are power density champions; batteries are energy density champions. The Ragone plot shows them in different territories, and that’s a feature, not a limitation โ€” when you understand it, you can use both technologies to build systems that neither could achieve alone.

The most exciting direction in energy storage right now is the middle ground: hybrid lithium-ion capacitors, solid-state batteries with faster kinetics, and graphene-enhanced supercapacitors pushing higher energy density. The gap between the two technologies is narrowing, but for at least the next decade, they’re best understood as complementary tools in an engineer’s power design toolkit โ€” not as rivals.

This article is written from a PCB and power system engineering perspective, drawing on manufacturer application notes, peer-reviewed research, and practical design experience.

Snubber Capacitor: How to Design for MOSFET & IGBT Switching

Learn how to design a snubber capacitor for MOSFET and IGBT switching circuits. Covers RC, RCD, and C-snubber topologies, step-by-step capacitance and resistance calculations, component selection tips, PCB layout rules, and a full FAQ โ€” written for power electronics engineers.

If you’ve ever watched a voltage spike kill a perfectly good MOSFET mid-prototype, you already understand why snubber capacitors exist. The problem is almost always the same: stray inductance in the switching loop punches a transient voltage spike across your device the moment current tries to change direction. A properly designed snubber capacitor absorbs that energy before your device does. This guide breaks down the theory, the design math, the component selection, and the PCB layout details you actually need โ€” written from the bench outward, not from a textbook backward.

What Is a Snubber Capacitor and Why Does It Matter?

A snubber capacitor is a passive component โ€” typically a film capacitor โ€” placed in close proximity to a power switching device (MOSFET, IGBT, SiC MOSFET, GaN FET) to suppress voltage transients and damp high-frequency ringing during switching transitions.

Every real-world power circuit contains parasitic inductance: in PCB traces, bus bars, component leads, and wiring. When a switch opens abruptly and current collapses, that parasitic inductance generates a back-EMF proportional to L ร— (di/dt). In fast-switching IGBTs, di/dt values can reach several thousand A/ยตs. The resulting voltage spike can easily exceed the device’s rated blocking voltage, destroying it instantly or degrading it over thousands of switching cycles.

The snubber capacitor offers a low-impedance path that absorbs the electromagnetic energy of the overvoltage as electrostatic energy, slowing the voltage rise (dv/dt) across the switch and preventing the peak from exceeding safe limits.

Rule of thumb: If your MOSFET or IGBT is failing from overvoltage in a circuit that looks correct on paper, stray inductance and insufficient snubbing are the top two suspects.

How Does a Snubber Capacitor Work in a Switching Circuit?

When the switching device turns off, load current that was flowing through the device must suddenly find another path. The stray inductance in the commutation loop resists this change and pushes a high voltage spike across the open switch.

With a snubber capacitor in place, the current from the bus commutates into the capacitor instead. The capacitor charges up, absorbing the energy, and the rate of voltage rise (dv/dt) across the switch is reduced because the capacitor limits how fast voltage can climb. The snubber effectively buys time โ€” it slows the transition enough that peak voltage stays within the safe operating area (SOA) of the device.

When the switch turns on again, the snubber capacitor discharges. In a simple C-snubber, that discharge energy is dissipated in the switch itself. In an RC or RCD snubber, the resistor controls that discharge and limits the peak discharge current.

Types of Snubber Circuits for MOSFET and IGBT Applications

Not every snubber topology fits every situation. The type you need depends on power level, switching frequency, circuit topology, and how much efficiency loss you can tolerate.

C-Snubber (Capacitor Only)

The simplest option. A low-ESL film capacitor is placed directly across the switch or across the DC bus near the switching device. It suppresses dv/dt and clamps the voltage peak but dissipates charge energy in the switch during turn-on. Effective for lower power levels where capacitor discharge loss is acceptable.

When to use it: Low to medium current applications, decoupling across IGBT modules, bulk bus stabilization.

RC Snubber

An RC snubber adds a series resistor to the capacitor. The resistor damps the resonance between the snubber capacitor and the parasitic inductance, preventing oscillations. The resistor dissipates the capacitor’s stored energy during turn-on rather than dumping it all into the switch at once.

When to use it: The most common choice for MOSFETs in SMPS, flyback converters, and half-bridge stages. Good balance of performance and simplicity.

RCD Snubber (Charge-Discharge)

A diode is added in series with the capacitor. The diode allows the capacitor to charge during turn-off (absorbing the energy spike) but blocks it from discharging back through the same path. A resistor provides a controlled discharge route. This allows the switch’s turn-on transient to be much cleaner.

When to use it: Medium to high current IGBT applications, inverter half-bridge topologies, motor drives.

RCD Clamp Snubber

A variation where the capacitor charges to bus voltage and is continuously reset through the resistor. Particularly effective for clamping peak voltage to a defined level above bus voltage.

Summary Table: Snubber Topology Comparison

TopologyComponentsEnergy RecoveryPower DissipationBest For
C-SnubberCap onlyNoneIn switchLow power, decoupling
RC SnubberR + CNoneIn resistorSMPS, flyback converters
RCD Charge-DischargeR + C + DNoneIn resistorIGBT half-bridge, inverters
RCD ClampR + C + DNoneIn resistorHigh dV/dt clamp applications
Lossless (LC or RLC)L + C ยฑ RYes (feedback)MinimalHigh-efficiency converters

Snubber Capacitor Design: Step-by-Step for MOSFET Circuits

Here’s the practical approach used for RC snubber design in MOSFET-based power converters. This is the seven-step method widely cited in application notes and it holds up well in practice.

Step 1: Observe the Ringing Frequency Without a Snubber

Using an oscilloscope, measure the natural ringing frequency (fโ‚€) at the switch node after turn-off. This is the resonant frequency of the parasitic LC tank formed by the stray inductance and the switch’s output capacitance (Coss) plus any other capacitance at that node.

Step 2: Add a Known Capacitor and Re-Measure

Add a known film capacitor C_add (start with 100 pF) directly across the MOSFET (as close as possible). The ringing frequency will drop. Measure the new frequency fโ‚. Increase C_add until fโ‚ = fโ‚€ / 2, at which point total capacitance at the node has quadrupled. This lets you back-calculate the parasitic capacitance Cโ‚€:

Cโ‚€ = C_add / 3

Step 3: Calculate Parasitic Inductance

With Cโ‚€ known:

L = 1 / [(2ฯ€ ร— fโ‚€)ยฒ ร— Cโ‚€]

This parasitic inductance is the primary cause of the voltage spikes you’re fighting.

Step 4: Calculate Snubber Capacitance

For a critically damped response (damping factor ฮถ = 1):

C_snub = Cโ‚€ (minimum)

In practice, choose C_snub = 2โ€“4 ร— Cโ‚€ for a margin of safety and more effective ringing suppression. Larger capacitance improves spike suppression but increases power dissipated in the snubber resistor.

Step 5: Calculate Snubber Resistance

R_snub = โˆš(L / C_snub)

This gives the characteristic impedance of the LC tank, which is the optimal damping resistance. A damping factor between 0.7 and 1.0 is the sweet spot โ€” you don’t need to eliminate ringing entirely, just keep it from bouncing off device voltage limits.

Step 6: Calculate Resistor Power Dissipation

P_R = C_snub ร— Vยฒ_bus ร— f_sw

At high switching frequencies, this can become substantial. Always verify the resistor wattage rating and derate it by at least 50% for thermal safety.

Step 7: Verify on the Bench

Simulate the design, then verify with a scope. Adjust R slightly up or down if ringing persists or if you see excessive overshoot on turn-on. Fine-tuning on real hardware is almost always required because stray inductance values are hard to model perfectly.

Snubber Capacitor Design for IGBT Modules

IGBT snubber design follows the same physics but has a few additional considerations driven by the higher power, higher current, and longer switching times typical of IGBT applications.

Key IGBT Design Parameters

ParameterTypical RangeImpact on Snubber
Collector current (Ic)10 A โ€“ 3600 ASets peak snubber current
Bus voltage (Vdc)400 V โ€“ 3300 VSets capacitor voltage rating
Switching frequency1 kHz โ€“ 20 kHzAffects snubber power dissipation
Stray inductance (Ls)20 nH โ€“ 200 nHSets spike magnitude
di/dt at turn-off500 A/ยตs โ€“ 5000 A/ยตsPrimary sizing driver

IGBT Snubber Capacitance Sizing

For an IGBT turn-off snubber, the basic C-snubber capacitance is calculated from the condition that all energy stored in the stray inductance transfers to the snubber capacitor, keeping the peak voltage below the device rating:

C_snub โ‰ฅ L_stray ร— Iยฒ_off / (Vยฒ_peak โˆ’ Vยฒ_bus)

Where:

  • L_strayย = total loop inductance in the commutation path (nH)
  • I_offย = current at turn-off (A)
  • V_peakย = maximum allowable voltage (typically 80% of V_CES rating)
  • V_busย = DC bus voltage

Bus Bar Inductance and Layout

The stray inductance in high-power IGBT circuits is dominated by bus bar geometry, not by the capacitor leads. A well-designed laminated bus bar can reduce loop inductance from 100โ€“200 nH down to 10โ€“30 nH. This single change reduces the required snubber capacitance and the peak voltage spike proportionally.

Oscillation and Self-Heating in IGBT Snubber Capacitors

After each switching event, a damped oscillation occurs between the snubber capacitor and the bus bar inductance. This creates RMS AC current through the capacitor at frequencies typically between 100 kHz and several MHz. The capacitor’s ESR at these frequencies determines self-heating. A capacitor that appears correctly rated for voltage and capacitance can still overheat and fail if its Iยฒ_RMS ร— ESR losses are not within spec. Always check the datasheet for:

  • Maximum RMS current rating
  • ESR at 100 kHz or the relevant oscillation frequency
  • Maximum dv/dt rating
  • Self-heating temperature rise at maximum operating conditions

Snubber Capacitor Selection: What Type of Capacitor to Use

Capacitor type is not interchangeable for snubber applications. The wrong capacitor will fail even if the capacitance and voltage values are correct.

Film Capacitors (Recommended)

Polypropylene (PP) film capacitors are the industry standard for snubber applications. They offer:

  • Very low ESL (especially wound-construction types)
  • High dv/dt capability
  • Self-healing metallization (when using metallized film)
  • Wide operating temperature range
  • Low dissipation factor at high frequency

Polyester (PET/MKT) film capacitors are a lower-cost alternative for lower-frequency applications, but have higher losses at elevated temperatures and frequencies compared to PP.

Ceramic Capacitors

High-voltage ceramic capacitors (X7R, C0G) can perform well as snubbers in lower-power, higher-frequency applications (e.g., SiC MOSFETs at 100+ kHz). Tests comparing film capacitors to ceramic arrays have shown that a parallel array of smaller ceramic capacitors can outperform large film types for surge suppression because of their lower combined ESL.

What NOT to Use

Capacitor TypeWhy It Fails in Snubber Applications
ElectrolyticToo high ESL and ESR; cannot handle high di/dt
TantalumCannot survive repetitive transient current
Standard ceramic (Y5V)Capacitance collapses at voltage; poor high-temp stability

Snubber Capacitor Voltage Derating

Never run a snubber capacitor at its rated voltage. Standard practice is to derate to 50โ€“70% of rated DC voltage. For a 400 V bus, use a capacitor rated at 630 V or 1000 V DC minimum. This accounts for the voltage overshoot the capacitor itself sees during snubbing.

For more information on how PCB-integrated capacitors behave in power applications, the guide at PCB capacitors covers the key characteristics that matter for layout and component selection.

PCB Layout Best Practices for Snubber Capacitors

Even a perfectly calculated snubber will underperform if the layout is poor. Parasitic inductance added between the snubber capacitor and the switch can negate the snubber’s effect entirely.

Placement Rules

  • Mount the snubber capacitor as close as physically possibleย to the switching device terminals. Every millimeter of distance adds loop inductance.
  • For IGBT modules, direct-mount capacitors that attach directly to the module’s C and E terminals are the best solution โ€” they essentially have zero loop inductance from the capacitor to the device.
  • For discrete MOSFETs on a PCB, place the snubber cap on the same side of the board as the MOSFET, across the drain-source pins, with the shortest possible trace length.

PCB Trace Geometry

Layout ChoiceEffect on Snubber Performance
Short, wide tracesReduces trace inductance โ€” better snubbing
Vias in snubber pathAdds ~1 nH per via โ€” minimize them
Ground plane under snubber loopReduces loop area, reduces inductance
Kelvin connectionsImproves accuracy for gate drive sensing

Parallel Capacitors for Lower ESL

Placing two or more smaller capacitors in parallel reduces total ESL better than a single larger capacitor of equivalent value. For high-frequency SiC or GaN MOSFET applications, this approach can cut effective snubber inductance in half or better.

Snubber Capacitor Design for SiC MOSFETs

Silicon carbide MOSFETs switch significantly faster than Si IGBTs โ€” dv/dt values of 50โ€“90 kV/ยตs are common. This makes snubber design both more important and more difficult:

  • Faster switching = higher dv/dt = more severe spike from even small stray inductance
  • Lower switching losses = any snubber loss is a larger percentage hit on efficiency
  • Higher frequency = more snubber power dissipation cycles per second

For SiC applications, the C-snubber (no resistor) is often preferred to minimize turn-on losses, but the stray inductance of the snubber path itself must be extremely low. The capacitor’s ESL must be less than the main loop inductance it is intended to divert โ€” otherwise the snubber does more harm than good.

Useful Resources for Snubber Design

ResourceTypeLink
Infineon โ€“ Snubber Considerations for IGBT ApplicationsApplication NoteInfineon PDF
ROHM โ€“ Snubber Circuit Design Methods (SiC MOSFET)Application NoteROHM PDF
Cornell Dubilier โ€“ Design of Snubbers for Power Circuits (Rudy Severns)Technical PaperCDE PDF
Nexperia AN11160 โ€“ Designing RC SnubbersApplication NoteNexperia PDF
DigiKey โ€“ RC Snubber Design for Power SwitchesArticleDigiKey Article
EE Times โ€“ Calculating an RC Snubber (7-step method)ArticleEE Times
Danfoss โ€“ IGBT Peak Voltage Measurement and Snubber SelectionApplication NoteDanfoss PDF
Fuji Electric โ€“ IGBT Protection Circuit Design Chapter 5Technical ManualFuji PDF

Common Snubber Design Mistakes to Avoid

These are errors that show up repeatedly on production boards:

1. Placing the snubber too far from the switch. The inductance added between the snubber and the device can be greater than the inductance you were trying to suppress. The snubber must be right at the device terminals.

2. Using electrolytic or standard ceramic capacitors. These fail under the repetitive transient current stress of a snubber application.

3. Under-rating the resistor wattage. Snubber resistors dissipate energy on every single switching cycle. At 50 kHz, even a small snubber capacitor can push watts through the resistor continuously.

4. Ignoring capacitor ESL. A physically large film capacitor may have more ESL than a smaller one. Check the manufacturer’s self-resonant frequency (SRF) data.

5. Skipping bench verification. Calculated values are a starting point. Parasitic inductance in the real board is almost always different from estimates. Always verify with a scope before signing off on the design.

Frequently Asked Questions About Snubber Capacitors

Q1: Can I use the same snubber design for both MOSFETs and IGBTs?

The same RC or RCD topology works for both, but the component values will differ. IGBTs are typically used at higher voltages and currents with lower switching frequencies, meaning larger capacitance values and higher voltage ratings. MOSFETs โ€” especially SiC types โ€” operate at higher frequencies, pushing snubber power dissipation up and requiring extremely low-ESL capacitors. The design procedure is the same; the numbers and component grades differ.

Q2: What capacitance value should I start with for a snubber?

A practical starting point for a simple RC snubber across a MOSFET is 2โ€“4ร— the device’s output capacitance (Coss) at the operating voltage. This is an empirical starting value, not a final design. Always use the seven-step measurement-based method for the final design to account for actual board parasitic inductance.

Q3: Does a larger snubber capacitor always mean better protection?

No. A larger snubber capacitor does suppress the voltage spike more effectively, but it also stores more energy that must be discharged on every turn-on โ€” dissipating more power in the snubber resistor (or in the switch itself for a C-only snubber). There is a practical optimum beyond which efficiency drops unacceptably. As a rule, snubber dissipation should not exceed 3โ€“5% of the converter’s rated output power.

Q4: Why does my snubber capacitor run hot?

Self-heating in a snubber capacitor is caused by RMS current flowing through the capacitor’s internal ESR. This current flows at the frequency of the damped oscillation that occurs after each switching event โ€” typically 100 kHz to several MHz. Even if the capacitor’s voltage and capacitance are within spec, excessive ESR at these frequencies causes thermal runaway. Switch to a lower-ESR film capacitor type and verify the RMS current rating against the manufacturer’s datasheet.

Q5: Is a snubber capacitor always required for IGBT circuits?

Not in every case, but in practice, nearly all high-power IGBT inverter and motor drive designs require some form of bus decoupling or snubbing. Even if the IGBT survives without one under normal load, fault conditions โ€” where peak turn-off current can reach 6โ€“10ร— rated current โ€” will generate voltage spikes far exceeding the device’s blocking voltage without protection. The snubber capacitor is a low-cost insurance policy against failure.

Final Thoughts

A snubber capacitor is one of those components that never shows up in the BOM until the board comes back from prototype with a dead MOSFET. Getting the design right the first time means understanding the stray inductance in your loop, choosing the right capacitor type (film, always โ€” never electrolytic), placing it as close to the device as physically possible, and verifying on the bench. The math is straightforward. The PCB layout discipline is what separates reliable designs from the ones that fail in the field after 10,000 switching cycles.

Start with the seven-step method, validate on the bench, and derate your capacitor voltage by at least 50%. That’s a snubber design that actually works.

SMD vs Through-Hole Capacitor: Which One Should You Use?

SMD capacitor vs through-hole: a PCB engineer’s guide to size, performance, cost, assembly, and when each mounting technology belongs in your design.

Every PCB engineer has faced that layout moment: the BOM calls for a capacitor and you’re deciding whether to stick with a traditional through-hole part or go full surface mount. The answer isn’t always obvious, and for good reason โ€” both technologies have real-world trade-offs that only become apparent when a design goes into production or ends up in a harsh environment. SMD capacitors dominate modern electronics, but through-hole parts haven’t gone away, and for certain applications they’re still the smarter choice.

This guide breaks down the decision clearly, from construction basics to PCB layout rules and manufacturing cost, so you can pick the right form factor the first time.

What Is an SMD Capacitor?

An SMD capacitor (Surface Mount Device capacitor) is a capacitor designed to be soldered directly onto pads on the surface of a printed circuit board, with no leads passing through the board. The component body itself forms the connection โ€” either through metallized end-caps (for MLCCs and tantalum chip capacitors) or a flat base with contact pads (for SMD aluminum electrolytic types).

SMD capacitors are the backbone of modern electronics. They’re used in practically everything: smartphones, laptops, automotive ECUs, medical devices, industrial controllers, and RF modules. Understanding how capacitors function on a PCB is essential before diving into the mounting method comparison, since the electrical role of the component doesn’t change โ€” only the form factor does.

The most common SMD capacitor types include:

  • MLCC (Multilayer Ceramic Capacitor):ย Available in tiny packages from 01005 up to 2220. The dominant SMD cap type by volume.
  • SMD Tantalum:ย Available in EIA case codes A through E (and beyond), offering high capacitance density in a flat package.
  • SMD Aluminum Electrolytic:ย Cylindrical can on an SMD base plate. Used for larger capacitance values where a flat tantalum isn’t sufficient.
  • SMD Polymer Electrolytic:ย Low-profile, low-ESR alternative to aluminum electrolytic. Increasingly popular in power supply designs.

What Is a Through-Hole Capacitor?

Through-hole capacitors (also called leaded or THT โ€” Through-Hole Technology โ€” capacitors) have wire leads that are inserted into drilled holes in the PCB and soldered on the opposite side. This has been the standard mounting method since PCBs were invented.

Common through-hole types include radial aluminum electrolytic (the classic “can” capacitor on vertical leads), axial film capacitors, ceramic disc capacitors, and large-value snap-in or screw-terminal electrolytics used in power electronics.

Through-hole parts dominated electronics until surface mount technology matured through the late 1980s and 1990s. Today they represent a minority of new designs, but they’re far from obsolete.

SMD Capacitor Package Sizes: What the Numbers Mean

One of the first things that confuses new engineers working with SMD capacitors is the package code system. The codes use imperial notation where the four digits represent length and width in hundredths of an inch.

Package CodeLength ร— Width (mm)Typical Use
010050.4 ร— 0.2 mmUltra-compact consumer electronics
02010.6 ร— 0.3 mmHigh-density RF, smartphone
04021.0 ร— 0.5 mmConsumer electronics, general use
06031.6 ร— 0.8 mmConsumer and industrial, most balanced
08052.0 ร— 1.25 mmHigher capacitance, power applications
12063.2 ร— 1.6 mmHigh-voltage, high-capacitance, or high-power
12103.2 ร— 2.5 mmLarge value bulk capacitance
18124.5 ร— 3.2 mmHigh-voltage speciality applications

In practice, 0603 and 0402 are the most widely used SMD sizes in mainstream electronics. The 0402 package suits smartphones and dense consumer PCBs well; 0603 is the sweet spot for industrial and automotive designs where assembly yield and reworkability matter more than absolute size minimization.

An important note for designers: smaller 0402 capacitors lose 60โ€“80% of their rated capacitance under rated DC voltage, while 0805 packages lose only 30โ€“40%. That means a 10ยตF 0402 X7R cap at its rated voltage may only deliver 2โ€“4ยตF in practice. Size selection isn’t just about footprint area โ€” it directly affects your actual capacitance in circuit.

Key Differences: SMD Capacitor vs Through-Hole Capacitor

Physical Size and Board Space

This is the most obvious difference. SMD components are about one-third the size and one-tenth the weight of equivalent through-hole components. For a compact wearable, smartphone motherboard, or any design where PCB area is at a premium, through-hole simply won’t fit.

Through-hole capacitors also consume space on both sides of the board โ€” the body sits above the top surface while the bent-over leads occupy the solder side. SMD components, by contrast, stay on one side and leave the reverse side of the board available for routing or additional components.

Mechanical Strength and Vibration Resistance

Through-hole components show two major benefits compared to SMDs: higher temperature resistance and higher resistance against mechanical stress. Due to the use of lead wires, twists and vibrations of the PCB cause lower harm to the component, which prevents breakage and other defects.

For designs that experience mechanical stress โ€” motors, power tools, industrial machinery, automotive underhood applications, aerospace equipment โ€” through-hole connections are inherently more robust. The lead wires create a physical anchor through the PCB substrate. SMD solder joints, being attached only to the surface, are more vulnerable to shear forces from vibration or board flex.

That said, a study published in IEEE Transactions on Components and Packaging Technologies found that SMD components showed a 37% lower failure rate than through-hole components in thermal cycling tests. SMD parts’ smaller mass means less mechanical stress from differential thermal expansion โ€” a meaningful advantage in applications that cycle through temperature extremes.

High-Frequency Performance

An SMD ceramic capacitor can have an effective series inductance (ESL) as low as 0.5nH, compared to 5nH or more for a through-hole equivalent. That order-of-magnitude difference in parasitic inductance is decisive for RF circuits, high-speed digital decoupling, and any application operating above a few hundred kilohertz.

The through-hole lead acts as an inductor in series with the capacitor โ€” and at high frequencies that inductance dominates the impedance. A 100nF through-hole ceramic disc capacitor becomes nearly useless for decoupling above ~10MHz because its lead inductance creates a resonance that limits its effectiveness. A 100nF 0402 MLCC in the same role keeps working effectively into the hundreds of megahertz range.

For RF engineers and high-speed digital designers, SMD capacitors aren’t just convenient โ€” they’re technically necessary.

Assembly Process and Manufacturing Cost

SMD assembly can be up to 5 times faster than through-hole assembly, based on industry studies of automated placement processes. This speed advantage translates directly into lower production cost at volume.

SMD capacitors go through automated pick-and-place equipment followed by reflow soldering in a controlled-atmosphere oven. The process is highly repeatable, fast, and compatible with double-sided assembly. Through-hole components require either wave soldering (which constrains board design and adds thermal stress) or hand insertion and selective soldering. If you have a board that is entirely SMT, then using a leaded capacitor means you just added an entire step in the manufacturing process. Also, drill hits cost money.

Mixed-technology boards โ€” those using both SMD and through-hole components โ€” are significantly more expensive to assemble than pure-SMT boards. Every through-hole component on an otherwise SMT board adds a wave soldering step or a hand-soldering operation, plus the cost of drilling.

Rework and Prototyping

For hand-prototyping on a workbench, through-hole parts have a clear advantage. You can insert them into a breadboard, solder them with a basic iron, and replace them with fingers and a standard solder pump. No special equipment needed.

SMD rework requires a hot air rework station or a precision soldering iron with fine tips, good lighting, tweezers, and ideally a microscope or magnification for 0402 and smaller packages. It’s a learnable skill but not trivial, and it adds tool cost and time to the prototyping cycle.

For production rework, the calculus flips somewhat. Replacing a through-hole electrolytic cap in an assembled board means desoldering through the board โ€” often damaging the pad ring. Replacing an SMD cap with the right hot air station is fast and clean, especially for smaller packages.

Thermal Performance

Large through-hole electrolytic capacitors have better thermal performance than their SMD equivalents of the same capacitance โ€” the physical separation from the board surface allows better airflow around the component body. This matters most for aluminum electrolytic capacitors in power supply designs, where core temperature drives the expected lifetime.

SMD aluminum electrolytics sit closer to the board, and heat from adjacent components can shorten their service life. Thermal vias and careful layout โ€” keeping SMD electrolytics away from heat sources and adding copper pour heatsinking โ€” are important design practices.

For MLCCs and tantalum SMD caps, the thermal story is different. Their smaller mass and tight thermal coupling to the PCB copper can actually help dissipate heat in low-to-moderate power scenarios, and their inherent stability at temperature is excellent compared to electrolytic types.

Side-by-Side Comparison Table

FactorSMD CapacitorThrough-Hole Capacitor
Physical SizeVery small (0201โ€“1812)Large
Board Space RequiredMinimal (one side)Both sides, plus drill holes
High-Frequency PerformanceExcellent (low ESL)Poor (lead inductance)
Mechanical StrengthModerateHigh
Vibration ResistanceLowerHigher
Thermal Cycling ReliabilityGood (low mass)Moderate (thermal stress on leads)
Assembly SpeedVery fast (automated)Slower (wave/hand solder)
Manufacturing Cost (volume)LowHigher
Prototyping / ReworkRequires toolsEasy by hand
Max Voltage (common types)Moderate (up to ~2kV for specialty)High (kV range readily available)
Max Capacitance AvailableUp to ~1000ยตF (SMD electrolytic)Very High (mF and above)
Temperature RangeWide (ceramic: โˆ’55ยฐC to +125ยฐC)Similar for film; varies by type
Component AvailabilityExtremely wideNarrowing for new designs
Mixed-Technology PCB CostAdds cost if mixedAdds cost if mixed
Visual Inspection EaseHarder (small size)Easier

When to Use SMD Capacitors

SMD capacitors are the right choice for the vast majority of modern PCB designs. Use them when:

  • You’re designing a compact consumer product, IoT device, wearable, or mobile application
  • Your circuit operates at frequencies above ~1MHz and parasitic inductance matters
  • Your production volumes justify automated SMT assembly
  • Board space is at a premium and component density needs to be maximized
  • Your design needs to meet modern size and weight targets

The 0402 and 0603 packages cover most decoupling, filtering, and coupling applications in commercial electronics. For demanding automotive, medical, or industrial designs, 0603 and 0805 offer a better balance of size and reliability.

When Through-Hole Capacitors Are Still the Right Call

Through-hole capacitors remain the better choice in specific, well-defined scenarios:

  • High-voltage power electronics:ย Large-value, high-voltage film and electrolytic capacitors for motor drives, inverters, UPS systems, and power supplies are routinely through-hole because SMD equivalents either don’t exist or are impractical
  • Harsh vibration environments:ย Military, aerospace, heavy industrial, and automotive underhood applications where mechanical robustness outweighs size requirements
  • Pure prototyping and hobby projects:ย When hand-assembly speed matters more than production economics
  • Very high capacitance values:ย Screw-terminal and snap-in electrolytic capacitors for bulk energy storage in power electronics have no practical SMD equivalent
  • High-current applications:ย Large through-hole electrolytics handle ripple current and heat dissipation more effectively at high current levels

Practical PCB Layout Tips for SMD Capacitors

Decoupling placement: Place SMD decoupling capacitors as close as physically possible to the power pins of the IC they’re serving. Use short, wide traces and keep the return path direct. Every millimeter of trace adds parasitic inductance that degrades performance.

Pad design and footprint: Follow IPC-7351 footprint standards for your chosen package size. Oversized pads cause tombstoning during reflow (one end of the component lifts). Undersized pads give poor solder joint strength.

Avoid placing large MLCCs near board edges or breakaway tabs. The ceramic body is brittle. PCB depaneling, bending during assembly, and screw-mounting stress can crack MLCCs silently โ€” creating an intermittent short that is very difficult to diagnose in the field.

Thermal balance: For reflow soldering, the two pads of an SMD capacitor should see the same thermal mass. Asymmetric copper pours on one side cause uneven heating and tombstoning. Add thermal spokes or match copper area on both pads.

Size up from 0402 when DC bias derating matters. In practice, smaller sizes like 0201 or 0402 perform best in high-frequency nodes, 0603 or 0805 work well for general decoupling, and 1206 or larger fit high-voltage or high-capacitance requirements.

Useful Resources for Engineers

Frequently Asked Questions

1. Can I replace a through-hole capacitor with an SMD capacitor?

Yes, in most cases โ€” but with caveats. The SMD part must match the capacitance, voltage rating, temperature rating, and dielectric class of the original. You also need an adapter board or creative PCB footprint if you’re retrofitting an existing design. For high-voltage or high-current through-hole parts, equivalent SMD versions may not exist in the required rating. For general-purpose decoupling and filtering below 50V, direct SMD replacement is almost always viable and often improves high-frequency performance.

2. Why do SMD capacitors have package size codes like 0402 and 0603?

The numeric codes are based on imperial dimensions in hundredths of an inch. A 0402 is 0.04 inches long and 0.02 inches wide (1.0mm ร— 0.5mm). A 0603 is 0.06 inches long and 0.03 inches wide (1.6mm ร— 0.8mm). This naming convention was established by EIA and JEDEC and is universally used by component manufacturers, though metric equivalents (1005, 1608) are sometimes seen in Japanese manufacturer documentation.

3. Are SMD capacitors reliable enough for industrial and automotive applications?

Absolutely โ€” SMD capacitors, particularly MLCCs in 0603 and larger packages, are qualified to AEC-Q200 automotive standards and are used in billions of automotive ECUs, ADAS systems, and powertrain controllers worldwide. The key is proper voltage derating, package size selection appropriate for the operating environment (0603 minimum for most automotive uses), and layout practices that protect against mechanical cracking. In thermal cycling environments, SMD MLCCs often outperform through-hole parts because their small mass reduces differential thermal expansion stress.

4. What is the minimum package size I can hand-solder reliably?

Most engineers with SMT soldering experience can hand-solder 0402 components reliably with a fine-tipped iron, good lighting, and steady hands. Some experienced technicians work with 0201. Below 0201 โ€” into 01005 territory โ€” hand soldering becomes impractical for production, and even for rework it’s extremely challenging. For prototype or rework work, 0603 is the sweet spot: small enough for modern designs, large enough to handle comfortably with standard SMT soldering tools.

5. When does a mixed SMD/through-hole design make sense?

Mixed technology is sometimes unavoidable. Very large bulk capacitors (1000ยตF+ at 50V+) often only exist as through-hole screw-terminal or snap-in types. High-voltage film capacitors above a few hundred volts are through-hole. Connectors are frequently through-hole for mechanical strength even on otherwise all-SMT boards. The engineering rule is: minimize through-hole to only those components where no viable SMD alternative exists, because each through-hole component adds manufacturing process steps and cost. When you can’t avoid mixing technologies, group all through-hole components together on the board to minimize wave soldering masking complexity.

Choosing the Right Capacitor for Your PCB

The SMD capacitor is the default choice for most PCB designs today โ€” smaller, faster to assemble, cheaper at volume, and superior at high frequencies. Through-hole capacitors retain a firm foothold in high-power, high-voltage, mechanically demanding, and legacy-compatible applications where their physical robustness and easy availability in large values are decisive.

The practical guide: default to 0402 or 0603 SMD MLCCs for signal-path and decoupling capacitors, use 0805 or 1206 for higher capacitance values where DC bias derating would otherwise bite you, reach for SMD tantalum or polymer when you need stable bulk capacitance in a tight space, and use through-hole parts only where the application demands it โ€” not out of habit.

Getting the form factor right from the start saves real money and headaches when the board goes into production.

Written from a PCB engineering perspective, drawing on IPC standards, manufacturer application notes, and production assembly experience.

RC Filter Capacitor: Low-Pass, High-Pass & Band-Pass Design

Master RC filter capacitor design for low-pass, high-pass, and band-pass circuits โ€” with cutoff frequency formulas, worked examples, dielectric selection tables, and PCB layout tips.

If you’ve ever chased down an audio hum caused by power supply noise, debugged an ADC that produced jittery readings, or watched an oscilloscope trace explode with high-frequency garbage on what should have been a clean signal path โ€” you were staring at an RC filter problem. The RC filter capacitor is the workhorse of passive analog signal conditioning, and understanding how to design with it properly is a skill that pays dividends on every mixed-signal or analog PCB you ever lay out.

This guide covers the three fundamental RC filter configurations from the ground up: low-pass, high-pass, and band-pass. Each section walks through the design math, the real-world capacitor selection decisions that textbooks skip, practical PCB implementation tips, and the common mistakes that make filters underperform in production hardware. You can find a broader overview of capacitor types and their PCB roles here if you want grounding on the component fundamentals before diving into filter design.

What Is an RC Filter and How Does the Capacitor Create Filtering?

An RC filter is a passive network built from a resistor (R) and a capacitor (C). The filter works because a capacitor’s impedance is frequency-dependent, while a resistor’s impedance is not. The capacitor’s impedance โ€” called capacitive reactance โ€” is expressed as:

Xc = 1 / (2ฯ€ ร— f ร— C)

As frequency increases, Xc falls. At low frequencies, the capacitor presents high impedance. At high frequencies, it presents low impedance approaching a short circuit. By arranging a resistor and capacitor in a voltage divider configuration, you can create a network whose output voltage is frequency-dependent โ€” which is exactly the definition of a filter.

Depending on which component connects to the output node, the filter passes either low frequencies or high frequencies. Cascade a high-pass and a low-pass together and you get a band-pass filter. Simple in concept, consequential in execution.

The RC Time Constant and Cutoff Frequency

The time constant of an RC network โ€” denoted by the Greek letter tau (ฯ„) โ€” defines how quickly the capacitor charges and discharges through the resistor:

ฯ„ = R ร— C (in seconds, with R in ohms and C in farads)

The cutoff frequency (also called the โˆ’3 dB frequency or corner frequency) is the frequency at which the filter transitions from passing signals to attenuating them. It is defined as the point where the output amplitude is 70.7% of the input โ€” a 3 dB reduction in amplitude, which corresponds to a 50% reduction in power:

fc = 1 / (2ฯ€ ร— R ร— C)

At the cutoff frequency, the capacitive reactance equals the resistance: Xc = R. The output is โˆ’3 dB, and the phase shift between input and output is 45ยฐ. Above or below this point (depending on filter type), the attenuation rate for a first-order RC filter is 20 dB per decade, or approximately 6 dB per octave.

RC Filter Order and Roll-Off Rate

Filter OrderReactive ElementsRoll-Off RatePhase Shift at fc
1st order1 capacitorโˆ’20 dB/decadeโˆ’45ยฐ (LPF) / +45ยฐ (HPF)
2nd order2 capacitorsโˆ’40 dB/decadeโˆ’90ยฐ (LPF) / +90ยฐ (HPF)
3rd order3 capacitorsโˆ’60 dB/decadeโˆ’135ยฐ / +135ยฐ
nth ordern capacitorsโˆ’20n dB/decadeโˆ’n ร— 45ยฐ

Higher-order RC filters provide steeper roll-off but add complexity, load sensitivity, and cumulative phase shift. For most discrete PCB filter applications, first-order and second-order designs are the practical sweet spot.

RC Low-Pass Filter Capacitor: Design and Applications

How the RC Low-Pass Filter Works

In an RC low-pass filter, the resistor is placed in series between the input and output, and the capacitor is connected from the output node to ground. At low frequencies, the capacitor has high impedance and does not load the output โ€” the input signal passes through with minimal attenuation. At high frequencies, the capacitor’s impedance drops, shunting the signal to ground and attenuating the output. The higher the frequency, the more current is diverted through the capacitor to ground, and the lower the output voltage becomes.

This is the configuration that turns a noisy square wave into something approximating a sine wave, removes high-frequency switching noise from a DAC output, and prevents aliasing at an ADC input.

RC Low-Pass Filter Design Steps

Step 1: Define the cutoff frequency. Determine what frequencies need to pass and what needs to be blocked. A common ADC anti-aliasing filter needs fc set to no more than half the ADC’s sample rate. A DAC reconstruction filter cutoff is typically set just above the highest audio frequency of interest (e.g., 20โ€“30 kHz for audio applications).

Step 2: Choose a starting resistor value. For low-impedance signal sources and moderate-impedance loads, a resistor in the range of 1 kฮฉ to 10 kฮฉ is a practical starting point. Higher values increase the impedance of the filter, which can cause loading issues with downstream circuits. Very low values require large capacitors to hit low cutoff frequencies.

Step 3: Calculate the capacitor value:

C = 1 / (2ฯ€ ร— R ร— fc)

Design example: You need a low-pass filter at fc = 10 kHz with R = 10 kฮฉ.

C = 1 / (2ฯ€ ร— 10,000 ร— 10,000) = 1.59 nF

The nearest standard preferred value is 1.5 nF (โˆ’5.7% frequency shift) or 1.8 nF (+13.2% frequency shift). Choose 1.5 nF for a cutoff that is slightly higher than 10 kHz, which is conservative for an anti-aliasing filter.

Step 4: Verify impedance compatibility. The output impedance of the driving stage should be much lower than R, and the load impedance seen by the filter output should be much higher than R (ideally 10ร— or greater). If the load impedance is comparable to R, it becomes part of the voltage divider and shifts the cutoff frequency downward.

RC Low-Pass Filter Capacitor Selection by Application

ApplicationRecommended Capacitor TypeToleranceNotes
ADC anti-aliasing filterC0G/NP0 MLCCยฑ1% to ยฑ5%Stable cutoff frequency; no DC bias effect
DAC output reconstructionC0G or film (polyester)ยฑ1% to ยฑ5%Low dielectric absorption; non-piezoelectric
EMI suppression (DC rail)X7R MLCCยฑ10% to ยฑ20%Tolerance acceptable; use low-ESL 0402 package
Audio tone controlFilm (polyester, polypropylene)ยฑ5%Neutral sound; no microphonics
General signal conditioningX7R MLCCยฑ10%Acceptable where ยฑ15% fc shift is tolerable
Power supply noise filterX7R MLCCยฑ20%Value less critical; use voltage-derated cap

Second-Order RC Low-Pass Filter

Cascading two identical first-order RC stages doubles the roll-off to โˆ’40 dB/decade. However, the critical design issue is impedance interaction between stages. The second stage loads the first stage, shifting the overall cutoff frequency lower than the calculated single-stage cutoff. To minimize this interaction, the second stage resistor R2 should be at least 10ร— the value of R1, with C2 adjusted to maintain the same desired cutoff frequency. This avoids the second stage acting as a load that modifies the first stage’s response.

RC High-Pass Filter Capacitor: Design and Applications

How the RC High-Pass Filter Works

In an RC high-pass filter, the component positions are swapped from the low-pass configuration. The capacitor is placed in series between the input and output, and the resistor is connected from the output node to ground. At low frequencies, the capacitor has high impedance and blocks the signal โ€” the output across the resistor is near zero. As frequency rises, the capacitor’s impedance drops, allowing more signal to pass through to the resistor. Above the cutoff frequency, the capacitor is effectively a short circuit and the full input signal appears at the output.

The RC high-pass filter blocks DC and attenuates low-frequency signals while passing higher-frequency content. This is the AC coupling capacitor in audio circuits, the differentiator configuration, and the high-frequency emphasis stage in equalization networks.

RC High-Pass Filter Design Steps

The cutoff frequency formula is identical to the low-pass case:

fc = 1 / (2ฯ€ ร— R ร— C)

Design example: You need a high-pass filter at fc = 100 Hz for audio AC coupling with R = 47 kฮฉ (typical input impedance of an amplifier stage).

C = 1 / (2ฯ€ ร— 47,000 ร— 100) = 33.9 nF

The nearest standard value is 33 nF, giving fc โ‰ˆ 102.5 Hz. A 39 nF capacitor would give fc โ‰ˆ 86.8 Hz โ€” a more conservative choice that ensures bass frequencies down to 87 Hz are passed without attenuation.

Important Considerations for RC High-Pass Filter Capacitors

AC coupling capacitors carry no DC bias. Unlike bypass or decoupling capacitors on power rails, the capacitor in a high-pass filter may have minimal DC voltage across it in a typical AC signal path. This is actually favorable โ€” you are not fighting DC bias derating when using X7R capacitors here. However, in circuits where the upstream stage has a DC offset, the coupling capacitor sees that voltage, and the correct voltage rating must be selected accordingly.

Dielectric absorption matters in high-pass filter circuits. When a high-pass filter is used in pulse or step-input circuits, a capacitor with high dielectric absorption (the tendency to “remember” a previous charge state) causes a tail error in the output waveform after the step passes. C0G and film capacitors have very low dielectric absorption. X7R is moderate, and older Z5U dielectrics are poor. For precision pulse differentiation or high-accuracy time-domain circuits, use C0G.

Bipolar electrolytic capacitors for large AC coupling values. When the required coupling capacitance exceeds approximately 10 ยตF โ€” typical in audio power amplifier output stages, speaker crossover circuits, and subwoofer-to-amplifier coupling โ€” film capacitors become physically large and expensive. Bipolar (non-polarized) aluminum electrolytic capacitors are the practical choice here, sized to keep their reactance below the desired cutoff frequency.

RC High-Pass Filter Application Guide

Applicationfc RangeRecommended CapacitorKey Concern
Audio AC coupling (line level)10โ€“100 HzFilm (polyester) or C0GLow distortion; no microphonics
Microphone coupling10โ€“50 HzFilm or bipolar electrolyticLow leakage; high impedance source
Differentiator / edge detectionCircuit-dependentC0G MLCCMinimal dielectric absorption
Speaker high-pass crossover80โ€“200 HzBipolar electrolytic or filmNon-polar; large value; voltage rated for speaker signal
High-pass at op-amp input1 Hzโ€“1 kHzC0G MLCCPrecision cutoff; low noise
Blocking DC from ADC input1โ€“10 HzC0G or filmStable cutoff; no drift under temperature

RC Band-Pass Filter Capacitor: Design and Applications

How the RC Band-Pass Filter Works

A passive RC band-pass filter is formed by cascading a high-pass filter stage followed by a low-pass filter stage. The high-pass stage sets the lower cutoff frequency (f_L), and the low-pass stage sets the upper cutoff frequency (f_H). The output passes signals that fall between these two cutoff frequencies and attenuates signals outside this band.

The center frequency (f0) of the band-pass filter is the geometric mean of the two cutoff frequencies:

f0 = โˆš(f_L ร— f_H)

The bandwidth (BW) is the difference between the upper and lower cutoff frequencies:

BW = f_H โˆ’ f_L

And the Q factor (selectivity) is:

Q = f0 / BW

A higher Q means a narrower, more selective passband. A passive RC band-pass filter has a maximum Q of 0.5 โ€” adequate for audio tone control and wideband signal conditioning, but too low for narrowband channel filtering or carrier frequency selection (which requires an active filter or LC resonant circuit).

RC Band-Pass Filter Design Example

You need a band-pass filter passing frequencies between 1 kHz and 30 kHz for an audio pre-processing circuit. Use R = 10 kฮฉ for both stages.

High-pass stage (sets f_L = 1 kHz): C1 = 1 / (2ฯ€ ร— 10,000 ร— 1,000) = 15.9 nF โ†’ use 15 nF (standard)

Low-pass stage (sets f_H = 30 kHz): C2 = 1 / (2ฯ€ ร— 10,000 ร— 30,000) = 530 pF โ†’ use 560 pF (nearest standard)

Center frequency: f0 = โˆš(1,000 ร— 30,000) = 5.48 kHz

Bandwidth: 30,000 โˆ’ 1,000 = 29 kHz

Q factor: 5,480 / 29,000 = 0.19

This is a wide-band filter suitable for audio band selection. The cascaded arrangement is a second-order band-pass filter with a roll-off of โˆ’20 dB/decade on each side of the passband.

Stage Impedance Isolation in RC Band-Pass Filters

The most common implementation error in cascaded RC filters is failing to account for stage loading. When the low-pass stage directly follows the high-pass stage, the input impedance of the low-pass stage loads the output of the high-pass stage. This shifts both cutoff frequencies from their individually calculated values.

The fix: make R2 (low-pass stage) at least 10ร— larger than R1 (high-pass stage), adjusting C2 proportionally to maintain f_H. This keeps the input impedance of the second stage high enough that it does not materially load the first stage. Alternatively, insert a unity-gain buffer (voltage follower op-amp) between the stages. This eliminates the loading problem entirely and is the preferred approach in precision active filter designs.

Capacitor Dielectric Choice for RC Filters: Practical Summary

This is the table that most filter design textbooks leave out. The formulas give you the value; the dielectric choice determines whether your filter actually behaves as designed across temperature and operating conditions.

DielectricTemperature StabilityDC Bias EffectDielectric AbsorptionBest For
C0G / NP0Excellent (ยฑ30 ppm/ยฐC)NoneVery low (<0.6%)Precision filters, ADC/DAC, RF, timing
X7RModerate (ยฑ15% over temp)SignificantModerateGeneral signal conditioning, non-critical
X5RModerateSignificantModerateAC coupling where value not critical
Film (polyester)GoodNoneVery lowAudio, AC coupling, power supply filters
Film (polypropylene)ExcellentNoneExtremely lowHigh-precision audio, RF, pulse circuits
Bipolar electrolyticPoorN/A (AC rated)HighLarge AC coupling capacitors (>10 ยตF)

For RC filters where the cutoff frequency must be stable across temperature โ€” anti-aliasing, precision equalization, oscillator timing networks, reference path filtering โ€” use C0G or film capacitors. The ยฑ15% capacitance drift of X7R across temperature directly translates to a ยฑ15% shift in your filter’s cutoff frequency. In a well-designed 20 kHz audio filter, that drift moves the cutoff by up to 3 kHz โ€” audible and consequential.

For general bypass, EMI, and non-critical signal path filtering where exact cutoff frequency is a secondary concern, X7R is entirely adequate and is cheaper and more available in small package sizes.

PCB Layout Considerations for RC Filter Capacitors

Keep Filter Components Close Together and Away from Noise Sources

The capacitor in an RC filter is part of a signal path, not a power supply. Its ground connection must be as close as possible to the signal source reference, and the loop area of the RC filter โ€” the area enclosed by the signal path through R, the capacitor, and back to ground โ€” should be minimized. A large loop area picks up magnetic interference that couples directly into your filter output as noise.

Place the resistor and capacitor adjacent to each other. Route the signal through the resistor first, then to the capacitor pad, with a direct, short trace to the ground reference. On mixed-signal boards, keep RC filter capacitors on the analog ground island, away from return current paths of high-speed digital circuits.

Parasitic Capacitance and Long Traces

Long PCB traces at high-impedance nodes create parasitic capacitance to adjacent conductors and to ground through the PCB substrate (approximately 1โ€“2 pF per centimeter of trace on standard FR-4). For a filter with R = 100 kฮฉ and C = 1.6 pF (designed for fc = 1 MHz), a 3 cm trace at the output node adds roughly 5 pF of parasitic capacitance โ€” shifting fc down to 300 kHz unintentionally. This is why high-frequency, high-impedance RC filters need short traces and careful shielding.

The practical guidance: keep traces at high-impedance RC filter nodes below 1 cm wherever possible. For frequencies above 1 MHz with resistor values above 10 kฮฉ, simulate the layout parasitics before treating the board layout as complete.

Component Tolerance and Production Yield

Capacitor tolerance directly affects filter yield in production. A ยฑ5% tolerance capacitor in an LC diplexer circuit has been shown to produce approximately 35% non-conforming parts without tuning. While a discrete RC filter is less sensitive than a resonant LC structure, the principle holds: tighter tolerance capacitors produce more consistent filter cutoff frequencies across a production run.

For a first-order RC filter with a ยฑ10% capacitor and ยฑ1% resistor, the worst-case cutoff frequency tolerance is approximately ยฑ11%. If your design has 20% headroom around the filter specification, ยฑ10% components are fine. If your anti-aliasing filter must not pass any signals above fs/2, the margins must be calculated explicitly.

Tolerance selection guide:

Design RequirementResistor ToleranceCapacitor Tolerance
Precision filter (ยฑ1% fc)ยฑ0.1%ยฑ1% (C0G)
Good accuracy (ยฑ5% fc)ยฑ1%ยฑ2% to ยฑ5% (C0G or film)
General purpose (ยฑ15% fc)ยฑ1%ยฑ10% (X7R)
Non-critical (ยฑ25% fc)ยฑ5%ยฑ20% (X7R)

Frequently Asked Questions

Q1: Why does my RC low-pass filter not achieve the expected attenuation at high frequencies?

Three likely causes. First, parasitic inductance in the capacitor โ€” particularly in large package electrolytics โ€” causes the component to become inductive above its self-resonant frequency (SRF), degrading high-frequency attenuation. Use a ceramic MLCC in 0402 or 0603 package for filtering above 1 MHz; these have SRFs in the tens of MHz range. Second, the filter resistor value is too high, making the filter output high-impedance and susceptible to capacitive coupling from adjacent traces bypassing the filter. Third, the PCB ground return path is shared with noisy return currents that inject noise after the filter โ€” the filter is working, but noise is entering downstream through the ground connection.

Q2: Can I use an electrolytic capacitor in an RC signal filter?

For low-frequency signal filters โ€” audio coupling, infrasonic high-pass filters below 20 Hz, power supply ripple filters โ€” a bipolar electrolytic capacitor can work. Standard polarized electrolytics should not be used in signal path filters where the AC signal could reverse the capacitor’s polarity. Polarized electrolytics in AC signal paths introduce significant harmonic distortion as the dielectric behaves nonlinearly near the zero-crossing. Use a bipolar (non-polarized) electrolytic, a film capacitor, or a C0G ceramic for signal path applications.

Q3: My RC filter cutoff frequency shifts with temperature in production. How do I fix it?

The most common cause is an X7R capacitor whose value changes with temperature (up to ยฑ15%). Replace the RC filter capacitor with a C0G/NP0 type (ยฑ30 ppm/ยฐC, effectively temperature-stable) or a film capacitor. If you must use X7R due to value availability, compensate by choosing the capacitor value so the nominal fc is centered in your acceptable range, giving margin for temperature drift in both directions. Also check whether the resistor has a significant temperature coefficient โ€” thin-film resistors (ยฑ25 ppm/ยฐC) are far more stable than thick-film types (ยฑ100โ€“200 ppm/ยฐC) and should be used in precision RC filters.

Q4: What is the difference between an RC filter and an LC filter, and when should I use each?

RC filters dissipate energy โ€” the resistor converts signal energy to heat, so the filter always has insertion loss. They are simple, inexpensive, and space-efficient for audio frequencies and lower-frequency signal conditioning. LC filters store and return energy โ€” the inductor and capacitor exchange energy reactively, creating much sharper roll-off per component count and negligible insertion loss in the passband. LC filters are preferred above 1 MHz, in RF applications, in power supply EMI filtering, and wherever low insertion loss in the passband is critical. The trade-off: inductors are bulky, can radiate EMI, and are harder to model accurately. RC filters are entirely appropriate for audio, low-speed ADC/DAC interfaces, and moderate-frequency signal conditioning.

Q5: How do I choose between a single second-order RC filter and two cascaded first-order RC filters for the same cutoff frequency?

Two cascaded first-order stages give โˆ’40 dB/decade roll-off but each stage must be properly impedance-isolated or the interaction between them shifts the overall cutoff frequency. A true second-order Sallen-Key active filter (using an op-amp) gives the same roll-off with a precisely controlled Q factor and no inter-stage loading. For passive-only designs where insertion loss is acceptable, two cascaded RC stages with a 10:1 impedance ratio between stages work well. For precision cutoff frequency control, an active topology is preferable. For demanding applications โ€” especially anywhere that must meet a specific filter mask in production โ€” simulate the cascaded network in SPICE including the actual source and load impedances before committing to the design.

Useful Resources for RC Filter Capacitor Design

ResourceDescriptionLink
Digi-Key RC Filter CalculatorCalculate cutoff frequency and component values for low-pass and high-pass RC filtersdigikey.com/en/resources/conversion-calculators
Murata SimSurfingSimulate MLCC capacitance vs. frequency, temperature, and DC bias to verify actual filter performanceds.murata.co.jp/simsurfing
Wรผrth Elektronik RedexpertInteractive impedance vs. frequency tool for Wรผrth MLCCs โ€” essential for verifying SRF before layoutwe-online.com/redexpert
KEMET KSIMModel real capacitor behavior under operating conditions for filter simulationksim3.kemet.com
All About Circuits RC Filter TutorialComprehensive series covering filter fundamentals, Bode plots, and design worked examplesallaboutcircuits.com
Electronics Tutorials โ€” RC FiltersLow-pass, high-pass, and band-pass tutorial series with design equations and exampleselectronics-tutorials.ws
Texas Instruments Active Filter DesignTI application report covering passive and active filter topology selection, component choice, and design examplesti.com โ€” SLOA049
LT Spice (Analog Devices)Free SPICE simulator for verifying RC filter frequency response with real component modelsanalog.com/ltspice
Analog Devices Filter Design ToolOnline active filter design wizard that generates schematics and component valuesanalog.com/designtools/en/filterwizard

Summary

The RC filter capacitor is the fundamental building block of analog signal conditioning. Understanding the three core configurations โ€” low-pass, high-pass, and band-pass โ€” and the real-world capacitor selection decisions that go with each of them is what separates circuits that measure well on the bench from circuits that still measure well after three years in the field across a โˆ’40ยฐC to +85ยฐC operating range.

The design math is straightforward: pick a resistor value, calculate C = 1/(2ฯ€Rfc), and choose the nearest standard value. What the formula does not tell you is that an X7R capacitor in a precision ADC anti-aliasing filter will shift your cutoff frequency by up to ยฑ15% with temperature, that a standard electrolytic in an AC signal path introduces harmonic distortion at zero-crossing, that parasitic inductance in a large-package capacitor turns your low-pass filter into a band-pass filter above a few MHz, or that insufficient impedance isolation between cascaded stages will move your band-pass filter’s cutoff frequencies significantly off target.

Use C0G or film capacitors wherever the cutoff frequency must be stable and predictable. Use 1% tolerance resistors and 5% or better capacitors in production designs where filter performance is part of the spec. Verify your filter’s frequency response in SPICE with actual component models before finalizing the layout. And keep filter traces short, loop areas small, and ground returns clean โ€” the PCB layout is part of the filter, whether you treat it that way or not.

Capacitor in a Power Supply: Ripple Filter & Reservoir Design

Power supply capacitor guide: how to size reservoir and filter caps, calculate ripple voltage, choose ESR, and avoid the mistakes that cause field failures.

Ask any power electronics engineer what kills most power supply designs in the field and the answer rarely surprises: wrong capacitor selection, poor placement, or both. The power supply capacitor is one of the most deceptively complex component choices on any PCB. Pick the wrong type, underestimate ripple current, or ignore ESR at your design frequency, and you end up with an unstable rail, a capacitor that runs hot and dies early, or an EMI failure that sends your board back from certification.

This guide covers exactly what you need to know โ€” from how reservoir capacitors and ripple filters actually work, through the math that sizes them correctly, to practical PCB layout rules that keep your supply clean and reliable.

What Does a Power Supply Capacitor Actually Do?

Before sizing anything, it’s worth being precise about the roles a capacitor plays in a power supply circuit. There are two distinct jobs, and confusing them leads to poor designs.

The Reservoir Capacitor: Storing Energy Between Rectifier Pulses

In a linear power supply, the output of the bridge rectifier is pulsating DC โ€” a series of half-sine humps at 100 Hz (for 50 Hz mains) or 120 Hz (for 60 Hz mains). The reservoir capacitor sits across the rectifier output and acts as an energy buffer. During each voltage peak, the rectifier charges the capacitor to near the peak voltage. Between peaks, when the rectifier diodes block, the capacitor discharges into the load, maintaining supply voltage between pulses.

The key insight: the capacitor is supplying the load current for most of the mains cycle, only being recharged in a short window around each peak. The larger the capacitor, the less voltage sag between peaks โ€” and therefore the lower the ripple. But there’s a trade-off: a very large reservoir capacitor charges in a very short time, demanding high peak current from the rectifier diodes and transformer secondary. You can’t simply keep scaling up capacitor value without increasing the diode and transformer current ratings accordingly.

The Filter Capacitor: Suppressing Residual AC Ripple

Once a reservoir capacitor has done its job, there’s still residual AC ripple on the output โ€” typically 10% of the DC output for a well-designed reservoir stage. Additional filter stages using capacitors (and inductors in LC filters, or RC networks for low-power circuits) attenuate this residual ripple before it reaches sensitive loads. In switching mode power supplies, the output capacitor sits after the inductor in the LC output filter, smoothing the switching ripple at the converter’s operating frequency rather than at mains frequency.

Understanding Ripple Voltage: The Core Parameter

Ripple voltage is the peak-to-peak AC variation riding on top of the DC output. The standard approximation formula for a full-wave rectified supply with a reservoir capacitor is:

Vripple โ‰ˆ Iload / (f ร— C)

Where Iload is the load current in amperes, f is the ripple frequency in Hz (100 Hz for 50 Hz mains full-wave, 120 Hz for 60 Hz mains), and C is the capacitance in farads.

Rearranging to find required capacitance:

C = Iload / (f ร— Vripple)

Worked Example: Sizing a Reservoir Capacitor

Suppose you’re designing a 12V linear supply delivering 2A at 100 Hz ripple frequency, and you want ripple held to 1V peak-to-peak:

C = 2A / (100 Hz ร— 1V) = 20,000 ยตF

That’s a large electrolytic โ€” exactly what you’d expect for a linear power supply capable of 2A output. If you want tighter ripple of 500 mV, the required capacitance doubles to 40,000 ยตF. This is why linear supplies for audio power amplifiers, bench instruments, and professional audio equipment use massive can-style electrolytic capacitors.

For a switching power supply operating at 200 kHz, the same formula applies but with a vastly higher f:

C = 2A / (200,000 Hz ร— 0.05V) = 200 ยตF

This explains why SMPS designs use much smaller output capacitors than linear supplies โ€” the higher switching frequency dramatically reduces the required bulk capacitance. It’s also why MLCCs become viable output capacitors in SMPS designs at higher switching frequencies.

Capacitor Types for Power Supply Applications

Not every capacitor type belongs in every power supply role. Selecting the right technology is as important as selecting the right value.

Aluminum Electrolytic Capacitors

The workhorse of linear power supply reservoir stages. Aluminum electrolytics offer the highest capacitance values in the smallest physical volume at reasonable cost. Available from a few ยตF up to hundreds of thousands of ยตF. Their chief weakness is ESR โ€” which can be several ohms for general-purpose types โ€” and a finite operational lifetime driven by electrolyte evaporation. Electrolyte dry-out is the most common failure mode in linear power supplies operated at elevated temperatures. A useful rule of thumb: every 10ยฐC increase in operating temperature halves the capacitor’s expected lifetime.

For switching power supply applications, always specify “low-ESR” or “switching-grade” aluminum electrolytics. General-purpose aluminum electrolytic capacitors should not be used in SMPS designs โ€” they have higher ESR and lower ripple current ratings, making them inadequate at switching frequencies. The difference in reliability and performance is not subtle.

MLCC Capacitors in Power Supplies

Multilayer ceramic capacitors have transformed SMPS output filter design. Their ESR is two to three orders of magnitude lower than aluminum electrolytic capacitors โ€” single-digit milliohms at switching frequencies are typical. This extremely low ESR allows a much smaller capacitance value to achieve the same ripple voltage, while also generating far less heat from ripple current flowing through the capacitor.

However, two practical issues demand attention. First, Class 2 MLCCs (X5R, X7R) lose substantial capacitance under DC bias. A 100 ยตF X5R MLCC rated at 6.3V may deliver only 20โ€“30 ยตF when running on a 5V rail. Size your MLCC values accounting for this derating โ€” always verify actual capacitance at operating voltage using manufacturer simulation tools. Second, the very low ESR of MLCCs can cause instability in switching power supply feedback loops and anti-resonance phenomena when multiple MLCCs are used in parallel. Combining MLCCs with a small-value aluminum electrolytic specifically chosen for its ESR can damp these oscillations.

Tantalum and Polymer Tantalum Capacitors

Solid tantalum and polymer tantalum capacitors sit between aluminum electrolytic and MLCC in the ESR spectrum. They offer higher capacitance density than ceramics of equivalent size, stable capacitance with no significant DC bias derating, and lower ESR than standard aluminum electrolytic types. Polymer tantalum in particular has become popular in low-voltage SMPS output filtering (3.3V, 1.8V, and below) where the low voltage rules out higher-capacitance MLCC options and space is constrained.

The standard reliability rule for MnOโ‚‚ tantalum capacitors applies in power supply design: voltage derate by at least 50%, and include current limiting to prevent inrush damage. Polymer tantalum relaxes this requirement to 80โ€“90% voltage derating with a better (non-shorting) failure mode.

Film Capacitors

Film capacitors โ€” polyester, polypropylene, and metallized film types โ€” appear at the AC input side of power supply circuits. X-class and Y-class safety capacitors are film types used across and between lines in EMI filters on mains-powered equipment. Film caps tolerate high peak currents, have no polarity concerns, and handle large voltage transients that would destroy other types. You’ll also find film capacitors in parallel with reservoir electrolytics in high-quality audio power supply designs, where their flat impedance response and low loss complement the bulk capacitance of the electrolytic.

Power Supply Capacitor Type Comparison

Capacitor TypeTypical ESRCapacitance RangeRipple CurrentBest Use in PSULifetime
Aluminum Electrolytic (std)0.1ฮฉ โ€“ 5ฮฉ1ยตF โ€“ 100,000ยตFModerateLinear supply reservoir2,000โ€“5,000 hrs at 105ยฐC
Aluminum Electrolytic (low-ESR)10mฮฉ โ€“ 200mฮฉ10ยตF โ€“ 10,000ยตFHighSMPS bulk output filter3,000โ€“10,000 hrs at 105ยฐC
Polymer Aluminum5mฮฉ โ€“ 50mฮฉ10ยตF โ€“ 3,000ยตFVery HighSMPS output, low-voltage railsVery long (no wet electrolyte)
MLCC X5R/X7R1mฮฉ โ€“ 20mฮฉ100nF โ€“ 100ยตFExcellentSMPS HF decoupling, output filterVirtually unlimited
Tantalum (polymer)10mฮฉ โ€“ 100mฮฉ1ยตF โ€“ 1,000ยตFGoodLow-voltage SMPS outputVery long
Film (PP/PE)Low1nF โ€“ 100ยตFVery HighAC input EMI filter, snubberExtremely long

ESR: The Specification That Dominates SMPS Design

<invoke name=”str_replace”> Every PCB engineer who works with switching power supplies learns this the hard way at least once: in an SMPS output capacitor, ESR is often more important than capacitance value.

For an aluminum electrolytic output capacitor in a buck converter, the ripple voltage contribution from ESR is:

Vripple_ESR = ฮ”iL ร— ESR

Where ฮ”iL is the inductor ripple current. If your inductor ripple current is 300 mA peak-to-peak and your capacitor has an ESR of 200 mฮฉ, that generates 60 mV of ripple voltage from ESR alone โ€” independent of the capacitance value. This ESR-dominated ripple is in phase with the inductor current, creating a characteristic sawtooth shape on an oscilloscope rather than the smooth triangular waveform you’d see with a pure capacitance-limited ripple.

The practical consequence: when using aluminum electrolytic capacitors as SMPS output filters, calculate both the minimum capacitance for load transient response and the maximum allowable ESR for ripple voltage โ€” then find a part that meets both. Neither spec alone is sufficient.

For MLCCs, the ESR is so low (often below 10 mฮฉ) that the capacitance term dominates ripple performance. The challenge with MLCCs shifts to ensuring adequate real-world capacitance after DC bias derating, and managing anti-resonance if using multiple capacitors in parallel.

Ripple Current Rating: The Parameter Engineers Most Often Ignore

Ripple current flowing through a capacitor’s ESR generates heat. The ripple current rating on a capacitor datasheet defines the maximum RMS AC current the component can handle without excessive temperature rise โ€” typically specified as the current that causes a 10ยฐC self-heating above ambient.

Exceed the ripple current rating and the capacitor runs hot. For aluminum electrolytic capacitors, this accelerates electrolyte evaporation dramatically. A capacitor running 10ยฐC hotter than its rated condition can have its lifetime cut in half. Running it 20ยฐC over can reduce lifetime to a quarter of the rated figure.

A common design error is selecting a capacitor based on capacitance and voltage rating alone, then checking the ripple current spec as an afterthought โ€” or not at all. The correct workflow is:

  1. Calculate the required capacitance and maximum ESR from your switching converter specs.
  2. Calculate the RMS ripple current that will flow through the output capacitor.
  3. Find candidate parts meeting all three parameters simultaneously.
  4. Derate the ripple current rating โ€” using 70โ€“80% of the rated value is good practice, especially if the capacitor will operate in a warm environment.

Filter Topologies: RC, LC, and Pi Filters

Simple Capacitor Filter (Shunt C)

The most basic filter: a single capacitor across the output. Works well for high-frequency SMPS switching ripple when using a low-ESR MLCC or polymer cap. Performance is limited by ESR and the self-resonant frequency of the capacitor. Adequate for many point-of-load applications where the output is already reasonably clean.

LC Filter

Adding an inductor in series before the shunt capacitor creates a second-order low-pass filter with much steeper roll-off than a capacitor alone. The LC filter reduces ripple by 12 dB/octave above the corner frequency, compared to 6 dB/octave for a single-pole RC filter. This makes it significantly more effective at attenuating switching noise in SMPS designs.

The resonant frequency of the LC filter is:

f0 = 1 / (2ฯ€โˆšLC)

Set this well below the switching frequency for effective attenuation. For a 200 kHz switcher, targeting a corner frequency of 20 kHz or below is typical. Be careful to damp the filter adequately โ€” an underdamped LC filter will ring and can cause output overshoot. Adding a small resistor in series with the output capacitor or using a capacitor with deliberate ESR provides the necessary damping.

Pi Filter (C-L-C)

The pi filter adds a second capacitor at the input side of the LC network, creating a three-element low-pass filter. This topology is particularly effective for mains-powered linear supplies immediately after the bridge rectifier, providing good rejection of both mains-frequency ripple and high-frequency interference. The additional input capacitor also helps to reduce the peak current demand on the rectifier diodes.

Pi filters require care in component selection: the inductors must handle the full supply current without saturation, and at mains frequencies (50โ€“120 Hz) the required inductance values are large and expensive. In SMPS designs operating at hundreds of kilohertz, practical-sized ferrite inductors become viable and pi filters are widely used.

Filter TypeRolloff RateBest ForDrawbacks
Shunt C only6 dB/octaveSMPS HF noise, point-of-loadLimited ripple rejection alone
RC filter6 dB/octaveLow-current supply cleanupVoltage drop across R, power loss
LC filter12 dB/octaveSMPS output, main filter stageMust be damped to avoid ringing
Pi filter (C-L-C)12โ€“18 dB/octaveMains-powered linear, EMI filteringBulky at 50/60Hz; inductor cost
Multiple parallel capsBroadband coveragePower delivery network, PDNAnti-resonance risk at certain freqs

PCB Layout Rules for Power Supply Capacitors

Getting the schematic right is half the job. The PCB layout determines whether the capacitors actually perform as designed.

Minimize loop area for high-current paths. The AC current path through the output capacitor and inductor forms a loop that radiates EMI proportional to its area. Keep the capacitor physically close to the inductor output, use wide copper pours for the power and return paths, and minimize the enclosed area between components and ground plane.

Place bulk capacitors first, then decoupling caps around them. The large output bulk capacitor belongs close to the switching converter’s output terminals. High-frequency ceramic decoupling caps then go between the bulk capacitor and the load ICs, addressing the frequency range where the bulk capacitor’s ESL prevents it from responding fast enough.

Never use a single via for high-current connections. A single 0.3 mm via can carry roughly 0.5โ€“1A before thermal issues arise. For a 5A output capacitor connection, use multiple vias or a large via with thick copper annular rings.

Match thermal mass on MLCC output capacitor pads. Asymmetric pad copper causes uneven heating during reflow soldering and promotes tombstoning on small packages. Add thermal reliefs or match copper area on both pads for reliable assembly.

Keep electrolytic capacitors away from hot components. Every 10ยฐC of added ambient temperature halves the expected lifetime of an aluminum electrolytic. Don’t place large output capacitors next to power MOSFETs, rectifier diodes, or inductors that run hot. If space forces proximity, use thermal vias and copper planes to separate the thermal zones.

Avoid placing large MLCCs near board edges or depaneling tabs. MLCC ceramic bodies crack under board flex. Place high-capacitance ceramic output caps away from mechanical stress points โ€” particularly the corners and edges of PCB panels.

Useful Resources for Power Supply Design

These references belong in your bookmarks if you work on power supply circuits regularly:

Frequently Asked Questions

1. How do I choose the right capacitor value for my power supply?

Start with your operating requirements: load current, acceptable ripple voltage, and the ripple frequency (mains frequency for linear supplies, switching frequency for SMPS). Use the formula C = Iload / (f ร— Vripple) for an initial estimate, then verify the chosen capacitor meets the ripple current rating and ESR spec at your operating frequency and temperature. For SMPS designs, also calculate the required maximum ESR to ensure ripple voltage from ESR contributions stays within your budget. Always check actual capacitance at operating DC voltage for Class 2 MLCCs โ€” derating can cut effective capacitance to a third of the nameplate value.

2. Why does my power supply output have high-frequency spikes even though I have a large output capacitor?

Large electrolytic capacitors have significant ESL (Equivalent Series Inductance) โ€” typically 10โ€“50 nH for through-hole electrolytics. Above the capacitor’s self-resonant frequency, the ESL dominates and the capacitor stops behaving like a capacitor. High-frequency switching spikes at 100 kHz and above bypass the electrolytic entirely. The solution is to add small, low-inductance ceramic decoupling capacitors โ€” 100 nF to 10 ยตF X7R in 0402 or 0603 packages โ€” in parallel with the electrolytic. The ceramics handle the high-frequency content that the electrolytic cannot address, giving broadband filtering across the combined impedance profile.

3. What is a “switching grade” electrolytic capacitor and why does it matter?

Standard general-purpose aluminum electrolytic capacitors are optimized for applications at 50/60 Hz mains frequency. Their ESR and ripple current rating are specified at 100โ€“120 Hz. In a switching power supply operating at 100 kHzโ€“500 kHz, these capacitors have much higher ESR at the operating frequency than their datasheet suggests, generate excessive heat from the higher ripple current, and fail prematurely. Switching-grade electrolytic capacitors are specifically designed with lower ESR and higher ripple current ratings at switching frequencies. The performance difference is significant โ€” never substitute a general-purpose electrolytic for a switching-grade part in an SMPS.

4. How does temperature affect power supply capacitor lifetime?

For aluminum electrolytic capacitors, the Arrhenius equation applies: every 10ยฐC increase in core temperature approximately halves the capacitor’s expected operational lifetime. A capacitor rated for 2,000 hours at 105ยฐC will last approximately 4,000 hours at 95ยฐC, 8,000 hours at 85ยฐC, and so on. Core temperature is determined by the ambient temperature plus the self-heating from ripple current flowing through the capacitor’s ESR. This is why operating an electrolytic capacitor at high ripple current without adequate thermal derating โ€” or placing it near a heat source โ€” dramatically shortens supply lifetime. Polymer aluminum and film capacitors have better temperature profiles and no wet electrolyte to dry out, giving them fundamentally longer service lives.

5. Can I use MLCCs to replace electrolytic capacitors in my power supply output filter?

In principle, yes โ€” particularly for low-voltage SMPS designs at high switching frequencies where the capacitance requirement is modest. The practical challenges are: Class 2 MLCCs lose significant capacitance under DC bias (verify actual capacitance at your rail voltage); very low MLCC ESR can cause instability in some regulator feedback loops that relied on the ESR zero provided by the electrolytic; and anti-resonance phenomena can occur when multiple MLCCs with similar self-resonant frequencies are paralleled. Where MLCC replacement is feasible, the advantages are significant โ€” lower board height, essentially unlimited cycle life, and better high-frequency performance. Use a design reference from the regulator IC’s manufacturer or a tool like TI’s PowerStage Designer to validate the replacement.

Summary: Getting the Power Supply Capacitor Selection Right

The power supply capacitor is simultaneously one of the most critical components in any supply design and one of the most frequently underspecified. The common errors โ€” using general-purpose electrolytics in SMPS circuits, ignoring ripple current rating, placing capacitors near hot components, or failing to account for DC bias derating in Class 2 MLCCs โ€” all show up in field failures, shortened product life, or performance that doesn’t match expectations.

The framework is straightforward: define your ripple voltage budget, calculate required capacitance and ESR from your converter parameters, verify the ripple current rating under worst-case operating conditions, derate by temperature and current, and validate the PCB layout ensures minimal loop area and adequate thermal management. Follow that process consistently, and the power supply capacitor choices that once seemed like guesswork become straightforward engineering decisions.

Written from a PCB and power electronics engineering perspective, based on manufacturer application notes, IEEE technical references, and hands-on design experience.

Polypropylene vs Polyester Capacitor: Which Film Type Should You Use?

Polypropylene vs polyester capacitor: a PCB engineer’s guide comparing dissipation factor, temperature stability, dielectric absorption, and the right application for each.

Walk into any PCB design review and bring up the topic of polypropylene vs polyester capacitor selectionโ€”you’ll quickly find out it’s one of those deceptively simple choices that actually has a lot riding on it. Get it right and the circuit does exactly what the simulation said it would. Get it wrong and you’re chasing phase errors, unexpected heating, or precision drift in the field.

Both are film capacitors. Both are non-polarized. Both look broadly similar on a BOM. But under the hood, polypropylene (PP) and polyester (PET, also called Mylar or CL) behave quite differently, and those differences map cleanly onto application requirements once you know what to look for.

This guide is written from the engineering bench outwardโ€”covering the dielectric physics, real performance data, and practical application guidance that actually moves the needle on a design decision.

Understanding the Two Dielectric Materials

Before going into numbers, it helps to understand what makes each plastic film behave the way it does at a molecular levelโ€”because the physics flows directly into the datasheet parameters.

Polypropylene (PP) Film

Polypropylene is a non-polar, semi-crystalline thermoplastic polymer from the polyolefin family. “Non-polar” here is the key electrical descriptor: because the molecular chains have no permanent dipole moments, the dielectric doesn’t try to reorient under an applied AC field. That means almost no energy loss from dipole rotation at any frequency. The result is polypropylene’s signature characteristicโ€”an exceptionally low dissipation factor (tan ฮด) of roughly 0.0002 (0.02%), which holds stable from DC all the way well into the megahertz range.

PP film also absorbs virtually no moisture, which makes it suitable for open or “naked” designs without extra encapsulation. The main trade-off is a lower dielectric constant (ฮตr โ‰ˆ 2.2) compared to polyester, meaning you need a physically larger piece of film to store the same charge at the same voltage.

Polyester (PET) Film

Polyester filmโ€”polyethylene terephthalate, shortened to PET and also known by the trade name Mylarโ€”has a polar molecular structure. Its dielectric constant is significantly higher at ฮตr โ‰ˆ 3.2 to 3.3, which directly translates to a smaller physical size for the same capacitance and voltage rating. That’s why PET dominates wherever board space is tight and the frequency is moderate.

The price of that higher dielectric constant is energy loss. PET’s polar chains rotate in an AC field, generating heat. Its dissipation factor is typically 0.01โ€“0.015 (1.0โ€“1.5%)โ€”roughly 50 to 75 times higher than polypropylene. This matters a lot in AC and high-frequency circuits but very little in a simple DC blocking or bypass role.

PET is also available in thinner gauges than PPโ€”down to about 0.7 ยตm versus about 1.9 ยตm minimum for polypropyleneโ€”enabling even smaller, higher-capacitance constructions.

Polypropylene vs Polyester Capacitor: Full Specification Comparison

ParameterPolypropylene (PP / MKP / CBB)Polyester (PET / MKT / CL)
Dielectric constant (ฮตr)~2.2~3.2 โ€“ 3.3
Dissipation factor (tan ฮด)0.0002 (0.02%)0.010 โ€“ 0.015 (1.0 โ€“ 1.5%)
Dielectric absorption (DA)Very low (<0.02%)Moderate (~0.2%)
Temperature rangeโ€“55ยฐC to +105ยฐCโ€“55ยฐC to +125ยฐC
Capacitance vs. temperatureยฑ2.5%, nearly linearUp to ยฑ5% (nonlinear)
Capacitance vs. frequencyVery stable to MHz rangeโ€“3% from 100 Hz to 100 kHz
Moisture absorptionNegligibleSome absorption
Insulation resistance (โ‰ค0.33ยตF)>25,000 Mฮฉ>7,500 Mฮฉ
Voltage rating (typical)100 V โ€“ 2,000 V50 V โ€“ 630 V
AC suitabilityExcellentLimited (high loss at frequency)
Physical size per ยตFLargerSmaller
CostHigherLower
Typical code/prefixCBB, MKP, KPCL, MKT, KS
Market share (film caps)~50%~40%

Key Performance Differences That Actually Matter on a Board

Dissipation Factor and Power Loss

This is the single most consequential difference between the two dielectric types for AC and high-frequency use. Dissipation factorโ€”sometimes called loss tangentโ€”tells you what fraction of the energy going into the capacitor each cycle converts to heat rather than getting stored and returned.

For a polypropylene capacitor running a power factor correction circuit at 50 Hz or a snubber cap across an IGBT at 20 kHz switching frequency, a tan ฮด of 0.02% means negligible heating even at significant reactive power levels. For a polyester cap in the same position, the 1.0โ€“1.5% dissipation factor is 50ร— higher, which can cause meaningful temperature rise inside the capacitor body, accelerating aging and in worst cases causing thermal runaway failure.

For purely DC applicationsโ€”bias bypass, supply rail decoupling at low frequency, coupling between stages at moderate signal levelsโ€”the dissipation factor difference is largely academic. Power loss in a DC circuit is determined by leakage current and ESR, not tan ฮด.

Temperature Stability of Capacitance

Polypropylene has a nearly linear, slightly negative temperature coefficient of capacitance (TCC) of about ยฑ2.5% across its full temperature range. It’s predictable and well-behaved. Polyester’s TCC is larger and nonlinearโ€”up to ยฑ5% at the temperature extremesโ€”and the capacitance actually changes by about 3% just moving from 100 Hz to 100 kHz signal frequency.

For timing circuits, resonant LC tanks, oscillators, or precision integrators, polyester’s drift is a problem. A 5% capacitance shift with temperature will shift resonant frequency, alter time constants, and cause calibration drift. Polypropylene holds its value much more consistently across temperature and frequency, which is why PP is the standard choice for precision and resonant applications.

Dielectric Absorption

Dielectric absorption (DA) is the tendency of a capacitor to partially “remember” a previous charge stateโ€”releasing a residual voltage after being discharged. It’s a small effect, but in sample-and-hold circuits, integrators, and D/A converters it causes a measurable error voltage that limits accuracy.

Polypropylene has extremely low DAโ€”typically under 0.02%. Polyester’s DA is roughly 0.2%, an order of magnitude higher. In most coupling and bypass applications this doesn’t matter. In precision analog circuits it’s decisive.

Voltage Rating and dV/dt Capability

Polypropylene film capacitors are routinely available at 1000 V, 1500 V, and higher DC ratings. PET capacitors typically top out around 630 V for standard types. More importantly, PP’s higher breakdown strength and lower dissipation factor make it substantially better at handling rapid voltage transients (high dV/dt). This is the physical basis for why polypropylene is used in snubber circuits and PP is not interchangeable with PET there.

Physical Size

Polyester wins on compactness. Because PET’s dielectric constant is about 50% higher than PP’s, a PET capacitor can deliver the same capacitance in roughly two-thirds the volume of an equivalent PP type (at the same film thickness and voltage). For SMD designs or space-constrained PCBs where a small bypass or coupling cap is needed, PET is the practical choice.

Application Decision Guide: When to Use Each Type

Use Polypropylene Capacitors When

Snubber circuits across switching devices (IGBTs, MOSFETs, SCRs). The combination of low ESR, high dV/dt tolerance, low dissipation, and high voltage rating makes MKP/CBB polypropylene the standard choice for snubbers across any semiconductor switch. PET simply can’t survive the combination of high peak current, fast transients, and continuous duty in this position.

EMI/RFI suppression, X and Y capacitors. Safety-rated X2 and Y2 capacitors on AC mains lines must withstand continuous AC voltage with self-healing and tolerate transient overvoltages. Metallized polypropylene is the industry-standard dielectric for these applications. PET’s higher dissipation makes it unsuitable for sustained AC mains duty.

Power factor correction (PFC) capacitors. Reactive power capacitors for industrial PFC banks carry significant AC current continuously. PP’s low loss factor is essential to prevent overheating and deliver the long service life (20+ years) these installations demand.

DC-link capacitors in high-power inverters. Solar, wind, EV drive, and industrial servo inverters increasingly specify PP film for DC-link duty, particularly in high-reliability or maintenance-free applications where the self-healing and temperature stability of PP justify the higher cost.

Precision timing, resonant circuits, and oscillators. Wherever the capacitance value needs to stay accurate across temperature and frequencyโ€”oscillators, crystal filter circuits, active filter designsโ€”polypropylene is the correct dielectric.

Audio signal coupling (where distortion matters). Polypropylene’s low DA and linear behavior makes it the preferred coupling capacitor in precision audio circuits, instrument amplifiers, and high-end signal path designs. PET’s higher DA introduces a subtle distortion mechanism that careful listeners and measurement engineers can detect.

Use Polyester (PET) Capacitors When

General purpose DC bypass and decoupling. For bypassing a supply rail, decoupling a digital IC, or bulk filtering where frequency is low and precision is not required, PET delivers more capacitance per cubic millimeter at lower cost. This covers a very large fraction of film capacitor usage on everyday PCBs.

Signal coupling at moderate frequencies with space constraints. When a 10 nF to 100 nF coupling capacitor needs to fit into a dense SMD layout and the circuit has modest performance requirements, MKT/CL polyester is the practical answer.

Cost-sensitive, high-volume consumer applications. LED driver boards, power adapters, consumer audio, white goods electronicsโ€”anywhere BOM cost is scrutinized heavily and performance margins are comfortableโ€”PET is the dominant choice. Per unit of capacitance, PET is noticeably cheaper than PP.

SMD film capacitor positions. PET is more compatible with SMD reflow soldering processes than PP, because polyester’s higher melting point survives the thermal profile better. SMD polypropylene film capacitors exist but are limited in range. If you need an SMD film cap, PET is almost certainly what’s in the catalog.

General noise suppression and bypassing on signal lines. For EMI bypassing on low-frequency signal lines (audio, low-speed control) where safety ratings are not required and the cap sees essentially DC with noise riding on it, PET handles the job at attractive cost.

Polypropylene vs Polyester Capacitor Application Table

ApplicationRecommended DielectricWhy
IGBT / MOSFET snubberPolypropylene (PP)High dV/dt, low loss, high voltage
X2 / Y2 mains EMI capPolypropylene (PP)AC rating, self-healing, safety
Industrial PFC bankPolypropylene (PP)Low loss, long life under AC
DC-link, HV inverterPolypropylene (PP)Overvoltage tolerance, stable C
Resonant / LC tank circuitPolypropylene (PP)Stable C over temp & frequency
Precision integrator / S&HPolypropylene (PP)Very low dielectric absorption
Audio signal coupling (hi-fi)Polypropylene (PP)Low DA, low distortion
General bypass, DC decouplingPolyester (PET)Small size, low cost
Signal coupling, moderate freqPolyester (PET)Compact, sufficient performance
SMD film capacitor positionPolyester (PET)Reflow compatible, available
Consumer electronics couplingPolyester (PET)Cost-effective for the performance level
Timer / clock circuit (tolerant)Polyester (PET)Acceptable where ยฑ5% drift is OK

Understanding the Role of a Capacitor on Your PCB

Choosing the right capacitor for a given PCB position requires understanding the electrical stress the component will actually see in operationโ€”AC voltage amplitude and frequency, peak current, temperature rise, duty cycle, and required precision. Polypropylene and polyester each carve out a large and well-defined space in that parameter landscape. The mistake most often seen in design reviews is defaulting to PET across the board for cost savings, then discovering that a snubber or PFC cap is running hot in thermal testingโ€”at which point the redesign costs far more than the premium PP part would have.

Marking Codes: How to Identify Each Type in the Field

In Chinese and Asian manufacturer coding, polypropylene film capacitors often start with CBB (e.g., CBB21, CBB22), while polyester film capacitors start with CL (e.g., CL11, CL21). In European IEC coding, polypropylene types use the MKP prefix (Metallized Kunststoff Polypropylen) and polyester types use MKT (Metallized Kunststoff Terephthalate). WIMA, one of the most respected film capacitor manufacturers, uses MKP for polypropylene and MKS for polyester (stacked) and MKT for wound polyester types.

A reliable field test for telling them apart is a hot-air gun and a capacitance meter: measure cold capacitance, apply gentle heat, measure again. PET capacitors show a significant capacitance shift; PP capacitors change very little. That behavioral difference is the same one that matters in production circuits under thermal cycling.

Useful Resources for Film Capacitor Selection

These are the reference materials worth bookmarking for serious capacitor selection work:

KEMET Film Capacitor Selection Guide โ€“ kemet.com/film-capacitors โ€” Parametric selector covering MKP, MKT, PPS, and power film types with full datasheets.

Vishay Film Capacitor Technical Reference โ€“ vishay.com/docs/26033/gentechinfofilm.pdf โ€” Detailed dielectric comparison, construction explanation, and application derating guidance.

WIMA Technical Capacitor Information โ€“ wima.com/en/technical-information โ€” One of the most respected film capacitor makers; application guides and material comparisons.

TDK/EPCOS Film Capacitor Portfolio โ€“ product.tdk.com โ€” Parametric search with full data across B3xxxx series PP and PET types.

Passive Components Industry Guide (passive-components.eu) โ€“ passive-components.eu/film-and-foil-organic-dielectric-capacitors โ€” Thorough technical overview including dielectric comparison tables and construction details.

Wikipedia: Film Capacitor โ€“ en.wikipedia.org/wiki/Film_capacitor โ€” Solid reference for historical context, dielectric material properties table, and construction types.

Digi-Key Film Capacitor Parametric Search โ€“ digikey.com/film-capacitors โ€” Real-time stock, pricing, and datasheets across all major PP and PET film families.

Frequently Asked Questions

Can I replace a polyester capacitor with a polypropylene one?

In most cases, yesโ€”and it usually improves performance. Polypropylene capacitors have lower dissipation, lower dielectric absorption, and better temperature stability. The practical considerations are physical size (PP is larger for the same capacitance and voltage) and cost (PP is more expensive). Verify that the replacement fits the PCB footprint and that the circuit doesn’t rely on any temperature coefficient matching. For coupling, bypass, and snubber positions, swapping PET for PP is almost always a neutral or positive change.

Why is polypropylene preferred for audio circuits over polyester?

Two main reasons. First, polypropylene’s dielectric absorption (DA) is roughly ten times lower than polyester’s (~0.02% vs ~0.2%). In circuits with a DC bias component, DA causes the capacitor to release a residual voltage that acts as an error signalโ€”audible as a subtle smearing or overhang in transient response. Second, PP’s dissipation factor is far lower and more consistent across frequency, meaning it introduces less distortion into the signal path. This is why high-quality audio amplifiers, tube amps, and precision instruments consistently specify PP film types in signal-path positions.

Is polyester (PET) suitable for AC mains circuits?

Not for direct AC mains duty as a safety capacitor. PET’s relatively high dissipation factor causes excessive heating in sustained AC applications, especially at higher voltages. More critically, standard PET capacitors are not safety-rated for the transient overvoltages present on AC mains. X2 and Y2 safety capacitors for EMI filtering must be metallized polypropylene with the appropriate safety certification (IEC 60384-14, UL, etc.). Using a PET cap in a safety-capacitor position is both a performance risk and a regulatory compliance violation.

What is the difference between MKP and MKT capacitors?

MKP stands for Metallized Kunststoff (plastic) Polypropylenโ€”it’s a metallized polypropylene film capacitor. MKT stands for Metallized Kunststoff Terephthalateโ€”a metallized polyester (PET) film capacitor. Both are metallized wound constructions with self-healing properties, but MKP offers lower dissipation, higher voltage ratings, better AC performance, and superior temperature stability. MKT is smaller and cheaper for the same capacitance. When you see these designations on a BOM or manufacturer catalog, the dielectric material is the key differentiator driving all the downstream performance differences discussed in this article.

Why does polypropylene have a lower maximum temperature than polyester?

Polypropylene’s maximum rated operating temperature is typically 105ยฐC, while polyester can go to 125ยฐC. This comes down to the melting and softening behavior of the polymer. Polypropylene has a lower melting point (~165ยฐC) compared to PET (~260ยฐC), and the practical rated temperature is set conservatively well below the melting point to ensure the dielectric maintains its mechanical and electrical integrity over the component’s service life. For most PCB environments this isn’t a limiting factor, but in high-ambient-temperature positionsโ€”near heat sinks, power devices, or in automotive under-hood locationsโ€”polyester’s higher temperature capability can be the deciding factor in its favor.

Summary

The polypropylene vs polyester capacitor decision comes down to a clear performance versus size-and-cost trade-off. Polypropylene is the premium dielectric: lower loss, lower dielectric absorption, better AC performance, higher voltage ratings, and excellent temperature and frequency stability. It belongs in snubbers, PFC circuits, EMI X/Y caps, DC-link positions, precision analog, and high-quality audio signal paths. Polyester is the practical workhorse: more capacitance per unit volume, lower cost, SMD-compatible, perfectly adequate for general DC bypass, coupling, and decoupling where precision and high frequency are not the design constraints.

Most production PCBs will carry both typesโ€”polyester in the dozens of general-purpose positions and polypropylene in the few critical performance positions where it genuinely earns its cost premium. Knowing which is which, and why, is the difference between a design that passes validation on the first spin and one that needs an unexpected second revision.

Polarized vs Non-Polarized Capacitor: Complete Guide

Every PCB engineer has been there โ€” staring at a schematic, a bag of loose capacitors on the bench, and a board that just popped when power came on. Nine times out of ten, a reversed polarized capacitor is involved. Understanding the difference between a polarized capacitor and its non-polarized counterpart is one of those fundamentals that separates a confident board bring-up from a mystery failure at 2 AM.

This guide covers everything you actually need to know: what polarized and non-polarized capacitors are, how they work differently at the physics level, how to identify them reliably on the bench and in PCB layout, and exactly which type belongs in which circuit. If you want a broader overview of how capacitors are used across PCB designs, that’s worth bookmarking too.

What Is a Polarized Capacitor?

A polarized capacitor is one where the dielectric layer is formed electrochemically during manufacture, producing a physically and chemically asymmetric internal structure. The result is a device with a defined anode (positive terminal) and cathode (negative terminal) โ€” and these labels are non-negotiable. Apply voltage the wrong way, and the dielectric breaks down.

The reason these capacitors are polarized at all comes down to how they achieve high capacitance in a small package. Instead of using a fixed dielectric material sandwiched between plates, they grow a thin oxide layer โ€” either aluminum oxide (Alโ‚‚Oโ‚ƒ) for electrolytic types or tantalum pentoxide (Taโ‚‚Oโ‚…) for tantalum types โ€” directly on the anode surface during manufacturing. This oxide layer can be made extremely thin, which pushes capacitance density far beyond what a ceramic or film construction can achieve.

The trade-off: that oxide layer only holds up when biased correctly. Reverse the voltage and the oxide starts to dissolve. Current surges. Heat builds. The component fails โ€” sometimes slowly, sometimes spectacularly.

Types of Polarized Capacitors

Aluminum Electrolytic Capacitors are the most common polarized type. They use a liquid or gel electrolyte and aluminum foil electrodes. Available in through-hole radial (the familiar tall cylinders) and SMD versions. Capacitance ranges from 1 ยตF to tens of thousands of ยตF. They’re inexpensive and widely available, making them the workhorses of power supply filtering and audio coupling. Downsides include higher ESR than ceramics, aging over time, and sensitivity to heat and ripple current.

Tantalum Capacitors use a pressed tantalum powder pellet as the anode, with tantalum pentoxide as the dielectric. They’re smaller than electrolytic types for the same capacitance, more stable, and offer lower ESR. Widely used in mobile devices, laptops, and telecom boards where space is tight. The catch: their failure mode under reverse bias is more violent than aluminum electrolytics, as explained below.

Niobium Oxide Capacitors are a less common polarized type, used as a lower-cost alternative to tantalum in some applications. They share similar construction principles but have somewhat lower performance limits.

Electrolytic Supercapacitors (EDLCs) are polarized and can store enormous amounts of energy โ€” sometimes several farads. Used in backup power, energy harvesting, and motor start circuits.

What Is a Non-Polarized Capacitor?

A non-polarized capacitor has a symmetric construction. The dielectric material between its two plates responds equally to an electric field from either direction, which means the component can be placed in a circuit in any orientation without affecting performance or reliability. There is no anode or cathode. No stripe to read. No polarity to get wrong.

Most capacitors on a modern PCB are non-polarized. When you look at a busy digital board and see hundreds of small brown or grey rectangles near every IC power pin, those are MLCCs โ€” multilayer ceramic capacitors โ€” and every one of them is non-polarized.

Types of Non-Polarized Capacitors

Ceramic Capacitors (MLCCs) are the most widely used capacitor type in electronics. They are non-polarized, available in values from 1 pF to 47 ยตF, come in tiny packages (0201, 0402, 0603, 0805), and are the go-to choice for decoupling, bypass, and RF applications. Dielectric classes include C0G/NP0 (precision, stable) and X7R/X5R (higher capacitance density, moderate stability). None of these classifications change the fact that all MLCCs are non-polarized.

Film Capacitors use plastic film dielectrics (polyester, polypropylene, polyethylene). They are non-polarized, stable, low-loss, and handle AC voltage well. Often found in audio circuits, power factor correction, motor run applications, and EMI filters.

Mica Capacitors are precision, low-loss non-polarized types used in RF applications and precision timing. Expensive and less common but still valuable in high-Q or high-stability circuits.

Bipolar (NP) Electrolytic Capacitors are a special case worth mentioning. They are constructed internally as two opposing polarized electrolytics in series, effectively cancelling the polarity requirement. Used in audio crossover networks and speaker circuits where AC signals would otherwise destroy a standard electrolytic.

Polarized vs Non-Polarized Capacitor: Core Differences

PropertyPolarized CapacitorNon-Polarized Capacitor
Polarity RequiredYes โ€” anode (+) and cathode (โˆ’)No โ€” install in any direction
Circuit TypeDC only (AC destroys them)AC or DC
Typical Capacitance Range1 ยตF to 100,000 ยตF1 pF to ~47 ยตF
Capacitance DensityVery highLower for same package size
ESRHigher (especially electrolytic)Lower (ceramic)
Failure Risk if ReversedHigh โ€” leakage, explosion, fireNone
Typical TypesElectrolytic, tantalumCeramic, film, mica
Common ApplicationsPower filtering, bulk decouplingBypass, RF, AC coupling, filters
AgingYes (electrolytic degrades over time)Minimal (ceramic)
CostLow (electrolytic) to moderate (tantalum)Very low (ceramic) to moderate (film)
Schematic SymbolCurved plate or + markingTwo straight parallel lines

Why Reverse Polarity Is Dangerous

This deserves more than a bullet point. When a polarized capacitor is connected backwards, what actually happens inside determines the failure mode โ€” and the distinction between electrolytic and tantalum matters a lot.

Aluminum Electrolytic Reverse Failure

In a reversed aluminum electrolytic, the oxide dielectric layer โ€” which was formed on the anode foil โ€” begins to break down under the reverse voltage. Current leakage increases rapidly. The electrolyte heats up. Gas forms inside the sealed can. Most modern electrolytics include a pressure vent (the scored “K” pattern on the top of the can) that allows controlled release. If the voltage is high or the current limit is low, the vent opens with a pop and sprays corrosive electrolyte across the PCB. In worst-case scenarios with higher energy supplies, the capacitor can rupture fully.

The timeline for this failure is typically seconds to minutes. You’ll often smell burning electrolyte before the can physically deforms.

Tantalum Capacitor Reverse Failure

Reversed tantalum capacitors fail faster and more dangerously. When the tantalum pentoxide dielectric breaks down under reverse bias, the resulting short-circuit current heats the component rapidly. The manganese dioxide (MnOโ‚‚) solid electrolyte โ€” present in standard solid tantalum types โ€” is itself an oxidizer. It can supply oxygen to the hot tantalum metal, triggering thermal runaway and ignition. Assembly technicians who have experienced this describe it as a small orange flash.

Critically, there is no safe low-voltage threshold. A reversed tantalum at 3.3 V can fail just as catastrophically as one at 16 V โ€” the failure is driven by internal chemistry, not voltage magnitude. There is no warning, no bulging, no gradual degradation. The failure happens within milliseconds of power-on.

The practical upshot: treat tantalum polarity with the same seriousness as mains voltage.

How to Identify Polarity Markings

Through-Hole Electrolytic Capacitors

Marking MethodWhat It Indicates
White or silver stripe on bodyNegative (โˆ’) terminal side
Minus signs (โˆ’) printed along stripeNegative terminal
Longer leadPositive (+) terminal
Trapezoidal vs right-angle base edgesTrapezoidal = positive pin

The stripe indicates negative on aluminum electrolytics. This catches out engineers coming from tantalum, where the convention is reversed.

SMD Electrolytic Capacitors

A filled wedge, arc, or notch on the silkscreen outline indicates the negative terminal. On the component itself, a stripe or bar on the top of the can marks negative. The positive pad on the footprint is sometimes made slightly larger to aid visual identification.

Through-Hole Tantalum Capacitors

The longer lead is positive. The body may be marked with a “+” or a stripe โ€” read the datasheet to confirm convention, as it varies by manufacturer. Some axial types have a chamfered edge on the positive end.

SMD Tantalum Capacitors

A bar, stripe, or beveled edge on one end of the molded package marks the positive (anode) terminal. This is the opposite convention from SMD electrolytics, where the bar indicates negative. This reversal trips up engineers regularly. When substituting a tantalum for an electrolytic or vice versa on a reworked board, always cross-reference the schematic rather than relying on visual pattern-matching of the stripe position.

PCB Silkscreen Markings

A well-designed PCB silkscreen makes polarity unambiguous. Look for:

  • A “+” symbol adjacent to the positive pad
  • A filled or hatched semicircle on the negative side of the component outline
  • A “D”-shaped or polarized component outline that physically cannot be misread
  • Pad size differentiation (positive pad larger on tantalum footprints)

If you’re designing a PCB, spend the extra two minutes making your silkscreen polarity marks unmistakable. A technician hand-soldering a prototype at midnight will thank you.

When to Use a Polarized Capacitor

A polarized capacitor earns its place in a design when you need large capacitance values in a compact space, and the circuit operates from a DC voltage that maintains a consistent polarity across the capacitor.

Power Supply Filtering and Bulk Decoupling

This is the primary home for electrolytic capacitors. A linear regulator output, a buck converter output, a rectified DC rail โ€” these applications need 10 ยตF to 1000 ยตF or more, and achieving that in a small package means using an electrolytic or tantalum. The capacitor sees a clean DC voltage with small AC ripple, which is exactly what polarized capacitors handle well.

Audio Coupling (Large Signal)

In audio amplifiers, interstage coupling capacitors need to be large enough that their reactance is negligible at the lowest audio frequency (typically 20 Hz). Values of 10 ยตF to 100 ยตF are common, and electrolytic capacitors fill this role โ€” provided the DC offset across the coupling capacitor maintains correct polarity bias.

Motor Driver and Actuator Circuits

Bulk capacitance near H-bridge motor drivers, solenoid controllers, and servo amplifiers handles inrush current and voltage transients from inductive switching. Large electrolytic caps on the power rail are standard practice here.

Energy Storage and Hold-Up

UPS systems, battery backup circuits, and power-fail hold-up networks rely on high-value electrolytic capacitors to maintain supply voltage during brief outages. Supercapacitors (also polarized) extend this hold-up time to seconds or minutes.

When to Use a Non-Polarized Capacitor

Non-polarized capacitors โ€” primarily ceramics โ€” belong anywhere the capacitor value matters for performance, the circuit involves AC signals, or the polarity across the capacitor cannot be guaranteed.

Decoupling and Bypass at IC Power Pins

Every logic IC, microcontroller, FPGA, and op-amp needs 100 nF ceramic capacitors at each power pin, placed physically close to the pin on the PCB. These are non-polarized MLCCs and should never be replaced with electrolytics. High-frequency noise rejection depends on the low ESR and low inductance of the ceramic capacitor.

RF Tuning and Matching Networks

Non-polarized ceramics (particularly C0G/NP0 types) are used in RF impedance matching, tank circuits, and antenna tuning networks. The AC signal polarity alternates continuously โ€” a polarized capacitor would fail immediately in these applications.

AC Signal Coupling

When coupling an AC signal between stages where no DC offset can be relied upon to maintain correct polarity bias, use a film capacitor or a bipolar electrolytic. Standard electrolytic and tantalum capacitors are not rated for AC service.

Active Filter Networks

Precision op-amp filters (Sallen-Key, multiple feedback topologies) use capacitors to set cut-off frequency and Q. Non-polarized ceramics (C0G) or film capacitors are used here because the capacitor value must be stable and the signal is AC by definition.

Motor Run Capacitors

Single-phase AC induction motors use non-polarized film capacitors in their run circuits, permanently connected across the auxiliary winding. AC line voltage is applied directly across these capacitors โ€” a polarized type would be destroyed instantly.

Polarized Capacitor Selection Checklist for PCB Design

Getting the right part placed correctly requires checking several things before your BOM is finalized and your PCB is sent for assembly.

Design StepWhat to Check
SchematicCorrect polarized symbol used, “+” terminal connected to higher voltage net
BOMPart number matches the schematic symbol type (electrolytic โ‰  tantalum)
PCB FootprintSilkscreen has unambiguous “+” marking; pad sizes match convention
Voltage RatingCapacitor rated at โ‰ฅ 1.5ร— (ideally 2ร—) the DC operating voltage
Temperature RatingCapacitor rated above maximum board temperature
Ripple CurrentElectrolytic rated for the actual ripple current at operating frequency
Tantalum: DeratingVoltage derated to โ‰ค 50% of rated value due to tantalum’s surge sensitivity
Assembly ReviewSilkscreen orientation matches component body marking before sending to fab

Polarized Capacitor Marking Cheat Sheet: Electrolytic vs Tantalum

This is the table that prevents the most common polarity confusion in real bench work.

Capacitor TypePackagePositive IndicatorNegative Indicator
Al Electrolytic (THT radial)CylinderLonger leadStripe on body
Al Electrolytic (SMD)CanLarger pad (footprint)Bar/stripe on top of can
Tantalum (THT dipped)Teardrop body“+” marking or longer leadOpposite end
Tantalum (SMD)Molded rectangleBar/stripe on body endOpposite end
Non-polarized MLCCRectangleNone requiredNone required
Film CapacitorBox or cylinderNone requiredNone required

Critical reminder: The bar on an SMD tantalum marks POSITIVE. The bar on an SMD electrolytic marks NEGATIVE. These are opposite conventions.

Frequently Asked Questions

Q1: Can I use a non-polarized ceramic capacitor instead of an electrolytic in a power supply filter?

For values up to about 10 ยตF, yes โ€” you can parallel multiple MLCCs to replace an electrolytic and often get better high-frequency filtering due to lower ESR. For bulk capacitance above 10 ยตF, ceramic MLCCs become expensive and physically large, and electrolytic or tantalum capacitors are the practical choice. Many modern designs use a combination: one large electrolytic for bulk energy storage and one or more small ceramics in parallel for high-frequency decoupling.

Q2: What happens if I accidentally install a polarized capacitor backwards?

For an aluminum electrolytic, the dielectric begins degrading under reverse bias. Depending on the voltage and current available, the capacitor may heat up and vent (audible pop, electrolyte spray), swell and bulge without immediate failure, or fail catastrophically if connected to a high-energy supply. For a tantalum capacitor, failure is nearly immediate under operating voltage โ€” thermal runaway and ignition within milliseconds to seconds. The component must always be replaced; even if it appears to survive a brief reversal, the dielectric has been permanently compromised.

Q3: How do I identify a capacitor’s polarity when there’s no markings visible?

For through-hole electrolytics, lead length is the most reliable indicator on new, untrimmed parts โ€” the longer lead is positive. For an unmarked capacitor body, use a multimeter in diode-test mode: connect the positive probe to one lead and the negative to the other. In the correct (forward-biased) orientation, an electrolytic will show a low initial reading that climbs as it charges. Reverse the probes and the reading stays high (high resistance). The low-leakage direction confirms positive-probe = positive terminal. When in doubt, always consult the datasheet for the specific part number.

Q4: Can I use two polarized electrolytic capacitors back-to-back to make a non-polarized one?

Yes, this is a legitimate technique for AC applications when a true bipolar electrolytic isn’t available. Connect two identical polarized capacitors in series with their positive terminals connected together (anode-to-anode) or both negatives connected together (cathode-to-cathode). The resulting combination behaves as a non-polarized capacitor with half the capacitance of each individual unit. It’s used in audio crossover networks and speaker circuits. The voltage rating of the combination equals the rating of one unit, not both.

Q5: Do SMD ceramic capacitors ever need polarity checking?

No. All MLCC ceramic capacitors โ€” regardless of size (0201 to 2220), capacitance (1 pF to 47 ยตF), or dielectric class (C0G, X7R, X5R, Y5V) โ€” are non-polarized. They have no anode or cathode, no oxide dielectric, and no polarity requirement. They can be placed in any orientation on the PCB with zero impact on performance or reliability. If you see polarity markings on what you believe is an MLCC, double-check that it isn’t actually a tantalum (which uses a similar-looking rectangular package in some case sizes).

Useful Resources for Capacitor Selection and Design

ResourceWhat It OffersLink
Murata SimSurfingSimulate MLCC capacitance vs. DC bias, temperature, and frequencyds.murata.co.jp/simsurfing
KEMET KSIMModel aluminum and tantalum caps under real operating conditionsksim3.kemet.com
TDK MLCC Product SelectorSearch by capacitance, voltage, case size, and dielectricproduct.tdk.com
Digi-Key Capacitor FilterFull parametric search with dielectric and polarity filterdigikey.com
Mouser Electrolytic SelectorFilter aluminum electrolytic by ESR, ripple current, temperaturemouser.com
AVX (Kyocera) Tantalum SelectorFilter solid tantalum by capacitance, voltage, case sizeavx.com
IPC-2221B PCB Design StandardIndustry standard covering component placement and marking requirementsAvailable via IPC.org
Nichicon Application NotesApplication guides for electrolytic capacitor selection and deratingnichicon.co.jp

Summary

The choice between a polarized capacitor and a non-polarized one isn’t complicated once you understand the physics behind it.

Polarized capacitors โ€” aluminum electrolytic and tantalum โ€” exist because their electrochemically grown oxide dielectrics pack enormous capacitance into a small volume. That same oxide layer is the source of their polarity requirement and their failure risk. They belong on DC rails, in power filters, in bulk decoupling, and in energy storage โ€” anywhere a stable DC bias maintains correct orientation and high capacitance is needed in a tight space. Treat their polarity markings with respect, derate their voltage ratings, and they’ll last for years.

Non-polarized capacitors โ€” ceramic MLCCs and film types โ€” have symmetric construction and need no polarity management. They go everywhere else: IC bypass, AC coupling, RF circuits, timing networks, and precision filters. For the vast majority of positions on a modern PCB, a ceramic MLCC is the first choice.

Master the marking conventions, design clear PCB silkscreens, verify your BOM before assembly, and you’ll eliminate one of the most common โ€” and most destructive โ€” sources of PCB failures.

Motor Start & Motor Run Capacitor: What’s the Difference?

Learn the key differences between a motor start capacitor and a motor run capacitor โ€” including specs, sizing formulas, replacement rules, testing methods, and failure symptoms โ€” with comparison tables and a full FAQ.

If you’ve ever replaced a capacitor on an HVAC compressor, a pool pump motor, or an industrial fan โ€” and stared at two physically similar cans wondering which is which โ€” this guide is for you. A motor start capacitor and a motor run capacitor look alike from the outside. They’re both cylindrical, both measured in microfarads (ยตF), and both connected to motor windings. But they do completely different jobs, operate under completely different electrical conditions, and swapping one for the other is a guaranteed way to kill your motor fast.

This article breaks down everything you actually need to know โ€” the physics behind each type, the specifications that matter, how to size a replacement, how to test one under load, and what failure looks like before it takes the motor with it.

Why Single-Phase Motors Need Capacitors at All

Before getting into the differences, it helps to understand why capacitors are in the circuit in the first place. Three-phase motors generate a naturally rotating magnetic field because three voltage phases arrive at 120ยฐ intervals. Single-phase AC motors don’t have that luxury โ€” they only have one voltage waveform, which means the magnetic field it creates simply pulsates back and forth. Left alone, a single-phase induction motor will hum and vibrate in place but won’t self-start. Give it a physical spin in the right direction and it will run, but it can’t generate starting torque on its own.

The engineering fix is to add a second winding โ€” the auxiliary or start winding โ€” and to feed it with a phase-shifted current. A capacitor creates that phase shift by leading or lagging the current relative to the main winding. The result is two magnetic fields that peak at different times, effectively simulating the rotating field of a three-phase motor long enough to get the rotor spinning. Once spinning, the rotor can sustain itself on the main winding’s alternating field through induction.

That one sentence โ€” long enough to get the rotor spinning โ€” is where motor start and motor run capacitors diverge fundamentally.

What Is a Motor Start Capacitor?

A motor start capacitor is an electrolytic capacitor designed to provide a large burst of capacitance for a very short duration โ€” typically only a few seconds โ€” to generate the high starting torque required to bring the motor up to speed from a dead stop.

How a Motor Start Capacitor Works

When power is applied, the start capacitor is in series with the auxiliary winding. The high capacitance value creates a large phase shift โ€” ideally approaching 90ยฐ between main and auxiliary winding currents โ€” which produces the maximum possible starting torque. Some motor designs achieve starting torques as high as 300% of full-load running torque.

Once the motor reaches approximately 75% of its rated full speed, a centrifugal switch mounted on the motor shaft opens and disconnects the start capacitor from the circuit. At that point the motor is running fast enough for the rotor’s induction to sustain rotation without it.

The centrifugal switch is critical. If the switch fails in the open position, the start capacitor never enters the circuit and the motor won’t start. If it fails closed, the start capacitor stays energized continuously โ€” and because it’s built for intermittent duty only, it will overheat and fail catastrophically, often blowing its top off entirely.

Motor Start Capacitor Specifications

SpecificationTypical RangeNotes
Capacitance70 ยตF โ€“ 1,200 ยตFAlways above 70 ยตF; given as a range (e.g., 88โ€“108 ยตF)
Voltage ratings125 V, 165 V, 250 V, 330 VACMatch or exceed original rating
ConstructionAluminum electrolyticNon-polarized; handles short duty only
Duty cycleIntermittent (seconds)Will fail if energized continuously
CaseBlack plastic, roundTypically 50โ€“60 Hz rated
Toleranceยฑ10%Wider tolerance acceptable for starting

One key identifier: start capacitor values are always expressed as a range (e.g., 88โ€“108 ยตF at 250 VAC), because the starting torque requirement is forgiving within that window. A run capacitor, by contrast, is always a fixed single value.

What Is a Motor Run Capacitor?

A motor run capacitor is a film capacitor โ€” almost always polypropylene โ€” that remains permanently energized in the circuit the entire time the motor is running. Its job is not to provide maximum starting torque but to maintain a continuous phase shift between main and auxiliary windings, improving running efficiency, power factor, and torque stability under load.

Understanding how run capacitors are constructed, selected, and integrated into PCB-level motor control designs is well covered in resources on PCB capacitors, particularly regarding dielectric selection and voltage derating principles that apply equally to motor and circuit-board capacitor applications.

How a Motor Run Capacitor Works

Where a start capacitor dumps its charge in seconds and gets disconnected, the motor run capacitor handles continuous AC current at line voltage for the entire operating life of the motor. This demands fundamentally different construction. Electrolytic capacitors โ€” fine for the start capacitor’s momentary duty โ€” would overheat and fail within minutes under continuous AC stress. Instead, run capacitors use metallized polypropylene film (or historically, oil-impregnated paper) which provides:

  • Very low dissipation factor (low heat generation under continuous AC)
  • Self-healing properties when metallized film types experience minor dielectric breakdown
  • Long service life: quality run capacitors are rated for 30,000โ€“60,000 operating hours
  • Stable capacitance value over temperature and service life

The run capacitor keeps the auxiliary winding energized and phase-shifted, which maintains a more symmetrical rotating magnetic field around the rotor. Without it, the motor would run on only the main winding โ€” possible, but inefficient, noisy, and hard on the windings.

Motor Run Capacitor Specifications

SpecificationTypical RangeNotes
Capacitance1.5 ยตF โ€“ 100 ยตFFixed single value on label
Voltage ratings250 V, 370 V, 440 VACUse same or higher voltage rating only
ConstructionPolypropylene film (MPP)Wet-fill or dry-fill versions available
Duty cycleContinuousDesigned to run as long as motor runs
CaseMetal cylinder or oval canisterRound most common; oval also available
Toleranceยฑ5% to ยฑ10%Must match spec within 5โ€“10%

Motor Start Capacitor vs Motor Run Capacitor: Head-to-Head Comparison

FeatureMotor Start CapacitorMotor Run Capacitor
Primary functionBoost starting torqueMaintain running efficiency
Time in circuitSeconds (until ~75% speed)Continuously while motor runs
Capacitance value70โ€“1,200 ยตF (range)1.5โ€“100 ยตF (fixed)
ConstructionAluminum electrolyticPolypropylene film
Voltage ratings125 V, 165 V, 250 V, 330 VAC250 V, 370 V, 440 VAC
Duty ratingIntermittentContinuous
DisconnectionVia centrifugal switchAlways in circuit
Case colorTypically black plasticTypically metal, silver/gray
Value markingRange (e.g., 88โ€“108 ยตF)Single value (e.g., 35 ยตF)
Can it replace the other?Never โ€” fails under continuous dutyOnly in unusual circumstances; values too low
Failure modeCatastrophic (blows top)Gradual capacitance drop; sometimes bulge

The Dual Run Capacitor: One Can, Two Jobs

In many HVAC systems โ€” particularly air conditioner condensing units โ€” you’ll find a dual run capacitor. This is simply two run capacitors sharing a single cylindrical can. The three terminals are labeled:

  • Cย โ€” Common
  • HERMย โ€” Hermetically sealed compressor motor
  • FANย โ€” Condenser fan motor

A common example would be a 40+5 ยตF at 440 VAC dual capacitor: the 40 ยตF section serves the compressor, and the 5 ยตF section serves the fan motor. These are electrically independent inside the can; the only shared element is the common terminal and the physical housing. When one section fails, the entire dual capacitor is typically replaced, though it’s technically possible to replace a failed section with a separate run capacitor wired to match.

A 440 V rated capacitor can always substitute for a 370 V application, but never the reverse โ€” voltage ratings must match or exceed the original.

Capacitor-Start vs Capacitor-Run Motor Types

The application tells you which capacitor arrangement is in use:

Capacitor-Start Motor (CS)

Uses only a start capacitor and runs on the main winding alone after the centrifugal switch opens. Delivers high starting torque but less efficient running performance. Common in compressors, pumps, and any application needing heavy load starts.

Capacitor-Run / Permanent Split Capacitor (PSC) Motor

Uses only a run capacitor, permanently connected. No centrifugal switch required. Lower starting torque but quieter, more efficient running. Common in direct-drive fans, small pumps, HVAC blower motors.

Capacitor-Start Capacitor-Run (CSCR) Motor

Uses both. The start capacitor delivers high starting torque; the centrifugal switch disconnects it once the motor reaches speed; the run capacitor remains in the circuit for efficient continuous operation. Most expensive and mechanically complex, but the best all-around performance. Used for demanding applications where both high starting torque and efficient continuous running are required.

Motor Type and Capacitor Configuration Summary

Motor TypeStart CapRun CapStarting TorqueRunning Efficiency
Capacitor-Start (CS)YesNoHighModerate
Permanent Split Cap (PSC)NoYesLow-ModerateHigh
Cap-Start Cap-Run (CSCR)YesYesVery HighHigh
Split-Phase (resistance start)NoNoModerateLow

How to Size a Replacement Motor Run Capacitor

Getting the replacement wrong โ€” even slightly โ€” causes the rotor’s magnetic field to become uneven. The rotor hesitates at those uneven spots during each rotation, creating noise, increased power consumption, reduced output torque, and accelerated winding wear. Here’s the correct sizing process:

Step 1: Read the Motor Nameplate

Always start with the motor’s data tag or nameplate, not the old capacitor. The motor manufacturer tested specific capacitor values for that exact motor design. The nameplate may specify the run capacitor value directly. If not, check the motor manufacturer’s documentation.

Step 2: Match the Capacitance Value Exactly

For motor run capacitors, exact replacement is mandatory. The acceptable tolerance is ยฑ5% to ยฑ10%. Do not substitute a higher or lower value thinking it will “work close enough.” A wrong value disrupts the balance between main and auxiliary winding currents, causing hesitation and overheating.

Step 3: Match or Exceed Voltage Rating

Never install a lower voltage rating than the original. The common run capacitor voltage classes are 250 VAC, 370 VAC, and 440 VAC. A 440 V capacitor can replace a 370 V application but not vice versa. The voltage rating must meet or exceed the line voltage the motor will see.

Step 4: Verify with the Load Test Formula

If the original rating is unknown, you can calculate the correct ยตF value from live measurements:

ยตF = (Start Winding Amps ร— 2,652) รท Capacitor Voltage

Measure the amperage on the wire running from the capacitor to the start winding, and the voltage between the capacitor’s relevant terminals (HERM to C, or FAN to C for a dual cap). Plug those values in and compare to the installed capacitor’s rating. If it’s outside the ยฑ10% range, replacement is warranted.

Motor Run Capacitor Sizing Reference Table

Motor HPVoltageTypical Run Capacitor Value
1/6 HP115 V3โ€“5 ยตF
1/4 HP115 V5โ€“7.5 ยตF
1/3 HP115 V7.5โ€“10 ยตF
1/2 HP230 V10โ€“15 ยตF
3/4 HP230 V15โ€“20 ยตF
1 HP230 V25โ€“35 ยตF
2 HP230 V35โ€“50 ยตF

These are general guidelines. Always verify against the motor’s nameplate or manufacturer documentation first.

How to Test a Motor Run Capacitor

Visual Inspection First

A failed or failing run capacitor often shows physical signs:

  • Bulging or swollen sides/endsย โ€” internal pressure buildup; replace immediately
  • Leaking oilย (wet-fill types) โ€” dielectric fluid escaping; replace immediately
  • Blown pressure reliefย โ€” safety interrupter has tripped; replace immediately

If the capacitor looks intact, proceed to electrical testing.

Testing with a Multimeter (Capacitance Mode)

  1. De-energize and discharge the capacitorย โ€” bridge the terminals briefly with a resistor (10โ€“20 kฮฉ, 2W) or use a discharge tool. Never short directly.
  2. Set the multimeter to capacitance (ยตF) mode.
  3. Connect test leads to the capacitor terminals.
  4. Compare the reading to the rated value on the label.
  5. If the measured value is outside the specified ยฑ5โ€“10% tolerance, replace the capacitor.

Testing Under Load (More Accurate)

The load test using the formula above (amps ร— 2,652 รท voltage) gives a more realistic reading because it measures the capacitor’s actual behavior under operating conditions rather than just static capacitance. A capacitor can pass a static test but still underperform under load, particularly in aging units.

Signs of a Failing Motor Run Capacitor

Pay attention to these symptoms โ€” they often show up well before complete failure:

SymptomLikely Cause
Motor hums but won’t startStart cap failed or run cap too weak to assist
Motor runs but draws high currentRun cap value dropped; magnetic field unbalanced
Motor runs hotInefficient field from weak cap; windings overcompensating
Noisy operation (vibration, buzzing)Rotor hesitating at uneven magnetic field spots
Motor turns off unexpectedlyOverload protection tripping from excess current
Slow acceleration to full speedWeak or failed start cap

Motor Run Capacitor Lifespan and Failure Causes

A quality run capacitor has a design life of 30,000 to 60,000 operating hours. Factory-installed capacitors in highly cost-competitive products sometimes have design lives as short as 1,000 hours. Three factors dramatically shorten run capacitor life:

Heat is the primary killer. Every 10ยฐC rise above the capacitor’s rated operating temperature roughly halves its service life. Motors running in hot environments, poorly ventilated enclosures, or next to heat-generating components will eat through run capacitors far faster than expected.

Overvoltage has an exponential effect. Running a 370 V capacitor on a line that regularly spikes to 420 V will degrade the dielectric far faster than normal aging predicts. Always use the 440 V class capacitor when line voltage stability is uncertain.

Motor faults upstream can overload the capacitor. If motor windings are beginning to fail, current through the capacitor rises above its rated value, accelerating thermal aging. A string of run capacitor failures in a motor that otherwise seems fine is a warning sign to check the motor windings closely.

Useful Resources for Motor Capacitor Selection and Design

ResourceTypeLink
Capacitor Industries โ€“ Run vs Start Capacitor GuideTechnical PDFcapacitorindustries.com PDF
TemcoIndustrial โ€“ Motor Capacitor FAQTechnical Guidetemcoindustrial.com
TemcoIndustrial โ€“ Run Capacitor Selection GuideSelection Guidetemcoindustrial.com
HVAC School โ€“ Testing Run Capacitors Under LoadPractical Guidehvacrschool.com
Wikipedia โ€“ Motor CapacitorReference Overviewen.wikipedia.org
InspectApedia โ€“ Motor Capacitor Selection GuideDiagnostic Guideinspectapedia.com
DigiKey TechForum โ€“ Start vs Run CapacitorsForum/Technical Referenceforum.digikey.com
IC-Online โ€“ Capacitor Sizing Chart GuideSizing Referenceic-online.com

Frequently Asked Questions About Motor Run Capacitors

Q1: Can I use a motor start capacitor as a motor run capacitor in an emergency?

No. A start capacitor is built for intermittent duty โ€” seconds at a time. Leaving it energized continuously will cause it to overheat and fail catastrophically, often destroying the motor winding in the process. The direction is one-way only: a run capacitor can theoretically substitute for a start capacitor in unusual circumstances if the capacitance and voltage ratings match, but a start capacitor can never substitute for a run capacitor under continuous operation.

Q2: What happens if I install the wrong ยตF value motor run capacitor?

The motor’s magnetic field becomes unbalanced. The rotor will hesitate at uneven spots during each rotation, causing audible noise, elevated current draw, reduced output torque, and overheated windings. The motor will still run, but it will run poorly and its lifespan will be shortened. Both over-sized and under-sized capacitors cause problems. The correct value is the one specified by the motor manufacturer โ€” not the nearest available standard value.

Q3: Can I use a 440 V run capacitor to replace a 370 V run capacitor?

Yes, in terms of voltage rating, a 440 V capacitor is a safe substitute for a 370 V application. The higher voltage rating simply means the dielectric can withstand more stress, which never hurts. The reverse โ€” using a 370 V capacitor in a 440 V application โ€” is not acceptable and will shorten the capacitor’s life and risk failure. The capacitance value (ยตF) must still match the motor specification exactly regardless of which voltage class you use.

Q4: My motor run capacitor reads within tolerance on a multimeter but the motor is still running hot. Could the capacitor still be the problem?

Yes. A static capacitance test measures the capacitor at low voltage with no AC stress. A capacitor that reads correctly off-circuit can still have elevated ESR (equivalent series resistance) or poor high-frequency characteristics that cause it to underperform under operating conditions. The load test formula โ€” amps ร— 2,652 รท capacitor voltage = ยตF โ€” gives a much more accurate picture of actual performance under load. If the under-load value diverges significantly from the static test, the capacitor is degraded and should be replaced even if the static reading looks fine.

Q5: How often should a motor run capacitor be replaced as preventive maintenance?

There’s no universal interval because operating conditions vary so much. In a climate-controlled indoor environment with a well-ventilated motor, a quality run capacitor may last a decade or more. In a hot outdoor HVAC condensing unit running most of the summer, life can be considerably shorter. A practical approach is to test run capacitors annually with a calibrated multimeter. If the value has dropped more than 5โ€“10% below the rated value, replace it before it causes a motor fault. After the sixth or seventh season of service in a demanding HVAC application, proactive replacement is cheaper than an emergency service call.

The Bottom Line

The motor start capacitor and the motor run capacitor share a body style and a unit of measurement. That’s roughly where the similarity ends. The start capacitor is a short-burst electrolytic that lives in the circuit for seconds, gets switched out by a centrifugal switch, and must never be left energized. The motor run capacitor is a polypropylene film component that runs continuously at line voltage for the entire service life of the motor, keeping the auxiliary winding phase-shifted and the magnetic field balanced.

Getting replacement right means matching the ยตF value exactly for run capacitors, matching or exceeding voltage ratings for both, never substituting a start cap for a run cap, and testing under load rather than relying only on a static multimeter reading. Do those things and motor capacitor failures become predictable, diagnosable, and cheap to fix โ€” instead of surprises that take the motor with them.